API auto test
1. Introduction to api-auto-test
- Guides and tutorials to help you get started with api-auto-test.
- api-auto-test is a free and open-source API development platform to help you build, test, and document APIs faster. It is a web-based API development environment that allows you to send requests and view responses in a single interface.
- Find articles, guides, and tutorials to help you get started with api-auto-test.

2. Workspaces
2.1. Create a workspace
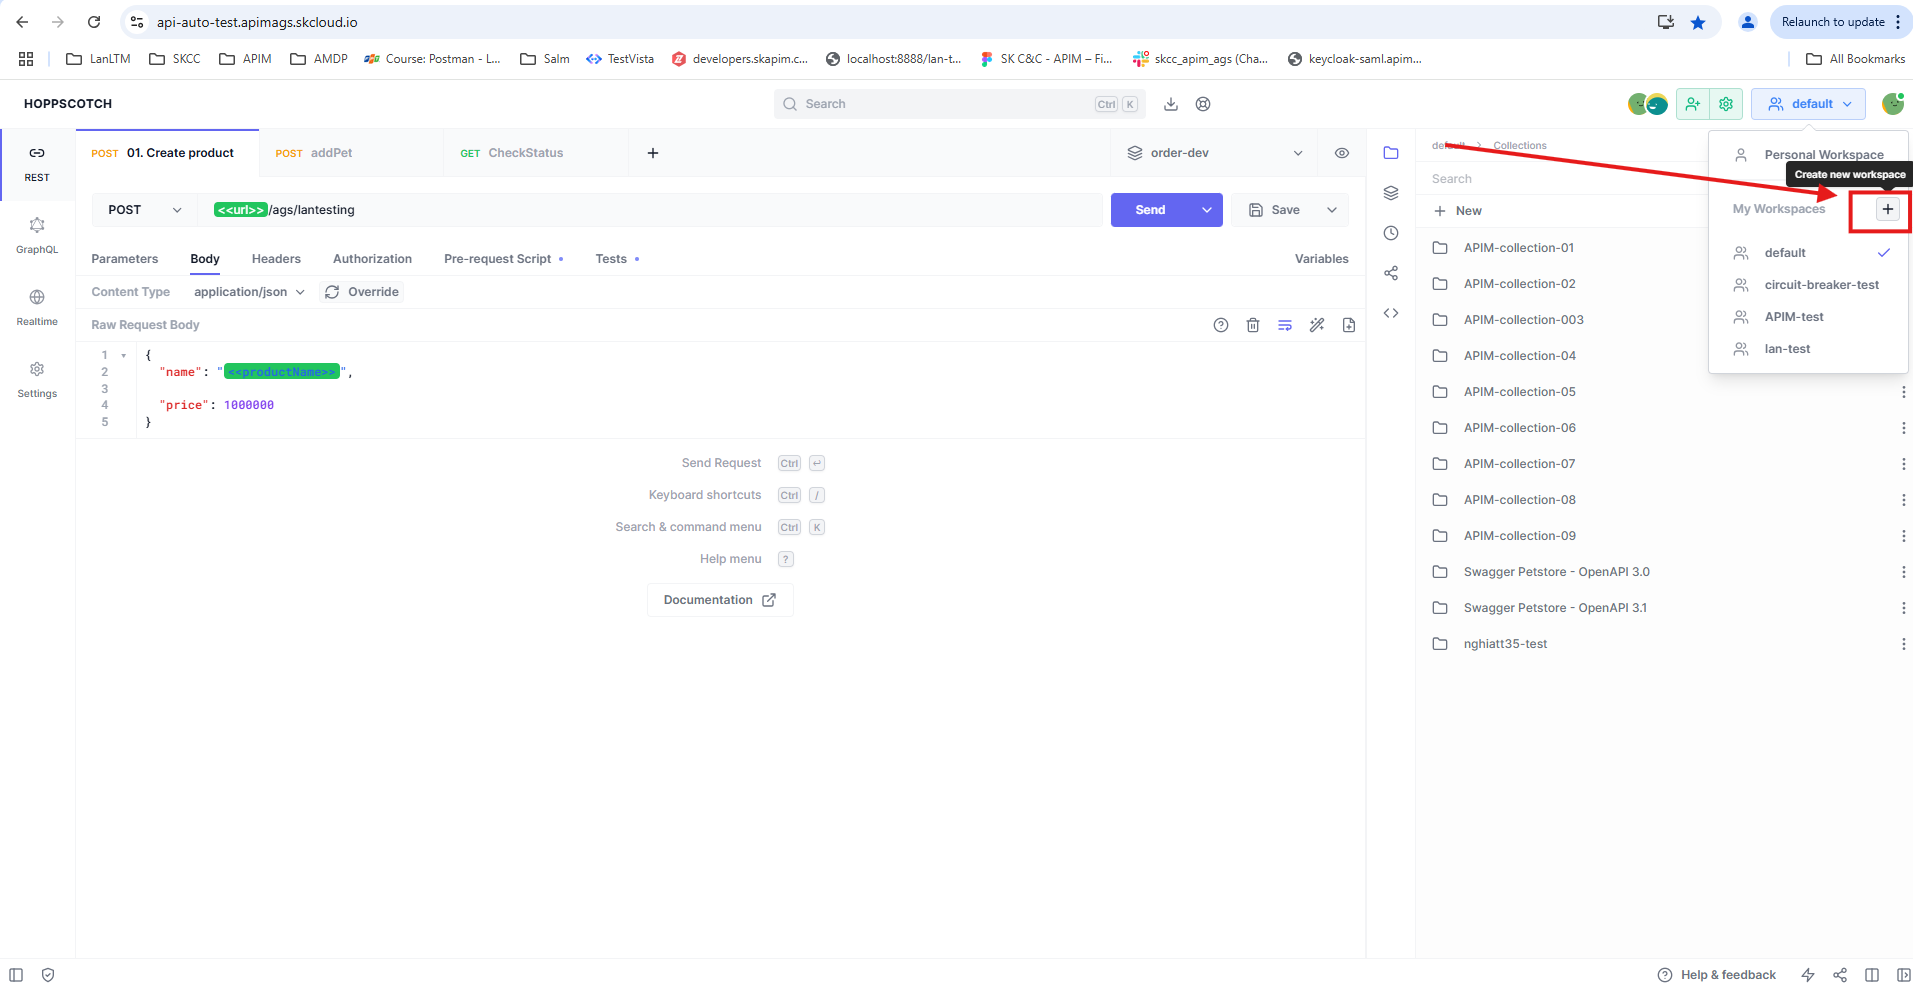
-
To create a workspace, click on the ”+” icon on the top right corner of the workspace switcher.
-
Alternatively, you can also click on the “Create new workspace” button on the “Profile” page under the “Workspaces” section.
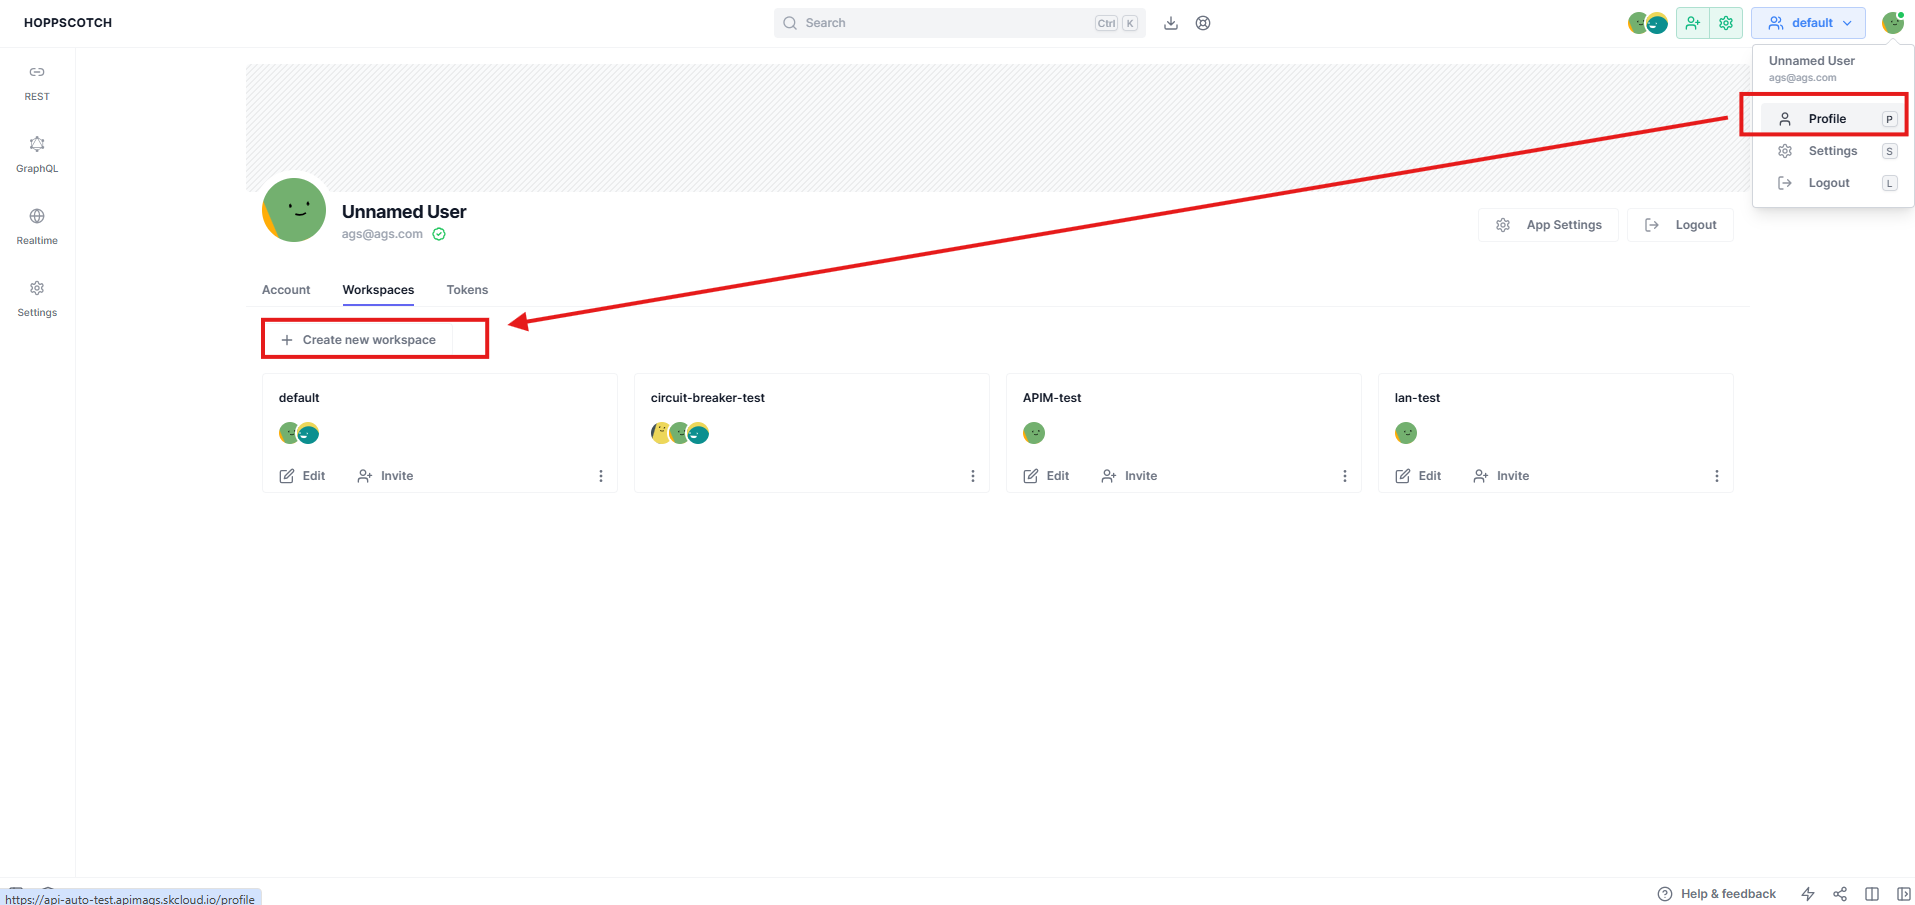
-
Creating a workspace makes you the owner of the workspace. You can invite other users to the workspace and assign them roles.
2.2. Invite users to a workspace
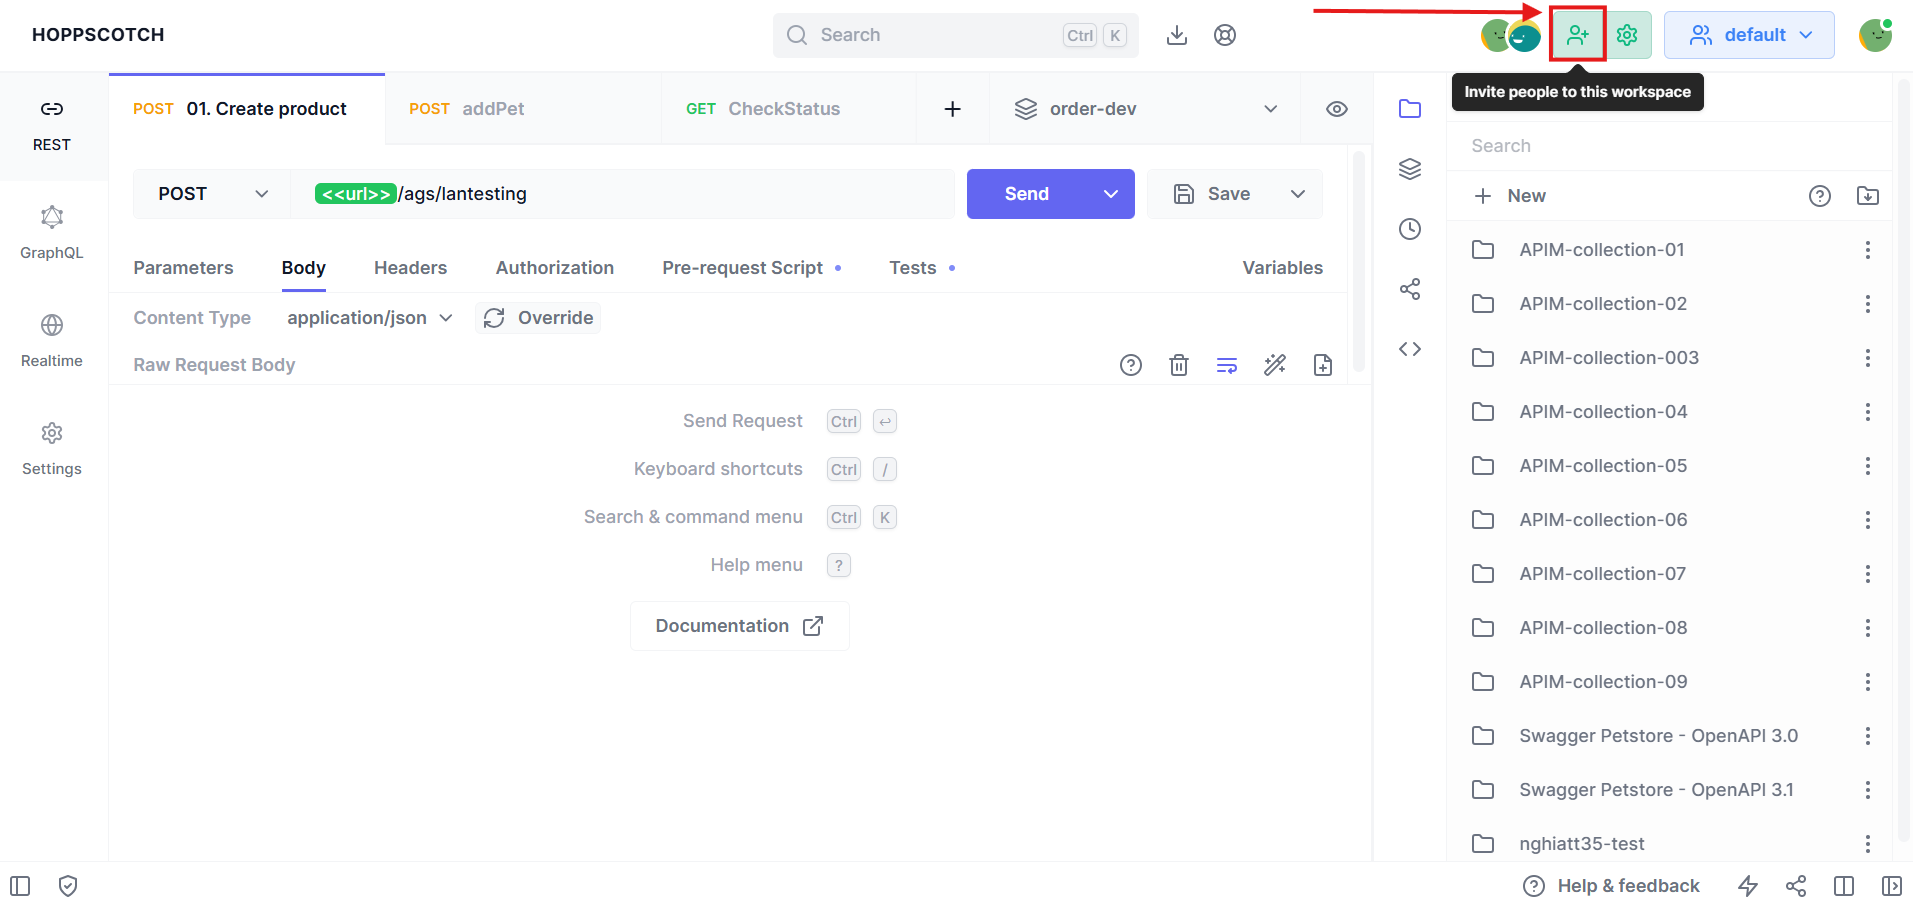
-
To invite users to a workspace, click on the “Invite” button.
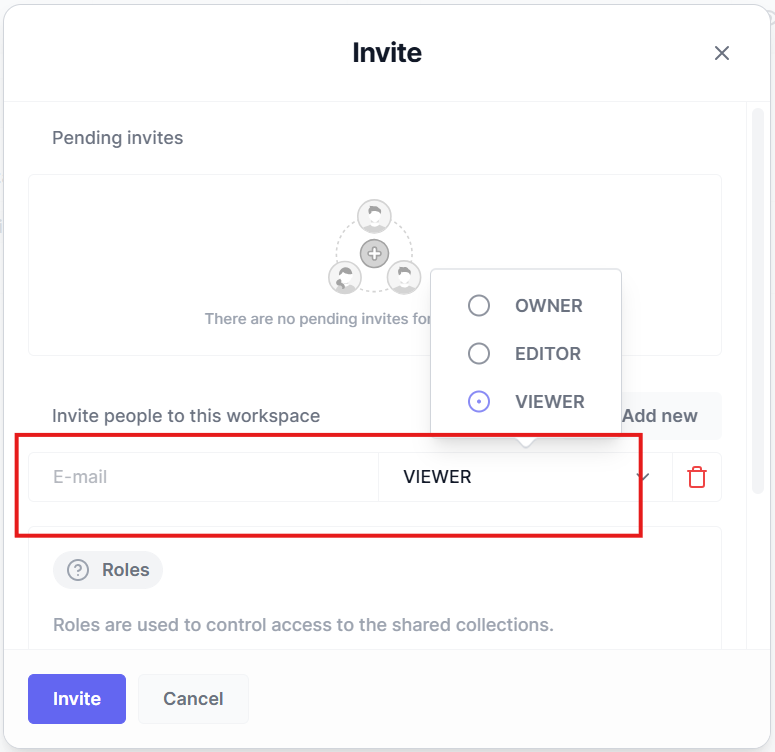
-
Enter the email address of the user you want to invite. You can invite multiple users at once by adding the email addresses in the input field entries.
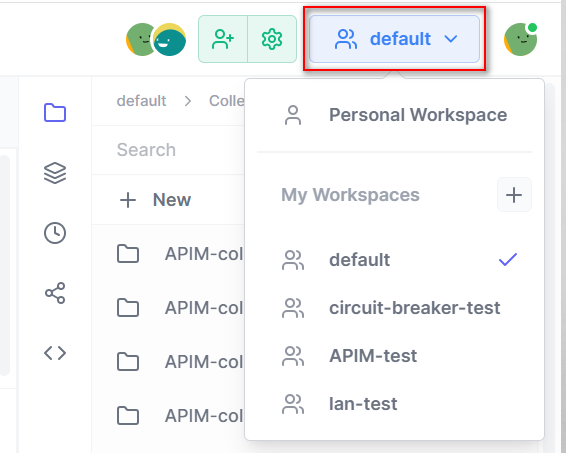
2.3. Switch between workspaces
To switch between workspaces, click on the workspace switcher in the top right corner of the app and select the workspace you want to switch to.
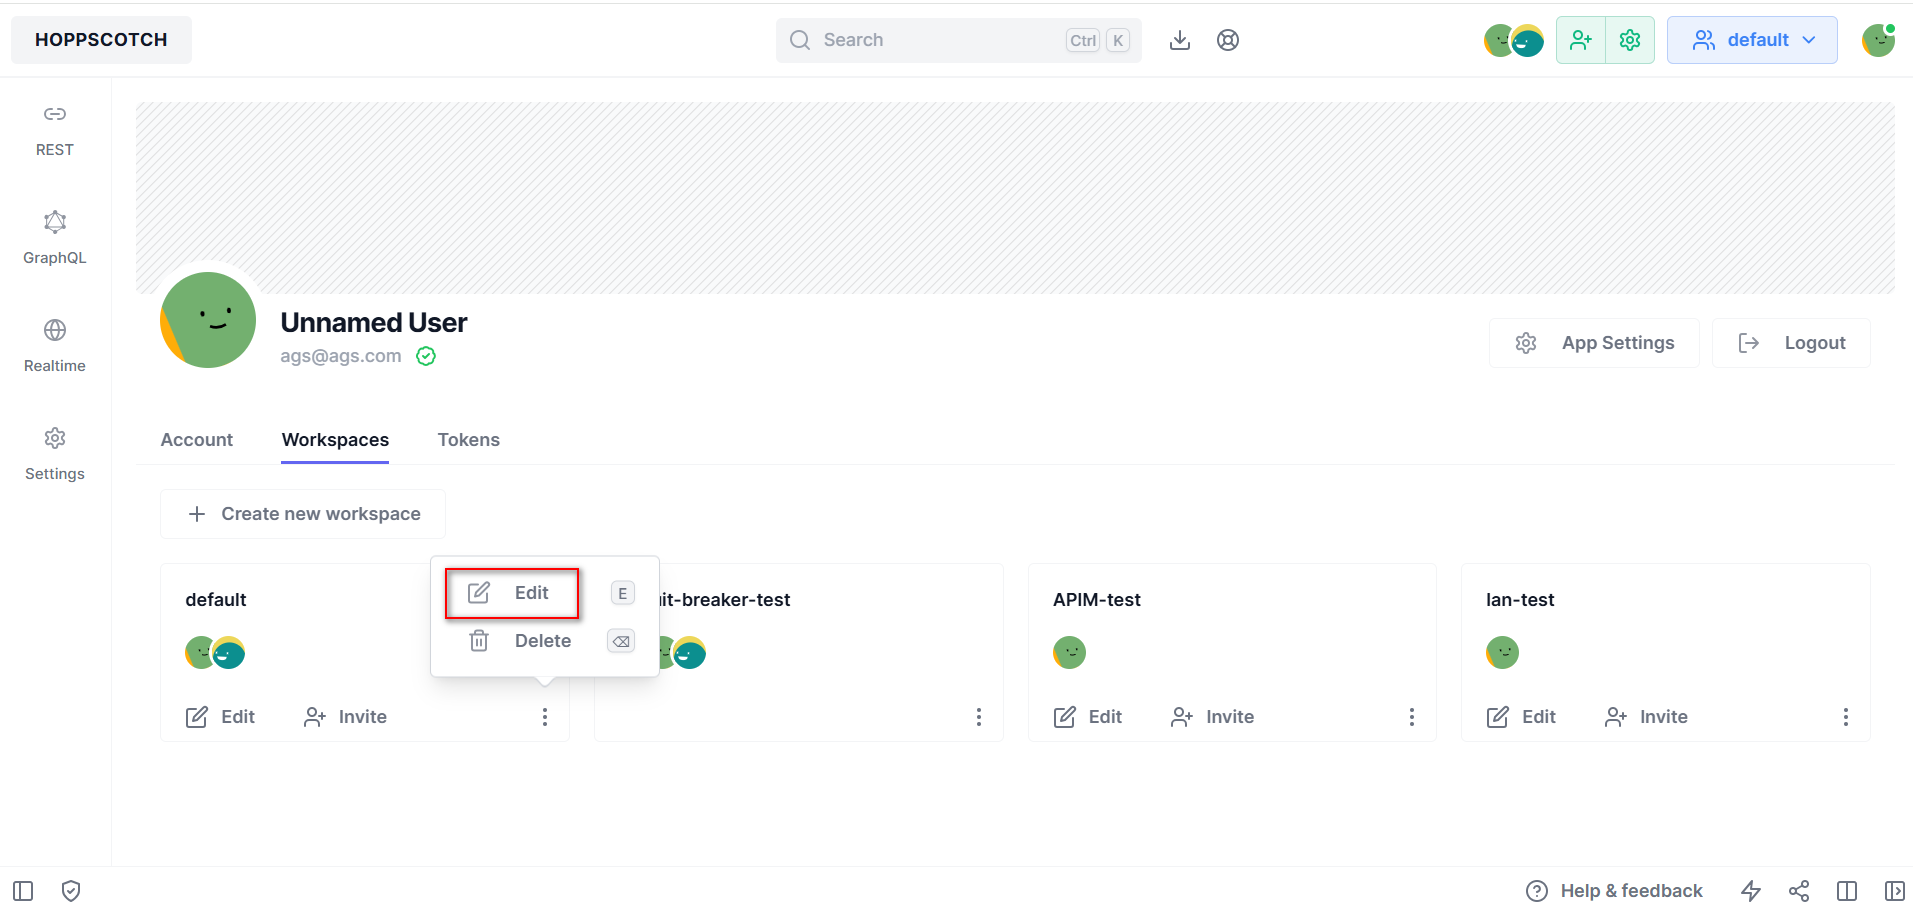
2.4. Edit a workspace
You can only edit a workspace if you are the owner of the workspace.
2.4.1. Remove a user from a workspace
- To remove a user from a workspace, click on the workspace settings button on the top right corner of the app.
- Then click on the “Delete” button on the user you want to remove from the workspace.
2.4.3. Leave a workspace
- To leave a workspace, click on the workspace settings button on the top right corner of the app. Then click on the “Delete” button on the workspace you want to leave.
- You can only leave a workspace if you are not the owner of the workspace. If you are the owner of the workspace, you will have to delete the workspace to leave it. Alternatively, you can also transfer the ownership of the workspace to another user and then leave the workspace.
2.4.4. Change member role
There are three types of roles for members in a workspace:
- Owner: The owner of the workspace has full access to the workspace and can invite other users to the workspace. The owner can also delete the workspace.
- Editor: The editor of the workspace has edit access to the workspace and can create, edit, and delete collections, environments, and requests in the workspace.
- Viewer: The viewer of the workspace has read-only access to the workspace and can only view the collections, environments, and requests in the workspace.
To change the role of a member in a workspace, click on the workspace settings button on the top right corner of the app. Then click on the “Role” drop-down on the user you want to change the role of. Then select the role you want to assign to the user then click “Save”.
2.4.5. Delete a workspace
To delete a workspace, click on the “Delete” button on the workspace you want to delete on the “Profile” page under the “Workspaces” section.
3. Collections
3.1. Creating a new collection
To create a new collection, click on the “Add new” button on the collections section and enter the name of the collection. You can also create a sub-collection by clicking on the “Add new” button on the desired collection and entering the name of the sub-collection.
3.2. Save requests to collections
To add a new request to your collection, you can click on the “Save” button on the request page and select the collection you want to add it to. Click on the drop-down menu next to the save button and click on “Save as” to save the request to a new location.
You can also use the keyboard shortcut Ctrl/Cmd + S to save the request to a collection.
3.3. Organizing collections
You can organize your collections by dragging and dropping them to the desired location. You can also create sub-collections by dragging and dropping a collection into another collection.
3.3.1. Editing collections
To edit a collection, click on the “Edit” button on the collection’s options.
3.3.2. Adding requests to collections
To add a request to a collection, click on the “New request” button on the collection’s options to save the current request to the collection.
3.4. Duplicating collections
To duplicate a collection, click on the “Duplicate” button on the collection’s options.
3.5. Deleting collections
To delete a collection, click on the “Delete” button on the collection’s options.
3.6. Importing and exporting collections
You can import and export collections from api-auto-test, OpenAPI, and Postman.
3.6.1. Importing collections
To import a collection, click on the “Import” button in the collections section and select the collection type you want to import.
3.6.2. Exporting collections
To export a collection, click on the “Export” button on the collection’s options and select the collection type you want to export.
3.7. Collection Properties
Collection properties enable you to define settings that universally apply to all requests within the collection.
Authorization details and headers can be specified at the collection level. Subfolders and individual requests within the collection can either inherit these properties or define their custom authentication and headers.
To set collection properties:
- Right-click on a collection or a subfolder within a collection to open its properties.
- Specify the authorization and headers that all nested requests or folders should adhere to.
- If a subfolder should inherit the properties of a parent collection, specify the authorization as “inherit” and leave the headers.
4. Variables
4.1. Variable Scopes
api-auto-test provides you different variables scopes, allowing you to use different scopes for different contexts.
- Global Variables: can be accessed throughout api-auto-test and has the broadest scope of all variables.
- Environment Variables: allow your variables to be scoped to an environment. Environment variables are useful when you have the same set of variables for two environments such as production and staging.
- Request Variables: are scoped to just an individual request, request variables are useful when you want to use variables in your URL path or when you want to embed a variable URL.
- Predefined Variables: are automatically generated at runtime and can be accessed globally throughout api-auto-test using the $ symbol, such as $guid or $timestamp.
The scope of each variable can be identified from the color of the variable name
| Variable Scope | Color |
|---|---|
| Global | Blue |
| Environment | Green |
| Request | Orange |
| Predefined | Yellow |
| Non resolvable | Red |
4.2. Types of Variables
- A regular variable: allows users to reference the variable throughout api-auto-test, and anyone can see the value associated with the variable. In a workspace, regular environment variable-value pairs will be synced to the server, making them available to all workspace members. However, you have the option to choose whether to sync a regular variable value present in your personal workspace.
- A secret variable: enables users to specify secrets and reference the values as variables. The values of secret variables in any workspace will never be synced to the server or shared with any workspace members. It is expected that in a collaborative workspace the user will populate the value of the variable at runtime. All secret variable values in api-auto-test will be masked using asterisks (***). Secret Variables cannot be scoped to a request and can only be scoped in an environment or globally.
Secret variables values will not be exported when an environment is exported.
- A predefined variable: is automatically generated at runtime and provides dynamic, context-specific data. Predefined variables are available throughout your requests and responses and are useful for incorporating system-level information or dynamic values into your API interactions without manual configuration. All predefined variables are accessible throughout api-auto-test and can be retrieved using the $ symbol. Below is the list of predefined variables whose values are dynamically generated during the request or collection run:
Variable Name Description Example: guidA v4 style unique (GUID) identifier for each request.123e4567-e89b-12d3-a456-426614174000
timestampThe current UNIX timestamp in seconds 1693047645isoTimestampThe current date and time in ISO-8601 format at zero UTC (also known as “Zulu time” or UTC-0)2024-09-25T00:00:00.000Z
randomUUIDA random 36-character UUID.6929bb52-3ab2-448a-9796-d6480ecad36b
Numbers, Text, and Colors| Variable Name | Description | Example |
|---|---|---|
| $randomAlphaNumeric | A random alpha-numeric character. | A9X1Z3 |
| $randomBoolean | A random boolean value. | true , false |
| $randomInt | A random integer value between 0 and 1000. | 29 , 432 , 786 |
| $randomColor | A random color amongst red, green, blue, yellow, purple, and orange. | yellow |
| $randomHexColor | A random hex value. | #f2a729 |
| $randomAbbreviation | A random abbreviation. | SQL , JSON , HTML |
| Variable Name | Description | Example |
|---|---|---|
| $randomIP | A random IPv4 address | 192.168.0.101 |
| $randomIPV6 | A random IPv6 address | 2001:0db8:85a3:0000:0000:8a2e:0370:7334 |
| $randomMACAddress | A random MAC address. | 00:1B:44:11:3A:B7 |
| $randomPassword | A random 15-character alpha-numeric password. | H8w72Sx93KlqA1b |
| $randomLocale | A random two-letter language code (ISO 639-1). | en, fr, es |
| $randomUserAgent | A random user agent. | Mozilla/5.0 (Windows NT 10.0; Win64) |
| $randomProtocol | A random internet protocol. | https, ftp |
| $randomSemver | A random semantic version number. | 1.2.3 |
| Variable Name | Description | Example |
|---|---|---|
| $randomFirstName | A random first name. | Ethan , Chandler, John |
| $randomLastName | A random last name. | Schaden , Schneider , Doe |
| $randomFullName | A random Full name. | Ethan Schaden , Chandler Schneider , John Doe |
| $randomNamePrefix | A random name prefix. | Dr. , Miss. , Prof. |
| $randomNameSuffix | A random name suffix. | MD , PhD , Jr. |
| Variable Name | Description | Example |
|---|---|---|
| $randomCity | A random city name. | New York , Houston , Philadelphia |
| $randomJobArea | A random job area. | Intranet , Development , Testing |
| $randomJobDescriptor | A random job descriptor. | Corporate , Lead , Principal |
| $randomJobTitle | A random job title. | Global Branding Officer , Productivity Analyst |
| $randomJobType | A random job type. | Manager , Coordinator , Director |
5. Environments
5.1. Types of Environments
- Global Environment - Variables defined in a global environment can be accessed from any workspace anytime. However the variables defined in a personal or shared workspace environment if used will have higher precedence over a global variables
- Personal Environment - Are personal to the user and is not associated with a shared workspace, however a user can use a personal environment in a shared workspace without sharing it with the workspace members
- Shared Environments - Are unique to each shared workspace, all the shared environments created in a shared workspace are accessible to every member of the shared workspace
5.2. Types of Variables in an Environment
api-auto-test environment provides support for two types of variables
- A Regular environment variable allows users to reference the variable throughout api-auto-test , and anyone can see the value associated with the variable. In a shared workspace, regular environment variable-value pairs will be synced to the server, making them available to all workspace members. However, you have the option to choose whether to sync a personal or global environment.
- A secret environment variable enables users to specify secrets and reference the values as variables. The values of secret variables in any workspace will never be synced to the server or shared with any workspace members. It is expected that the user will populate the value of the variable at runtime. All secret variable values in api-auto-test will be masked using asterisks (***).
Secret variables values will not be exported when an environment is exported.
5.3. Shared Environment Access
| Environment Variable | Secret Variable | |
|---|---|---|
| Workspace Owner | create / delete variable, edit value and use | create / delete secret variable, add values and use |
| Workspace Editor | create / delete variable, edit value and use | create / delete secret variable, add value and use |
| Workspace Viewer | use | add value and use |
5.4. Creating an environment
Click on the ”Environments” icon on the sidebar to create environments.
A variable created in an environment can be used by typing the variable name enclosed in double angle brackets <<variable>>
5.4.1. Creating environment variables from client
Environment variablesLearn how to use environment variables in your requests and scripts.
Environment variables allow you to store and reuse values in your requests and scripts.
By storing a value in a variable:
- You can reference it throughout your request section.
- You can change its value by updating it in a single place.
- You increase your ability to work efficiently and minimize the likelihood of errors.
You can create a new environment by clicking the environments icon on the sidebar and clicking the new button. Let’s label the environment as Pokemon Envs.
Now, let’s create an environment variable called baseURL pointing to https://pokeapi.co/api/v2.
Similarly, you can create multiple environments and environment variables.
Accessing environment variableIf you have more than one environment, select the environment whose variables you want to access. You can access the variables in the request section by referencing the variable in the following format <<variable_name>>, in our case the variable will be <<baseURL>> and the complete URL will be <<baseURL>>/pokemon/ditto.
5.4.2. Creating environment variables using scripts
Pre-request scriptsLearn how to use pre-request scripts in Hoppscotch.
ScriptsHoppscotch lets you add dynamic behavior to REST API requests. This allows you to write test suites and build requests that can contain dynamic parameters. You can add ECMAScript code that executes based on events in the flow:
- Pre-request scripts are executed before a request is sent to the server.
- You can add multiple pre-request scripts to a request.
- You can add pre-request scripts to both requests saved and not saved in a collection.
Hoppscotch will then execute the scripts along with the requests in the specified order.
Pre-request scriptPre-request script is a piece of code that will run before the execution of the request.
You can use the pre-request script for a pre-processing task such as:
- Setting parameters, headers.
- Adding body data.
- Adding variable values.
- Including timestamps in request headers.
Hoppscotch provides a special pw object containing various methods to create scripts and tests. The pw object is global and can be referenced by name to access methods.
For example, to set an environment variable, you can use the pw.env.set() method.
pw.env.set("variable", "value");
ExamplesLet us look at some examples of how you can use Hoppscotch to write pre-request scripts.
Setting environment variablespw.env.set() can be used directly for quick and convenient environment variable definition. It can be used to better organize request codes.
pw.env.set("baseURL", "https://httpbin.org");pw.env.set("method", "get");
Goto the pre-request script tab and copy-paste the above ECMAScript code as shown below:
These variables can be accessed in the request section by referencing them in double angle brackets <<variable_name>>. So the URL will be <<baseURL>>/<<method>>.
Let us take a case where we need to test random test-user data available at an endpoint.
Let us use the following GET API endpoint https://reqres.in/api/users/.
Add <<randomValue>> to the endpoint URL.
https://reqres.in/api/users/<<randomValue>>
Now in the pre-request script tab add the following logic.
var random = Math.floor(Math.random() * 10);pw.env.set("randomValue", random.toString());
The ECMAScript code will assign a random number to the environment variable randomValue and the API will return a random user associated with the random value.
You will get a similar response as shown below:
{
  "data": {
    "id": 4,
    "email": "eve.holt@reqres.in",
    "first_name": "Eve",
    "last_name": "Holt",
    "avatar": "https://reqres.in/img/faces/4-image.jpg"
  },
  "support": {
    "url": "https://reqres.in/#support-heading",
    "text": "To keep ReqRes free, contributions towards server costs are appreciated!"
  }
}
5.5. Using scripts
You can also create and delete environment variables using scripts by using the pw object.
pw.env.set("variable", "value"); // Creates an environment variable pw.env.unset("variable"); // Deletes the environment variable
5.6. Duplicating an environment
Create a copy of an existing environment to modify or test different configurations without affecting the original:
- Click the “Environments” icon in the sidebar to view all existing environments under Global Environments.
- Next to the environment you want to duplicate, click the More icon.
- From the dropdown menu, select Duplicate. A new environment with the suffix Duplicate will be created.