API Docs Validator
📋 API Document Validation
Overview
Path: Left Sidebar → API Document Validation
Menu Type: Group Menu (includes submenus)
The API Document Validation feature provides functionality to validate the format and structure of API specifications and to monitor validation status.
How to Access
- Click the API Document Validation menu in the left sidebar to expand its submenus.
- Select the desired function from the expanded submenu list.
💡 Note: Since API Document Validation is a group menu, clicking it toggles submenu expansion and collapse.
Submenu Structure
When user clicks the API Document Validation menu, the following submenus are displayed:
- API Document Settings – Configure API validation rules
- API Document Status Dashboard – View and monitor validation status
API Document Settings
Path : Left Sidebar > API Document Validation > API Document Settings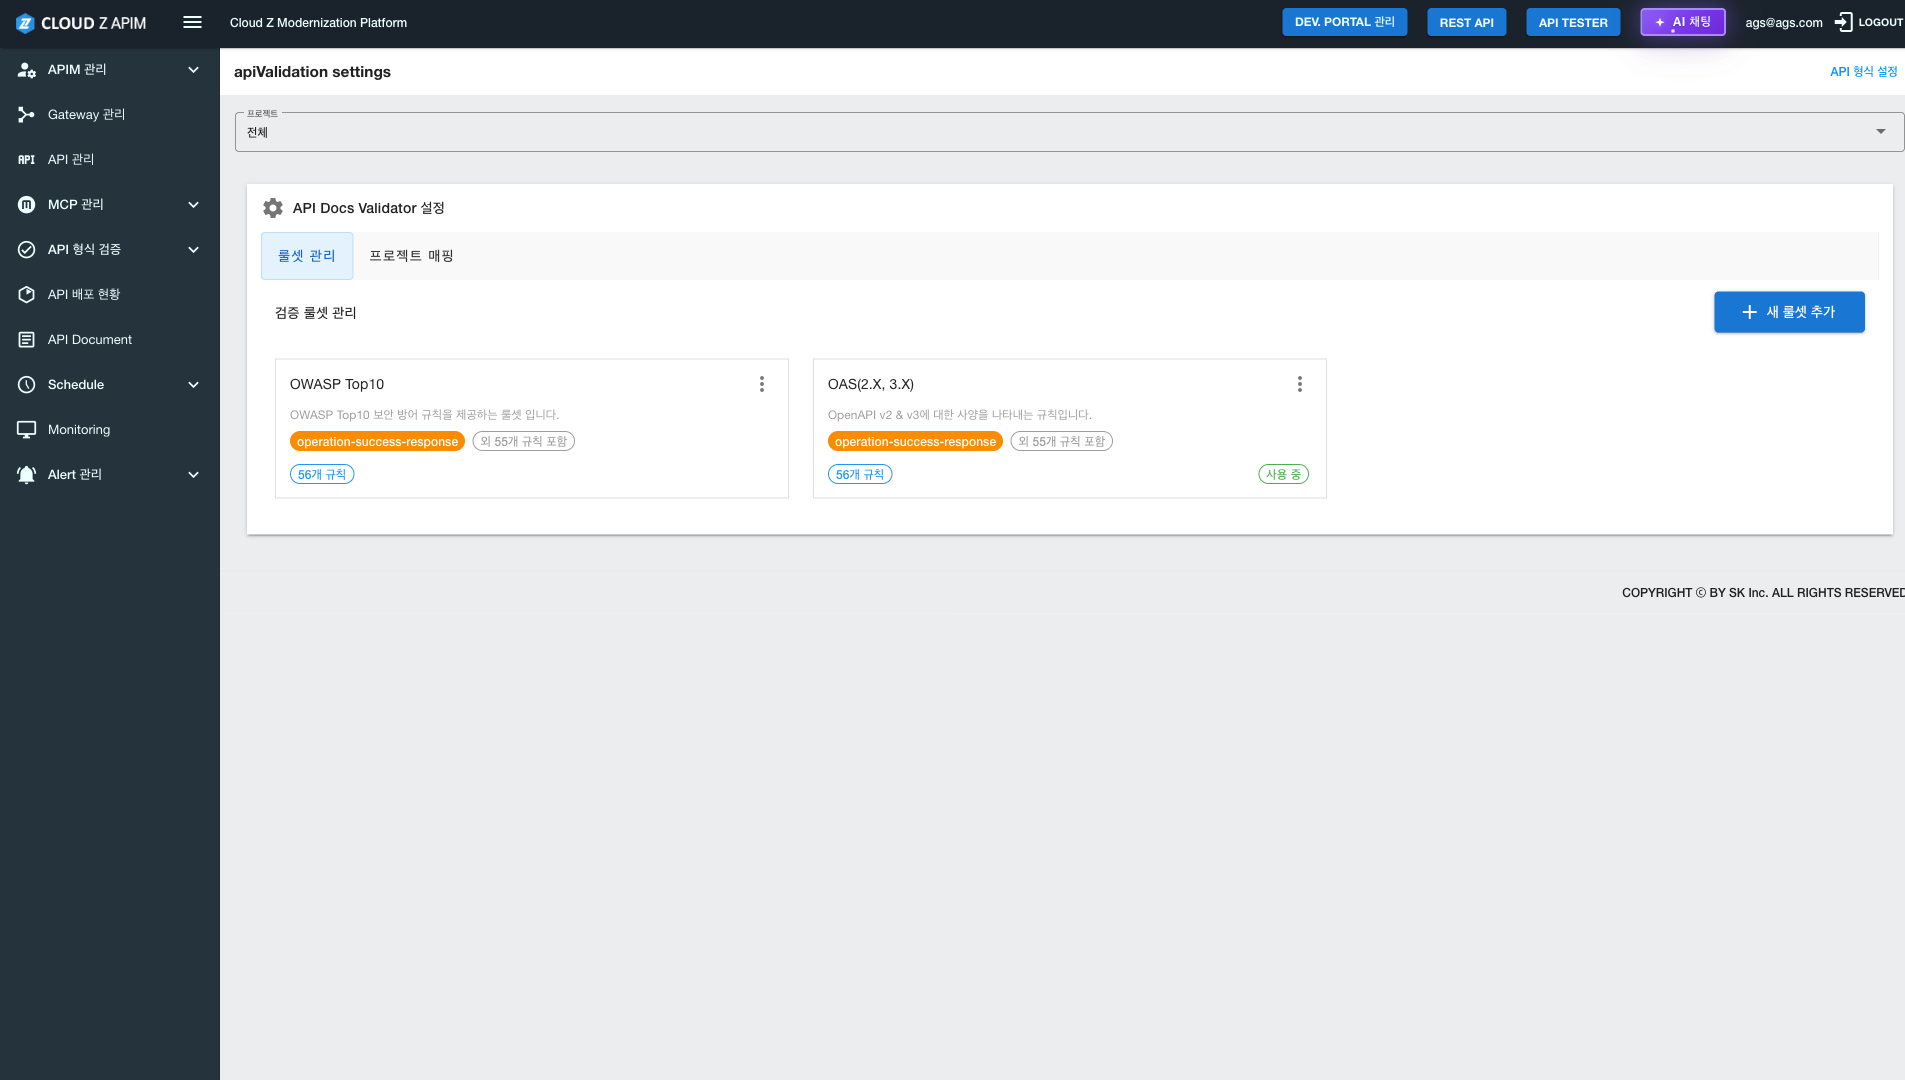
Feature Overview
The API Document Settings page allows users to define, manage, and apply validation rule sets for the API Docs Validator. It supports standardized API documentation quality by allowing users to create customizable rulesets, configure validation functions, and map them to specific projects.
Page Structure
Main Section-
API Docs Validator Setting
- Ruleset Management
- Project Mapping
-
Validation Ruleset Management
- View and manage existing rulesets list
- Add New Ruleset button
-
Project Selection
- Select a specific project using the project dropdown
Key Features
- Validation Ruleset Management: Create, edit, and delete validation rulesets
- Add New Ruleset: Create new rulesets using predefined templates and customize validation functions by adding or removing them
- Project Mapping: Associate validation rulesets with specific projects
-
Default Rulesets
- OWASP Top10: Validation rules based on OWASP Top 10 security vulnerabilities
- OAS(2.X, 3.X): Validation rules for OpenAPI Specification
How to Use
- Click the API Document Validation menu in the left sidebar to expand the submenu
- Select API Document Settings in Sub-menu
- Select a project from the Project dropdown (Optional)
- Review or manage existing rulesets in the Validation Ruleset Management section
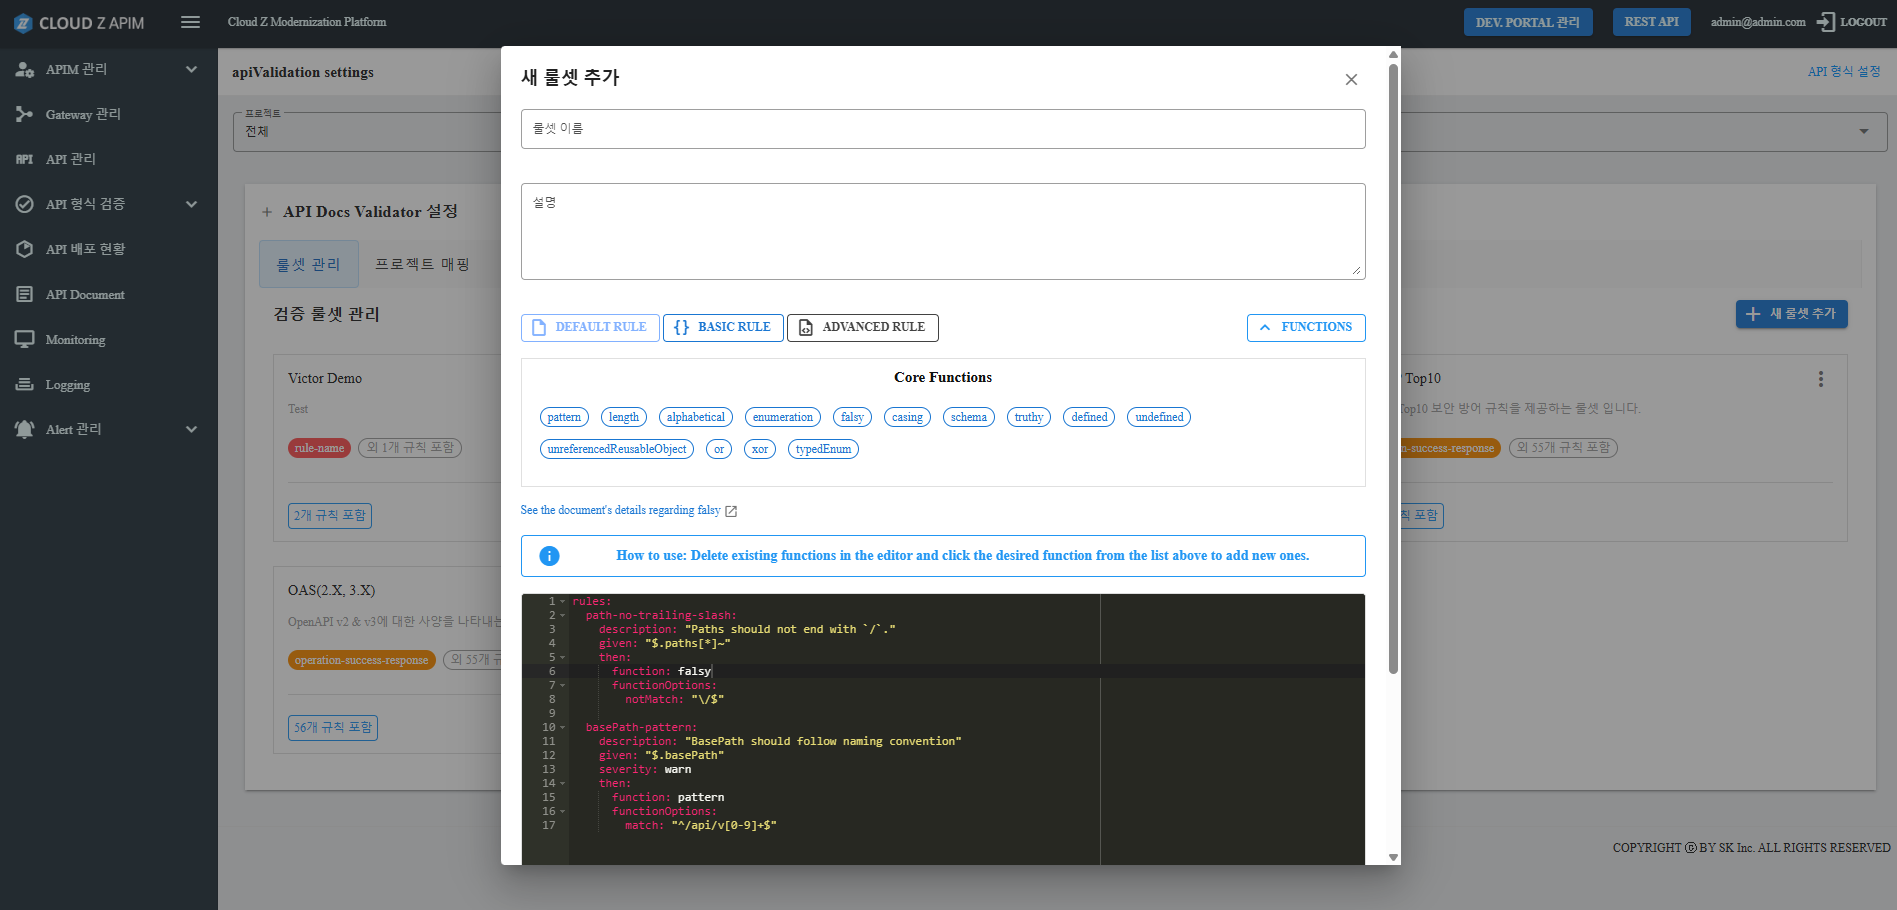
- Click Add New Ruleset to create a new validation ruleset
- When clicking Add New Ruleset, a modal dialog appears with three templates:
- Default Rule
- Basic Rule
- Advanced Rule
- Enter Ruleset Information: Enter Ruleset Name, Description
- Select a template and customize its validation functions:
- Open the Functions List to view all validation functions included in the template
- Remove existing functions by deleting them from the editor and click on functions to add new function from the available function list
- Hover over a function name to view a short description
- Click the link below the function list to open it in a new tab
- When clicking Add New Ruleset, a modal dialog appears with three templates:
- Click button Save to add the new item to the rule set management list.
Ruleset Types
- OWASP Top10: Validates the top 10 web application security vulnerabilities
- OAS(2.X, 3.X): Validates OpenAPI Specification versions 2.x and 3.x
Cautions
- ⚠️ Changes to rulesets must be saved to take effect
- ⚠️ Project mapping should be used when validation rules apply only to specific projects
API Document Status Dashboard
Path : Left Sidebar > API Document Validation > API Document Status Dashboard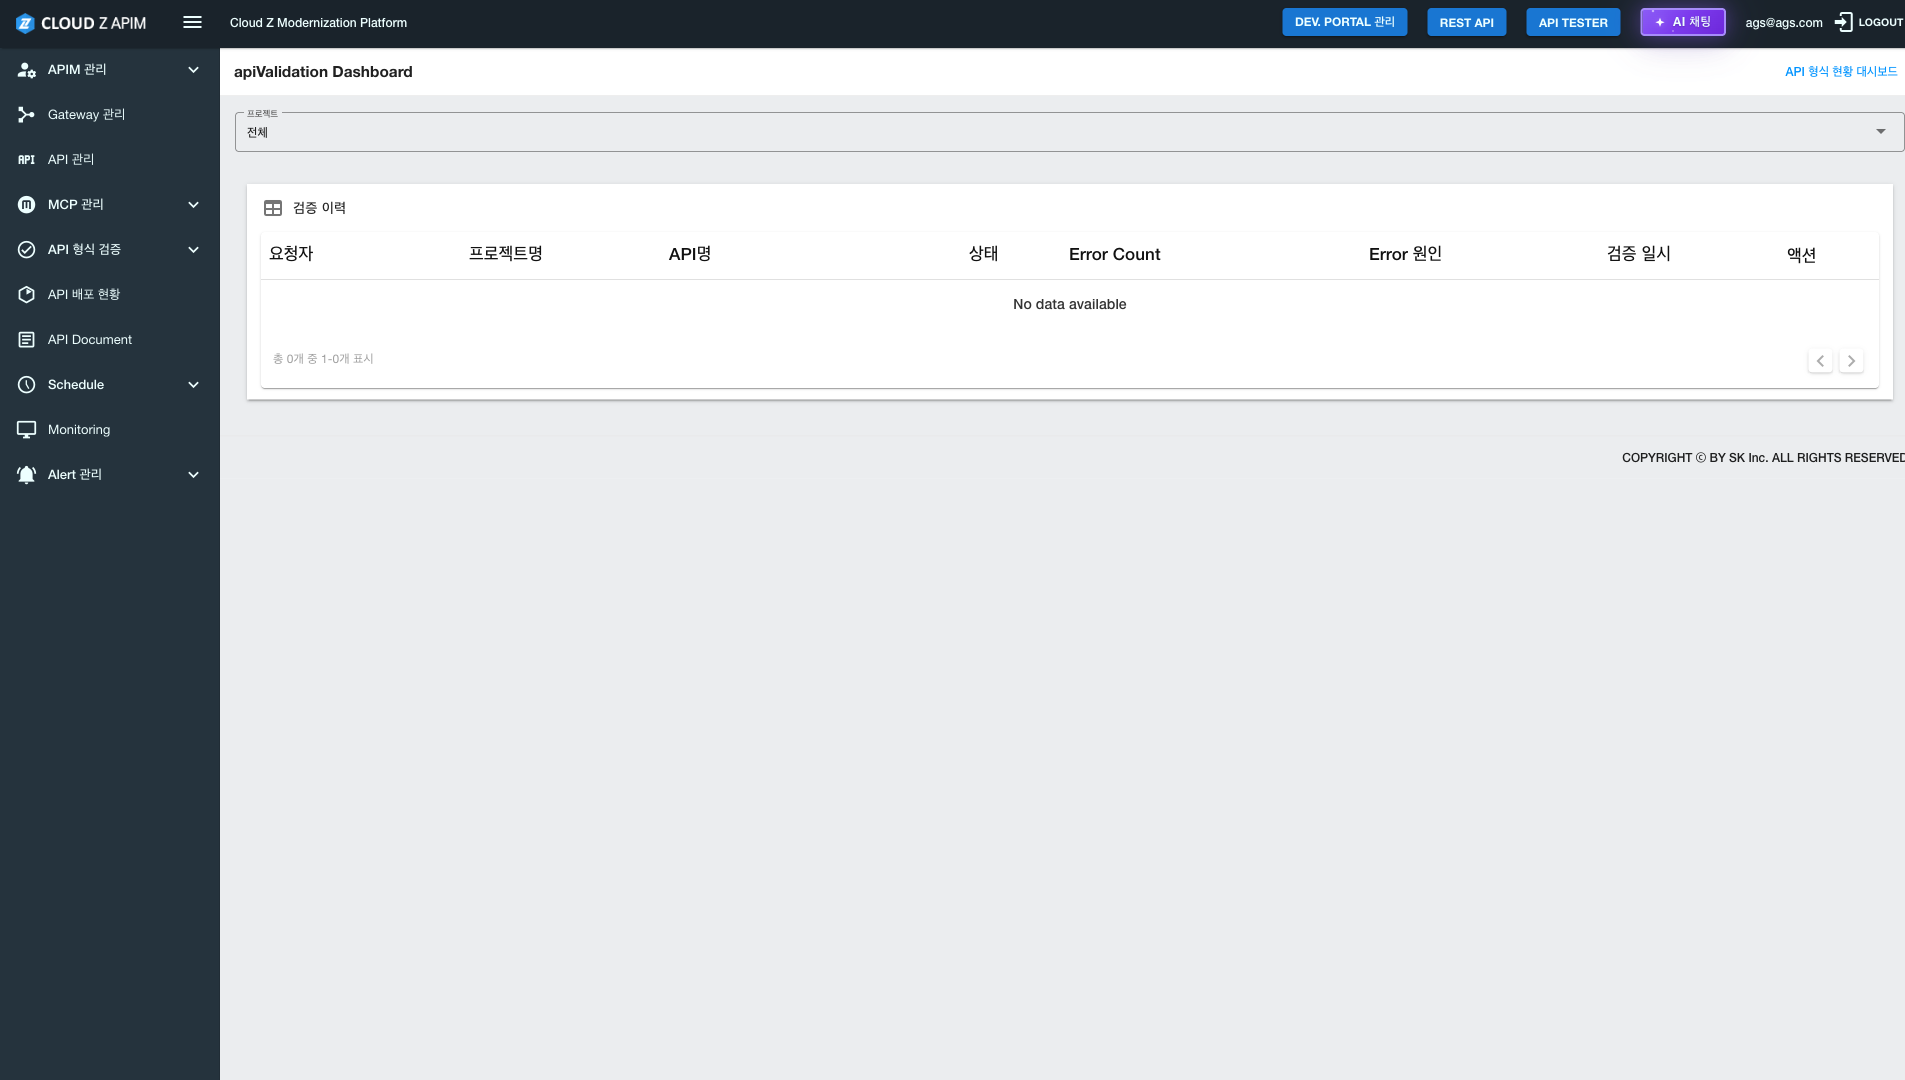
Feature Description
The API Document Status Dashboard allows users to view and monitor API format validation execution history and results.
Page Structure
Validation History TableDisplays validation execution history in a table format.
| Column name | Description |
|---|---|
| Requester | User who requested the validation |
| Project Name | Target project |
| API name | Target API |
| Status | Validation status (Pass / Fail, etc.) |
| Error Count | Number of detected errors |
| Error Cause | Reason for validation failure |
| Validation Time | Date and time of execution |
| Actions | View details, re-run validation, etc. |
Key Features
- View Validation History: Review past validation executions
- Monitor Validation Status: Check pass/fail results
- Error Analysis: Review error counts and causes
- Filtering: Filter by project using the project dropdown (optional)
How to Use
- Click the API Document Validation menu in the left sidebar to expand the submenu
- Select API Document Settings in Sub-menu
- Check the validation execution history in the Validation History table.
- Use the Project dropdown to select a specific project for filtering (optional).
- Use the Actions column of the table to view details or perform additional actions
Table Functions
- Pagination: View results page by page when history is large
- Sorting: Sort by clicking column headers (if supported)
- Detail View: View detailed information via the Actions column
Usage tips
- 💡 Project Filtering: Use the project dropdown to view validation history for a specific project
- 💡 Status Check: Quickly identify pass/fail results via the Status column
- 💡 Error Analysis: Use Error Count and Error Cause columns to identify validation issues
- 💡 Latest Data: Refresh the page to view the most recent validation results
Swagger Document Format Validation
Path : Left Sidebar > API Document Validation > API Document Validation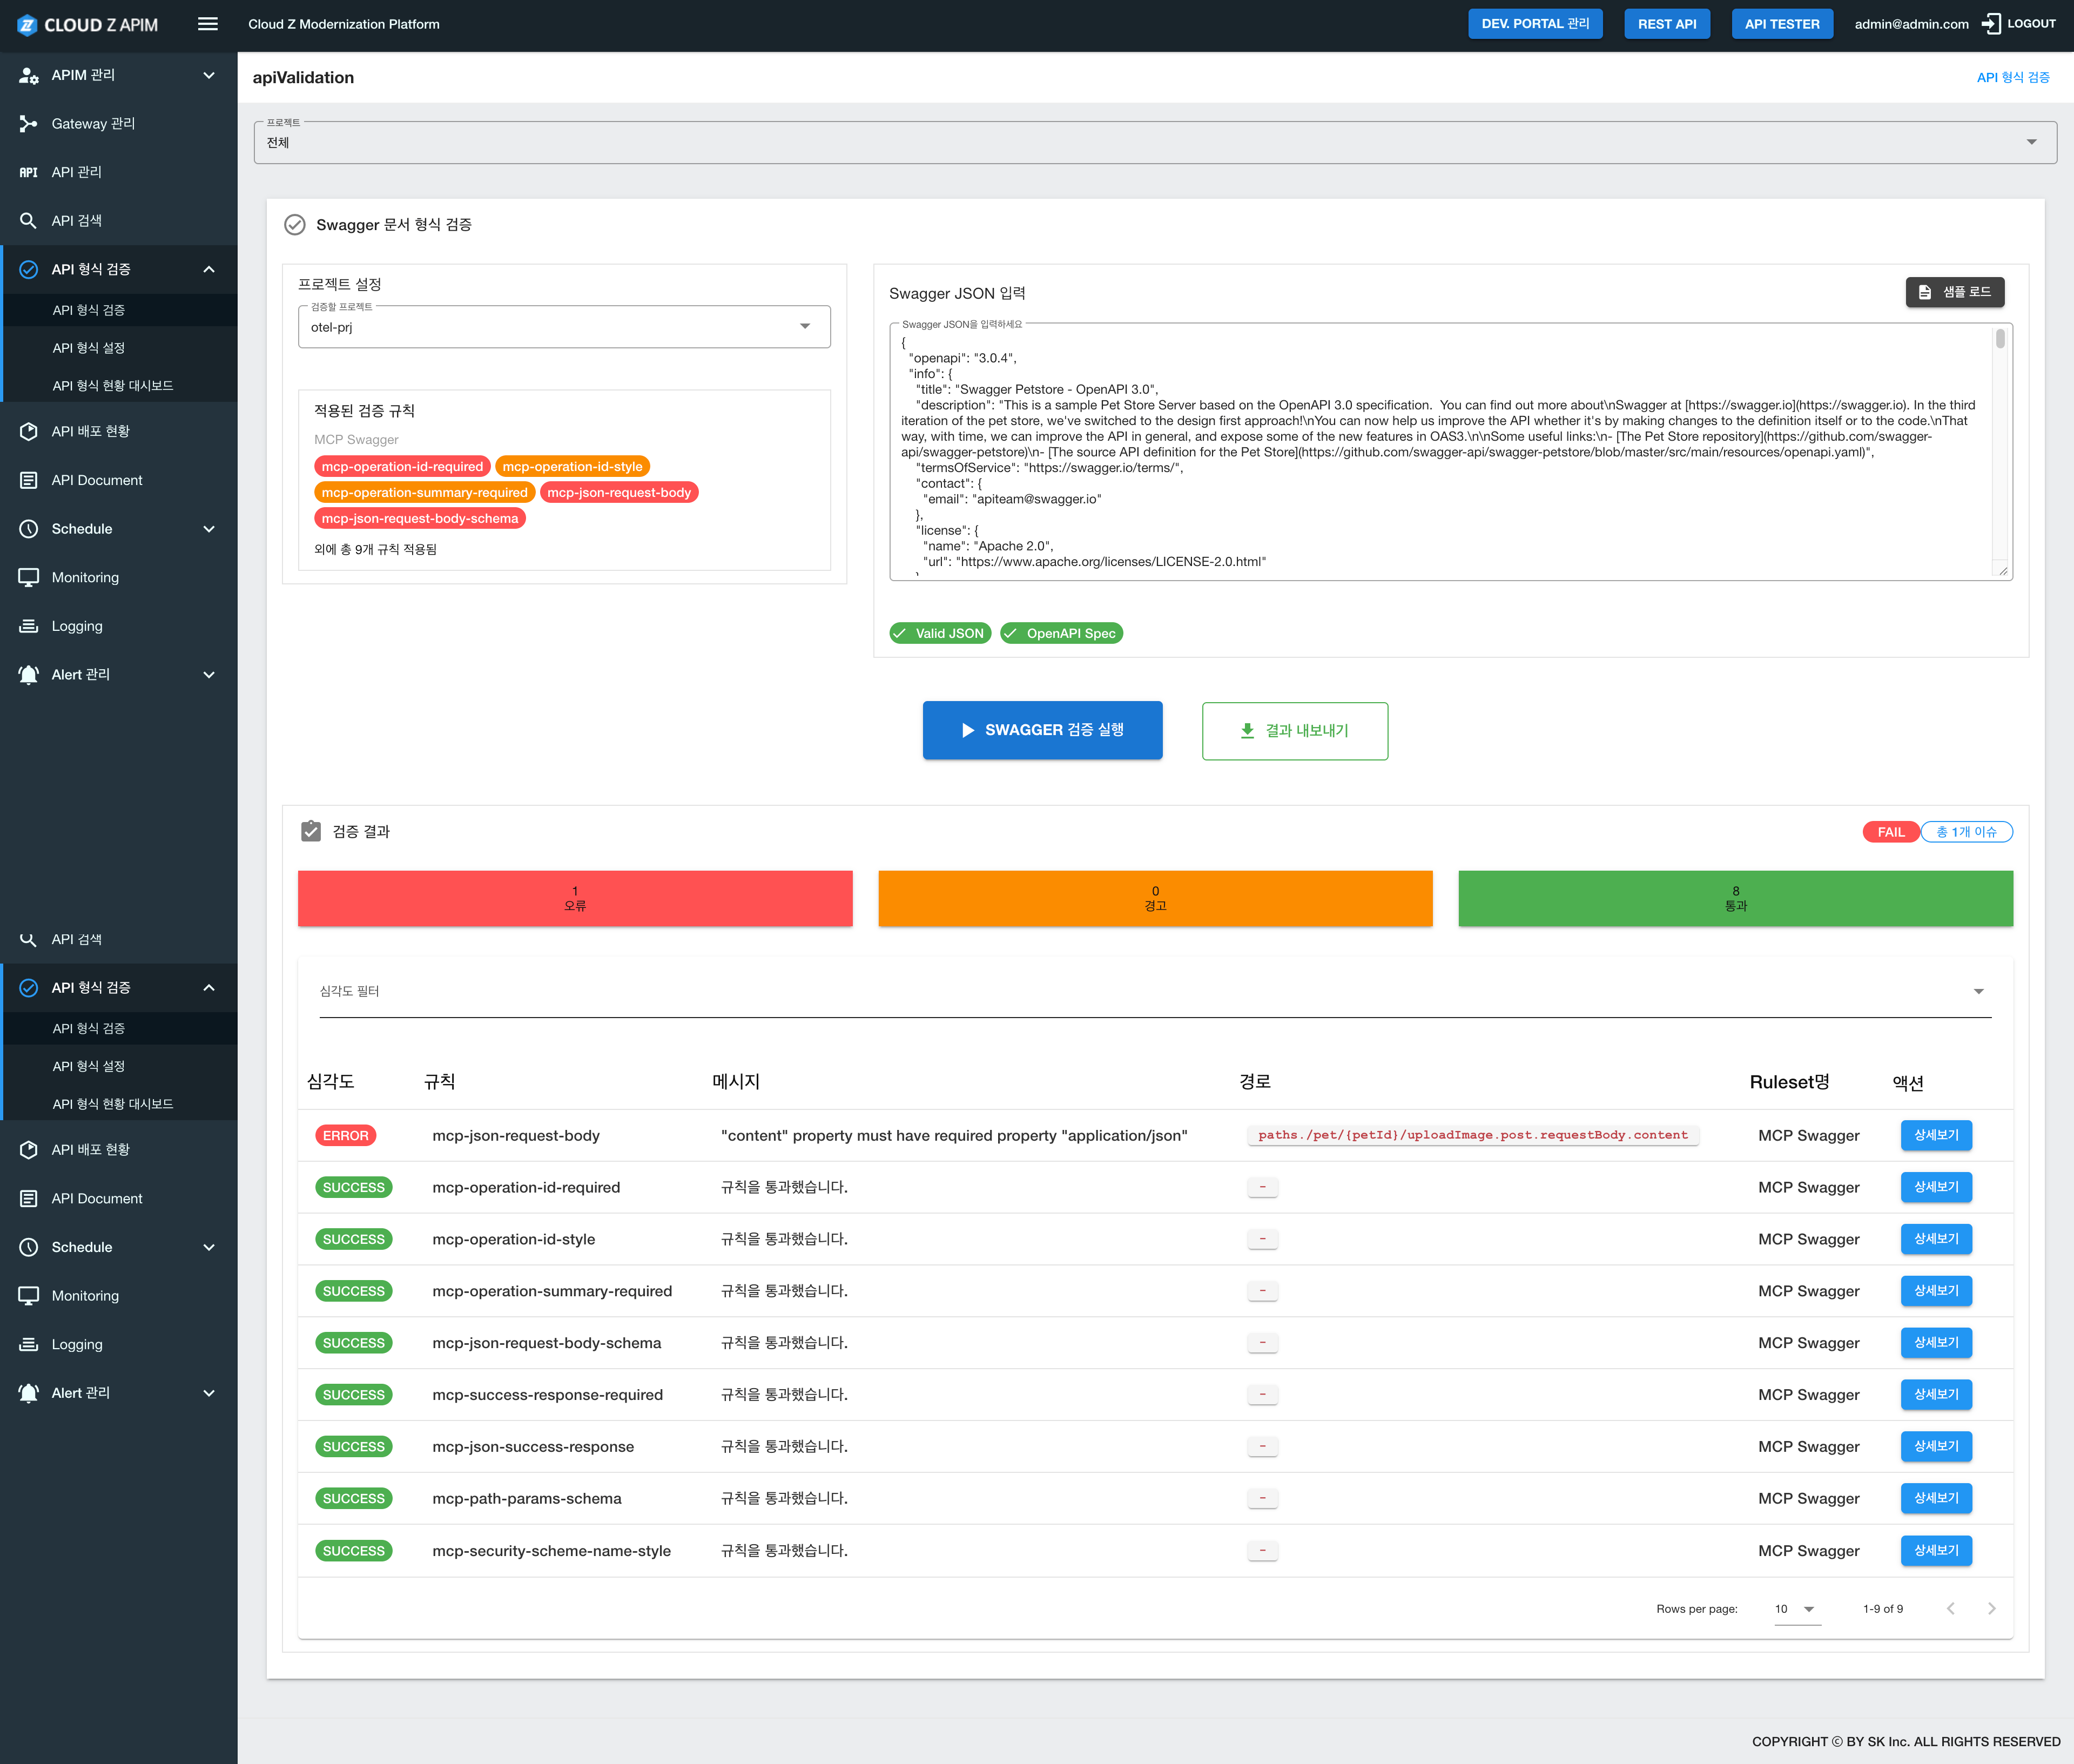
Feature Overview
Swagger Document Format Validation allows users to input Swagger/OpenAPI definitions and validate them against configured rules. This helps identify standard compliance issues and errors in Swagger documents before deployment.
Page Structure
1. Project Configuration Section- Project Selection: Select the project to validate
- E.g., otel-prj
- Applied validation rules are automatically loaded based on the selected project
Displays the rulesets and rules applied to the selected project:
- Ruleset Name: Name of the applied ruleset (e.g., MCP Swagger)
-
Applied Rules Examples:
- mcp-operation-id-required: operationId validation required
- mcp-operation-id-style: operationId style validation
- mcp-operation-summary-required: operation summary validation required
- mcp-json-request-body: JSON request body validation
- mcp-json-request-body-schema: JSON request body schema validation
- Other rules
- Rule count: Displays total rule count (e.g., “and N additional rules applied”)
- Input Field: A large text area where users can enter Swagger/OpenAPI JSON definitions.
- Default guide message: "Please enter Swagger JSON"
- Supports Swagger definitions in OpenAPI 3.0 format
- Load Sample Button: A blue button located at the top-right corner of the input field.
- Automatically loads a sample Swagger definition (e.g., Petstore example) into the input field
- Allows users to review the input format and perform test validations
- Validation Status Indicators: Displays JSON validation results below the input field.
- Valid JSON: Displays with a green check icon when the JSON format is valid
- OpenAPI Spec: Displays with a green check icon when the definition complies with the OpenAPI specification
- Run Swagger Validation Button: A large blue button located at the bottom center of the page.
- Executes all configured validation rules against the entered Swagger JSON
- Validation starts immediately upon clicking, and results are displayed below
- Export Results Button: A green button located next to the validation run button
- Allows users to export validation results to a file
4. Validation Results Section
After validation is executed, results are displayed at the bottom of the page.
Summary Information (Top card format):
- ERROR: Number of detected errors, displayed on a red background
- E.g., 1 error
- WARNING: Number of detected warnings, displayed on an orange background
- E.g., 0 warnings
- SUCCESS: Number of successful validations, displayed on a green background
- E.g., 8 success
- FAIL - Total N Issues: Total number of validation issues, displayed with a red label
- E.g., FAIL - Total 1 issues
| Column name | Description |
|---|---|
| Severity | Display ERROR (red) or SUCCESS (green) |
| Rule | Applied validation rule name (E.g., mcp-json-request-body) |
| Message | Validation result message (E.g., "content" property must have...) |
| Path | Path within the Swagger definition where the error is occurred |
| Ruleset name | Name of the ruleset to which the rule belongs |
| Action | View detailed information for each item by clicking “View Detail” button |
- Pagination: Displays results page by page when large volumes of validation results exist (e.g., “Rows per page: 10”)
- Sorting: Sort results by clicking on column headers
- Detail View: Click the View Details button in the Action column to see detailed information for each validation item
Key Features
1. Apply Project-specific validation rules- When a project is selected, the validation rules mapped to that project are automatically applied.
- Different validation rules can be applied to each project.
- The Swagger/OpenAPI definition of the developed API can be entered directly for validation.
- Check JSON format validity and OpenAPI specification compliance real time.
- Click the Sample Load button automatically inputs a sample Swagger definition.
- The sample can be used to check the required input format and test the function.
- Click the Run Swagger Validation button to run all configured validation rules.
- Validation results are categorized as Error, Warning, or Pass.
- Detailed information for each validation item (rule, message, path) can be viewed.
- Validation results can be exported as a file for documentation or sharing.
How to Use
Basic Validation Process- Select Project: From the project to be validated dropdown at the top, select the project to be validated.
- Check Validation Rules: Check the list of rules in the Applied Validation Rules section.
-
Enter Swagger JSON:
- Method 1: Copy the Swagger JSON of the developed API and paste it into the input field.
- Method 2: Click the Load Sample button to load a sample Swagger and modify it.
- Check JSON Validity: At the bottom of the input field, check the indicators for Valid JSON and OpenAPI Spec
- Run Validation: Click the Run Swagger Validation button.
- Review Results: In the Validation Results section at the bottom, check both summary information and detailed results.
- Fix Errors: If errors are found, refer the message and path information to correct the Swagger definition.
- Re-validate: After correction, run validation again to confirm that all errors have been resolved.
Practical Usage Scenarios
Scenario 1: Swagger Validation After Development Completion- After completing API development, generate Swagger/OpenAPI definition.
- Navigate to API Management > API Format Validation from the left sidebar.
- Select the project to be validated in project to be validated section
- Copy the generated Swagger JSON, and paste it into the input field.
- Click the Run Swagger Validation button.
- Review the results and fix any errors.
- Repeat until all validations pass.
Scenario 2: Validation Test Using Sample
- Select the project to be validated.
- Click the Load Sample button to load sample Swagger.
- Use the sample Swagger as a reference to write the actual Swagger definition.
- Click the Run Swagger Validation button to validate.
- Review the results and make necessary corrections.
Scenario 3: Validation Rule Compliance Check
- Select the project to check the applied validation rules.
- Enter the Swagger JSON.
- Run validation.
- In the Detailed results table, check the validation results for each rule.
- Review the rules with ERROR andWARNING and fix them.
- Click the View Details button to see more information about the errors.
Usage Examples
Example 1: Basic Validation Execution
- Select otel-prj project
- Click Load Sample to load sample Swagger
- Click Run Swagger Validation
- Check Validation results:
- Errors: 1
- Warnings: 0
- Passed: 8
Example 2: Actual Swagger Validation
- Copy the Swagger JSON of the completed API
- Selet project (E.g., otel-prj)
- Paste Swagger JSON into the input field
- Check JSON validity (check Valid JSON, OpenAPI Spec)
- Click button Run Swagger Validation
- Review errors in validation results:
- Example: Violation of mcp-json-request-body rule
- Message: "content" property must have required property "application/json"
- Path:
paths./pet/{petId}/uploadImage.post.requestBody.content
- Fix the error of this path in the Swagger definition
- Re-run validation after fixing
- Confirm all validations pass
Example 3: Validation Result Analysis
- After running validation, check the Validation Results section
- Check the total number of issues in the summary information (E.g., FAIL - Total 1 issue)
- In the Detailed results table, check each item:
- Severity: check prioritize items with ERROR
- Rule: check which rule failed
- Message: check specific error details
- Path: check exact position in the Swagger definition need to fix
- Click View Details for additional information
- Fix errors and re-run validation
Cautions
- ⚠️ Project Selection Required: Since validation rules may differ for each project, the correct project must be selected.
- ⚠️ JSON Format Compliance: The entered Swagger must be in valid JSON format and must comply with the OpenAPI specification.
- ⚠️ Validation Rule Review: Check the validation rules applied to the project in advance and prepare the Swagger so that all required items are properly followed.
- ⚠️ Re-validation After Fixing: After fixing the errors, make sure to run validation again to confirm that all issues have been resolved.
- ⚠️ Save Validation Results: Use the result export function to save important validation results.
Usage Tips
- 💡 Use Samples: For first‑time use, use load sample button to check the required input format.
- 💡 Real-time Validation: While entering JSON, check Valid JSONand OpenAPI Spec indicators for real-time validation.
- 💡 Rule-based Filtering: The validation results table can be filtered by rule to view only the results for a specific validation rule.
- 💡 Path Utilization: The path information in the validation results can be used to locate the exact position in the Swagger definition and correct it.
- 💡 Repeated validation: Run validation periodically during development is effective for detecting and resolving errors early.