Environment Variable Management
While environment variable information for an application can be hardcoded in a YAML file, it lacks reusability. From an operational perspective, separating the code that runs the application from the configuration code injected into the application can significantly enhance reusability. These internal configuration values of the application can be managed externally and injected into the container using Kubernetes' Secret ConfigMap resources.
Secret is used when injecting security-sensitive information like passwords, API keys, SSH keys, etc…, into a container.
ConfigMap is used for injecting non-sensitive configuration information into a container.
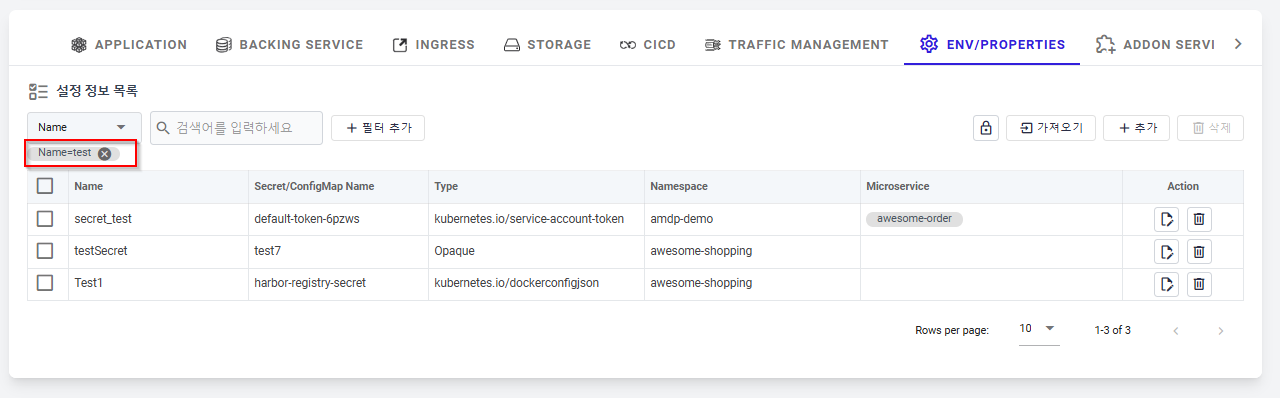
Environment Variables List
This is the interface for managing the Secret and ConfigMap information registered as environment variables for an application:

① List of Env/Properties configuration information.
- Name: The name of the environment variable.
- Secret/ConfigMap Name: The name of the Secret or ConfigMap managing the environment variable. In a Kubernetes environment, environment variables used by applications are managed as Secret/ConfigMap.
- Type: Displayed as follows on the screen:
- If it's a ConfigMap, only ConfigMap is displayed.
- If it's a Secret, the specific type of secret is displayed (dockerconfigjson, opaque, tls, service-account-token, basic-auth, etc…)
- Opaque (generic): A general-purpose secret that can be used for the same purposes as a ConfigMap. It can also be used to pass sensitive data to a container.
- Dockerconfigjson: Used for authentication information to access Docker image repositories. Kubernetes needs access to image repositories since it manages containers, and for private images in repositories like Docker Hub or ECR, additional authentication is required. The dockerconfigjson is the secret used to access these private registries.
- tls: Helps to manage TLS certificates as a secret. When TLS certificate information is stored in a Secret, objects like Pods or Services can use it for encrypted communication.
- service-account-token: Associated with ServiceAccount, a key Kubernetes API resource for RBAC (Role-Based Access Control). ServiceAccount is linked to a Pod and sets its permissions. When a ServiceAccount is connected, a token with authentication information is automatically created as a secret.
- basic-auth: This type is provided to store credentials for basic authentication.
When using this secret type, the secret's data field must contain one of the following two keys:
username: Username for authentication,
password: Password or token for authentication.
- Namespace: The cluster namespace where the Secret/Configmap is deployed.
- Microservice: The name of the microservice/application currently using the environment variable.
- Action: Additional action buttons for the environment variable information.
- Edit : Moves to the edit page for the environment variable.
- Delete : Deletes the environment variable. When Block Delete is ON, users cannot perform any deletion.
② ConfigMap Import: You can select and register from the Secrets/ConfigMaps deployed in Kubernetes.
③ Create a new Secret/ConfigMap resource.
④ Delete the Secret/ConfigMap information. When Block Delete is ON, users cannot perform any deletion.
⑤ Filter the view by the searched value regarding Name or Namespace.
Environment Variable creation
From the Environment Variables List screen, click on button “Add new” to create a new Secret/ConfigMap.
Creating a ConfigMap (File Type)
This is a detailed description of each item on the ConfigMap creation page.
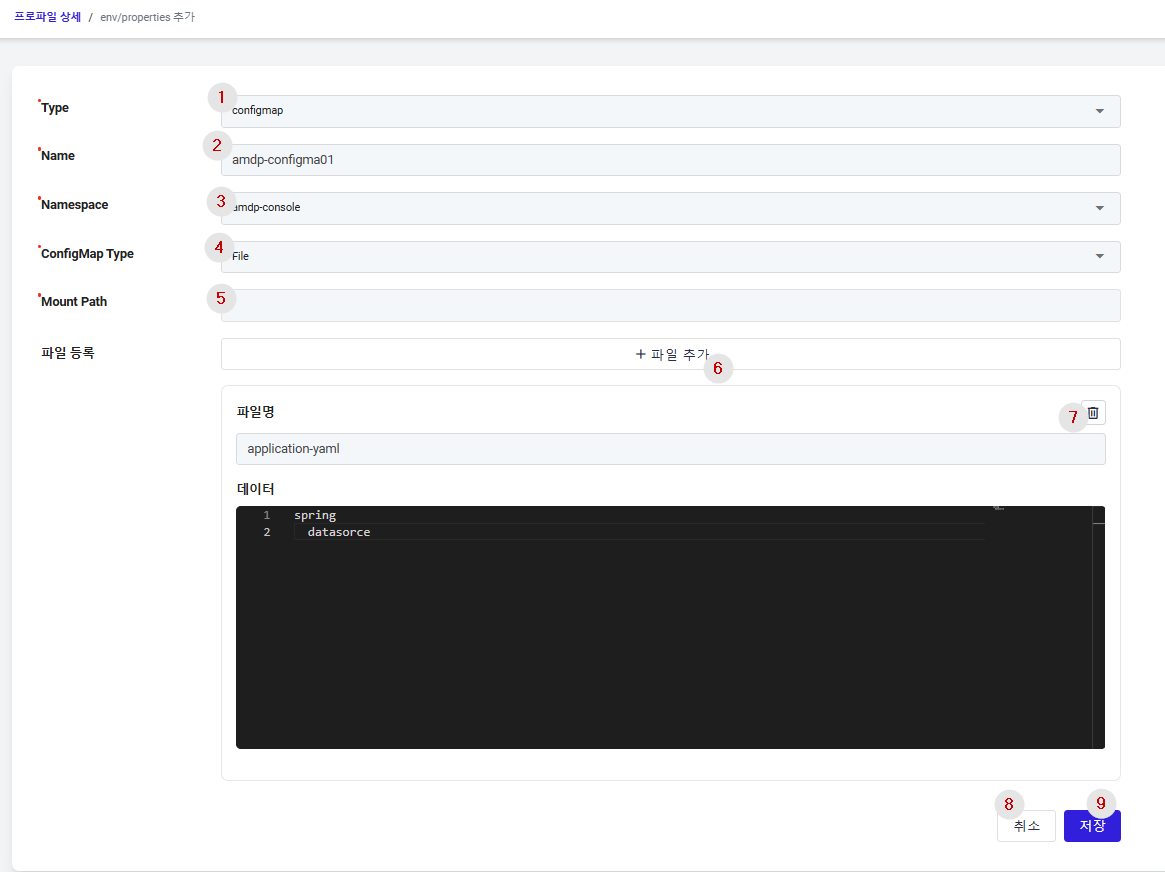
① Type: Choose between ConfigMap and Secret types for storing environment variables.
② Name: The name of the ConfigMap that will manage configuration information for the application.
③ Namespace: Select the namespace to use the ConfigMap from the list of namespaces registered in the profile.
④ ConfigMap Type: ConfigMap supports both Property and File formats. The details are as follows:
- Property: A type where configuration information can be registered in a Key/Value format.
- File: A type that allows for the registration of existing configuration files. For instance, if you want to manage the application.yaml file of a SpringBoot application separately, use the File type.
⑤ Mount Path: When choosing the File type, input the path where the file will be injected and mounted in the application.
⑥ Add File: You can input multiple files, and click the add button for each additional file
⑦ Delete button: Delete added file information.
⑧ Cancel: Cancel from the ConfigMap creation page
⑨ Save: Save the entered information to create the ConfigMap.
Creating a ConfigMap (Property Type)
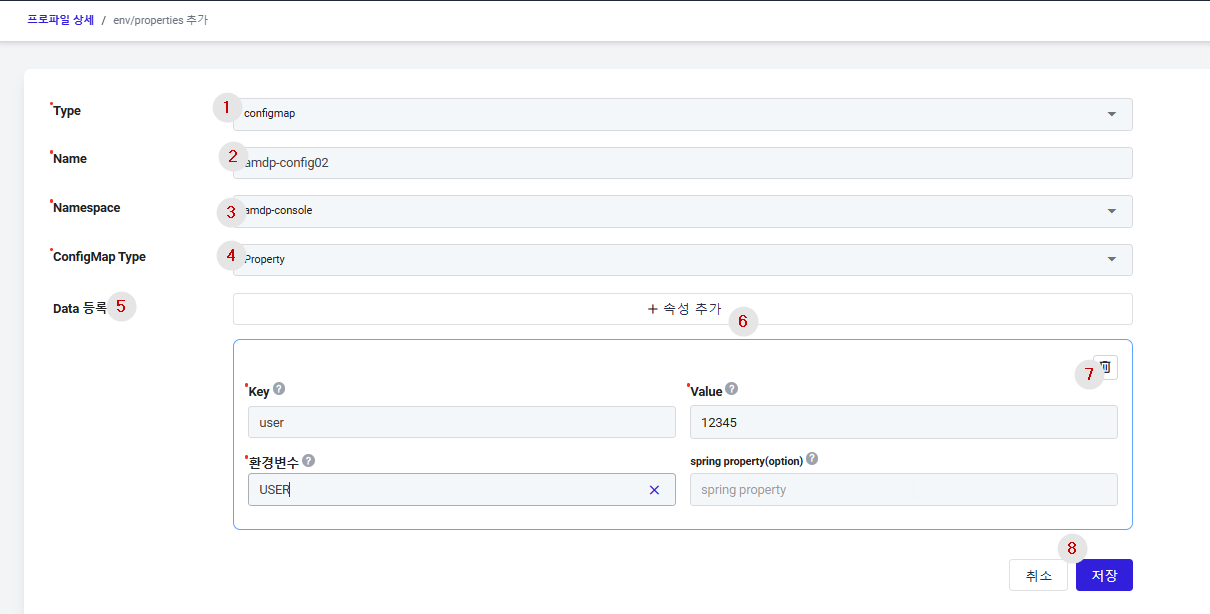
① Type: Choose between ConfigMap and Secret types for storing environment variables.
② Name: The name of the ConfigMap that will manage configuration information for the application.
③ Namespace: Select the namespace to use the ConfigMap from the list of namespaces registered in the profile.
④ ConfigMap Type: Select appropriate Property:
- Property: A type where configuration information can be registered in a Key/Value format.
- File: A type that allows for the registration of existing configuration files. For instance, if you want to manage the application.yaml file of a SpringBoot application separately, use the File type.
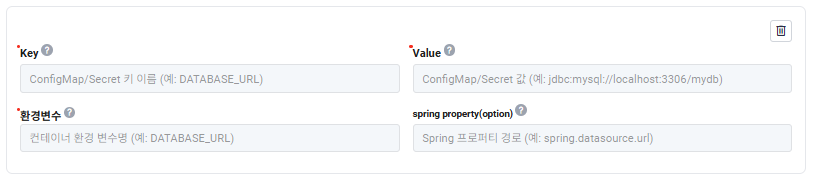
⑤ Data (Data Registration) : Input the application's configuration information as follows:
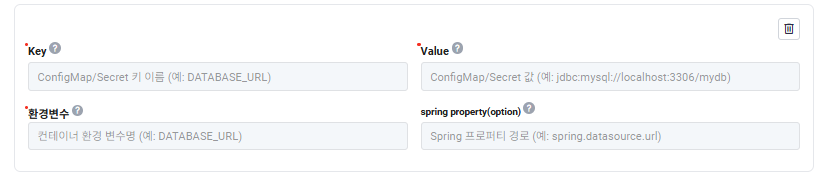
- Key: The key of the environment variable.
- Value: The value of the environment variable.
- Environment Variable: The env name that can be injected and used in the actual application.
- Spring Property (optional): Enter the variable name that maps to properties in the application.yaml file
⑥ Add Button: A new configuration information can be added by clicking the add button. In this page, multiple configuration information can be created.
⑦ Delete Button: Added configuration information can be deleted.
⑧ Save: To save the entered information to create the ConfigMap.
Creating a Secret (Opaque Type)
This is a detailed description of each item on the Secret creation page.

① Type: Select the type of Secret. Secrets are used when you need to inject sensitive information such as passwords, API keys, SSH keys, etc., into containers.
② Name: Input the name of the Secret.
③ Namespace: Choose the namespace for the Secret from the list of namespaces registered in the profile.
④ Secret Type: Secrets support both Opaque and kubernetes.io/dockerconfigjson formats.
- Opaque: A method for registering configuration information in a Key/Value format. (Detailed explanation can be found in the Environment Variable List section).
- kubernetes.io/dockerconfigjson: A method for registering authentication information to access an image registry. (Detailed explanation can be found in the Environment Variable List section).
⑤ Data (Data Registration): Enter the data similarly to how you would input configuration data.
- Key: The key of the environment variable.
- Value: The value of the environment variable
- Environment Variable: The env name that can be injected and used in the actual application.
- Spring Property (optional): Enter the variable name that maps to properties in the application.yaml file.
⑥ Add Button: You can input multiple key-value data pairs, and click the add button for each new
⑦ Delete Button: Delete the specific key-value data.
⑧ Save: Save the entered information to create the secret.
Creating a Secret (kubernetes.io/dockerconfigjson Type)
This section provides a detailed description of each item on the Secret creation page for the dockerconfigjson type.
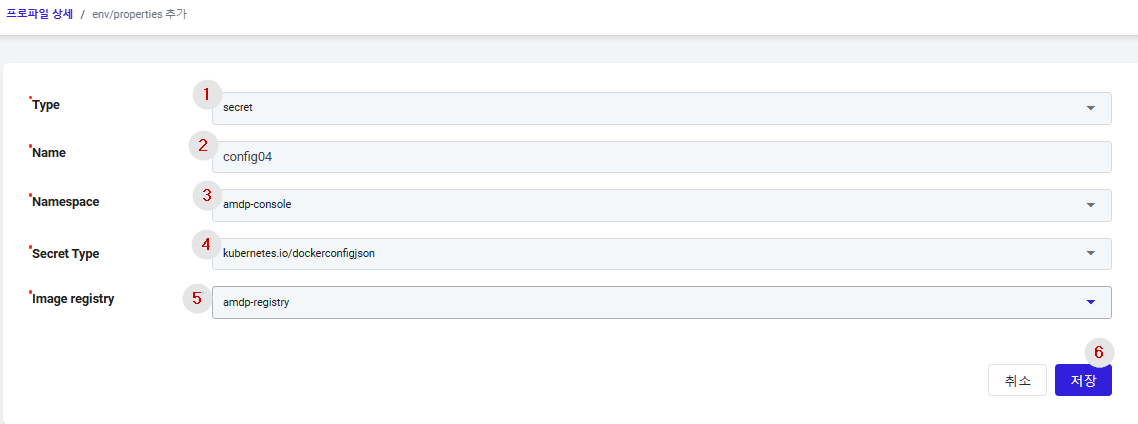
① Type: Select whether you are creating a ConfigMap or a Secret.
② Name: Input the name of the Secret.
③ Namespace: Choose the namespace for the Secret from the list of namespaces registered in the profile.
④ Secret Type: Secrets support both Opaque and kubernetes.io/dockerconfigjson formats.
- Opaque: A method for registering configuration information in a Key/Value format. (Detailed explanation can be found in the Environment Variable List section.)
- kubernetes.io/dockerconfigjson : A method for registering authentication information to access an image registry. (Detailed explanation can be found in the Environment Variable List section.)
⑤ Image Registry: This is a list of image registries registered in the project settings. Select the image registry you want to authenticate using the secret being created.
⑥ Save Button: Save the entered information to create the Secret.
Import Environment Variables
From the Environment Variables List, click on button Import file to import Secret/ConfigMap
Importing a ConfigMap (Property Type)
This section describes how to import an existing ConfigMap of the Property type:
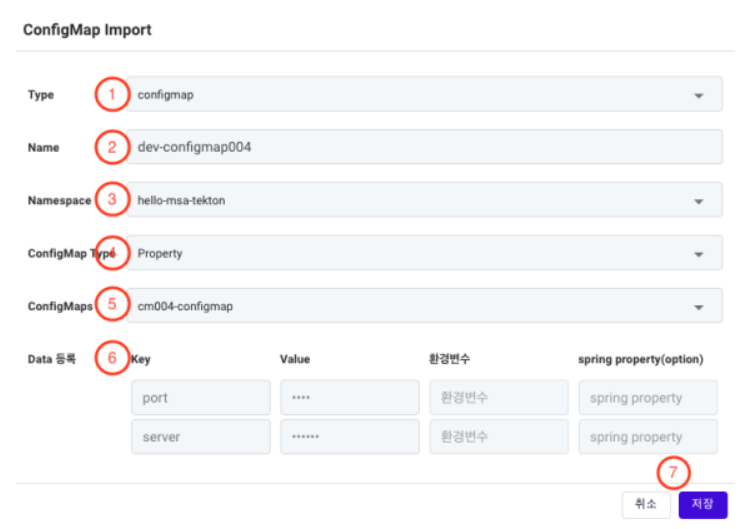
① Type: Select whether you are importing a ConfigMap or a Secret.
② Name: Enter the name of the ConfigMap.
③ Namespace: Choose the namespace for the ConfigMap from the list of namespaces registered in the profile.
④ ConfigMap Type: ConfigMaps support both Property and File formats.
- Property: A format where configuration information is registered in a Key/Value format.
- File: A format for registering existing configuration files. For example, if you want tomanage the application.yaml file of a SpringBoot application separately, you would use the File type.
⑤ ConfigMaps: This brings up a list of ConfigMaps deployed in the namespace selected in ③. Choose the ConfigMap you want to import.
⑥ Data (Data Registration): Display the key-value data of the selected ConfigMap. You cannot modify this key-value information during the import process.
⑦ Save Button: Save the entered information
Importing a ConfigMap (File Type)
This section provides a detailed description of each item on the ConfigMap import page for the File type:
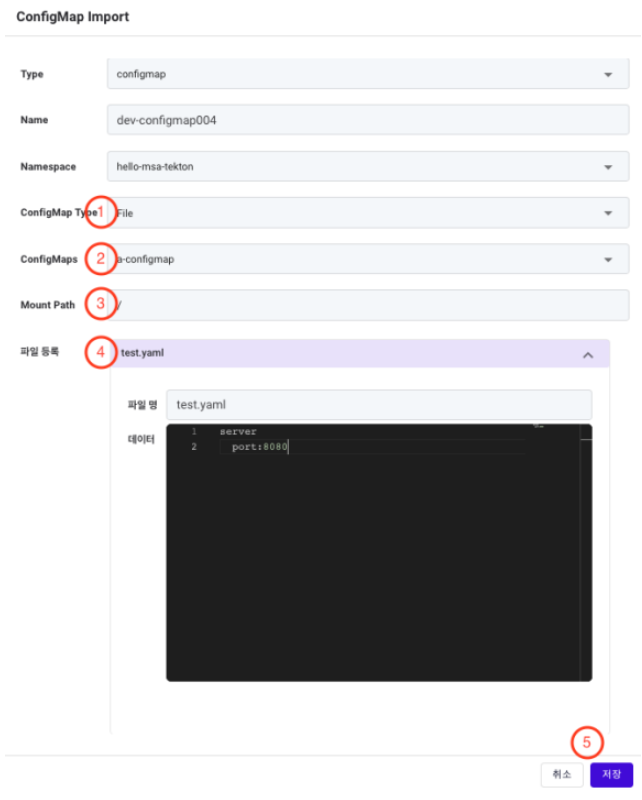
The Type, Name, and Namespace information are the same as those set previously.
① ConfigMap Type: ConfigMaps support Property and File formats. Property : A format where configuration information is registered in a Key/Value format. File : A format for registering existing configuration files. For example, use this for separating and managing a SpringBoot application.yaml file.
② ConfigMaps: Bring up a list of ConfigMaps deployed in the selected namespace. Choose the ConfigMap you want to import.
③ Mount Path: If the File format is chosen, enter the path where the file will be mounted in the application.
④ File Registration: Display the configuration data of the selected ConfigMap.
⑤ Save Button: Save the entered information
Importing a Secret (Env)
This section describes how to import an existing Secret for environment variables
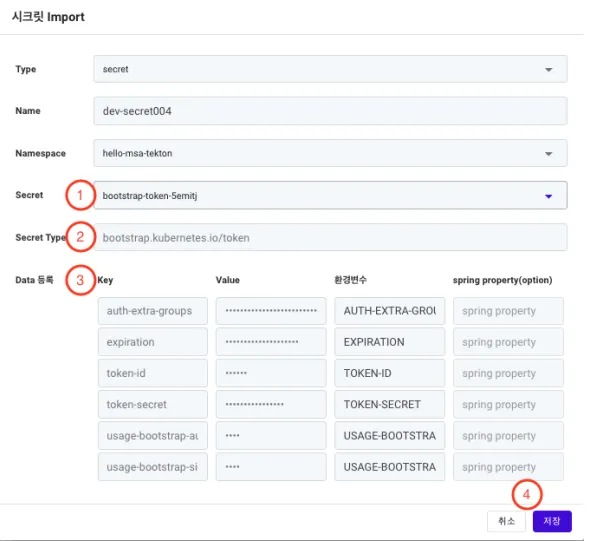
The Type, Name, and Namespace information are the same as those set previously. ① Secret: To bring up a list of Secrets deployed in the selected namespace. Choose the Secret you want to import.
② Secret Type: To display the specific type of the selected Secret. This item cannot be modified.
③ Data (Data Registration): To display the detailed data of the selected Secret.
④ Save Button: To save the entered information.
Importing a Secret (File)
This section describes how to import an existing Secret for file-based configuration..
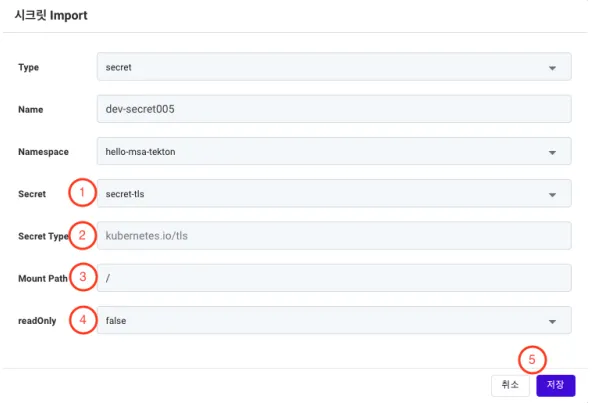
The Type, Name, and Namespace information are the same as those set previously. ① Secret: To bring up a list of Secrets deployed in the selected namespace. Choose the Secret you want to import.
② Secret Type: T display the specific type of the selected Secret. This item cannot be modified.
③ Mount Path: The path where the Secret data will be mounted in the application.
④ readOnly: To set whether the mounted Secret is read-only.
⑤ Save Button: To save the entered information.
Environment Variable Edition
Editing a ConfigMap (File)
This section provides a detailed description of each item on the ConfigMap editing page for the File type.
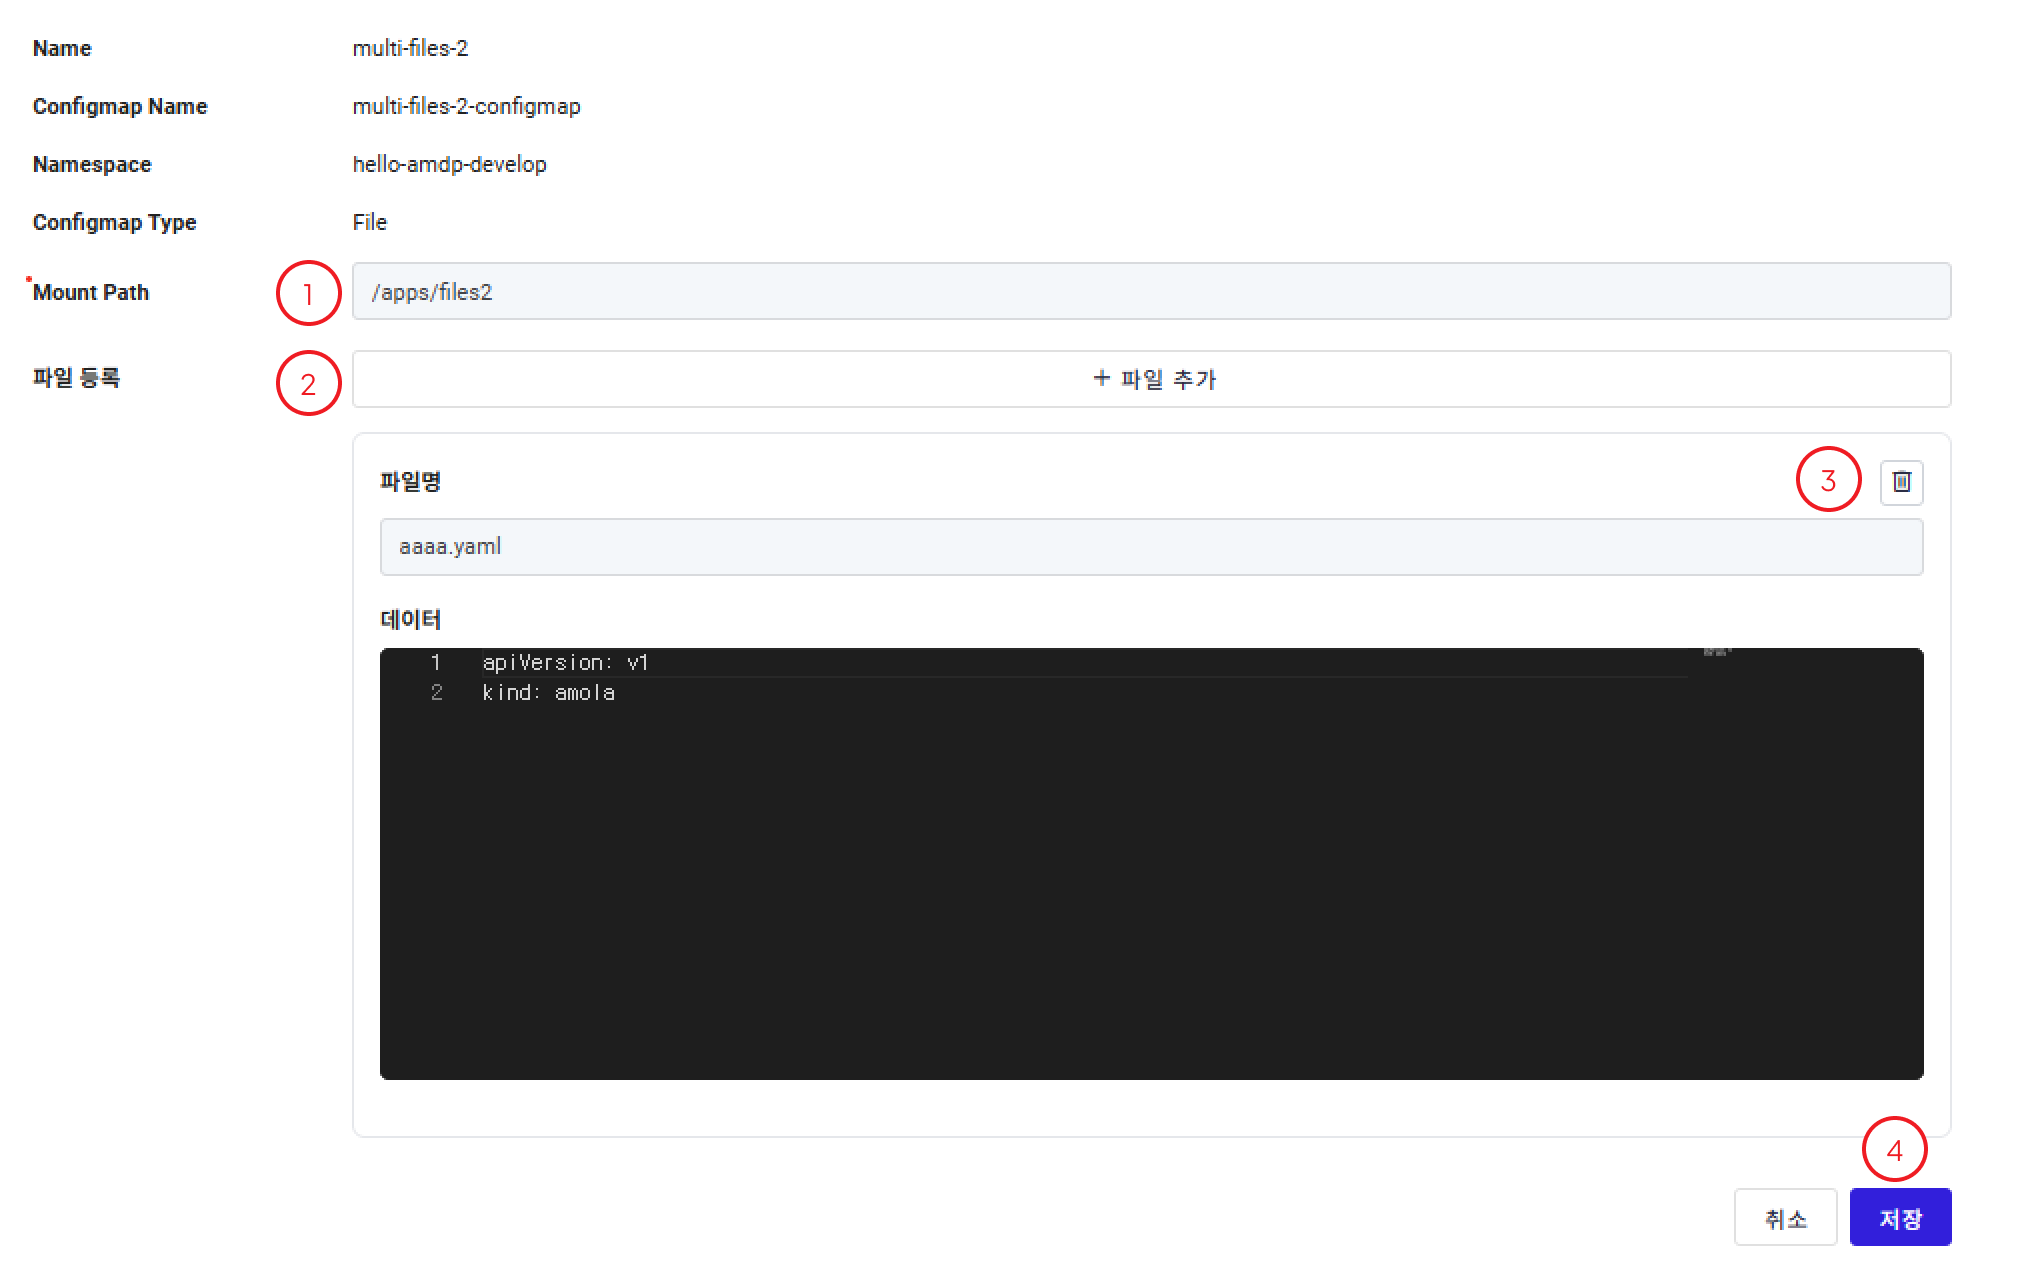
① Mount Path: If the File format is chosen, enter the path where the file will be mounted in the application.
② File Registration: Add new configuration files or modify existing ones.
③ Delete Button: Delete existing files
④ Save Button: Save the entered information.
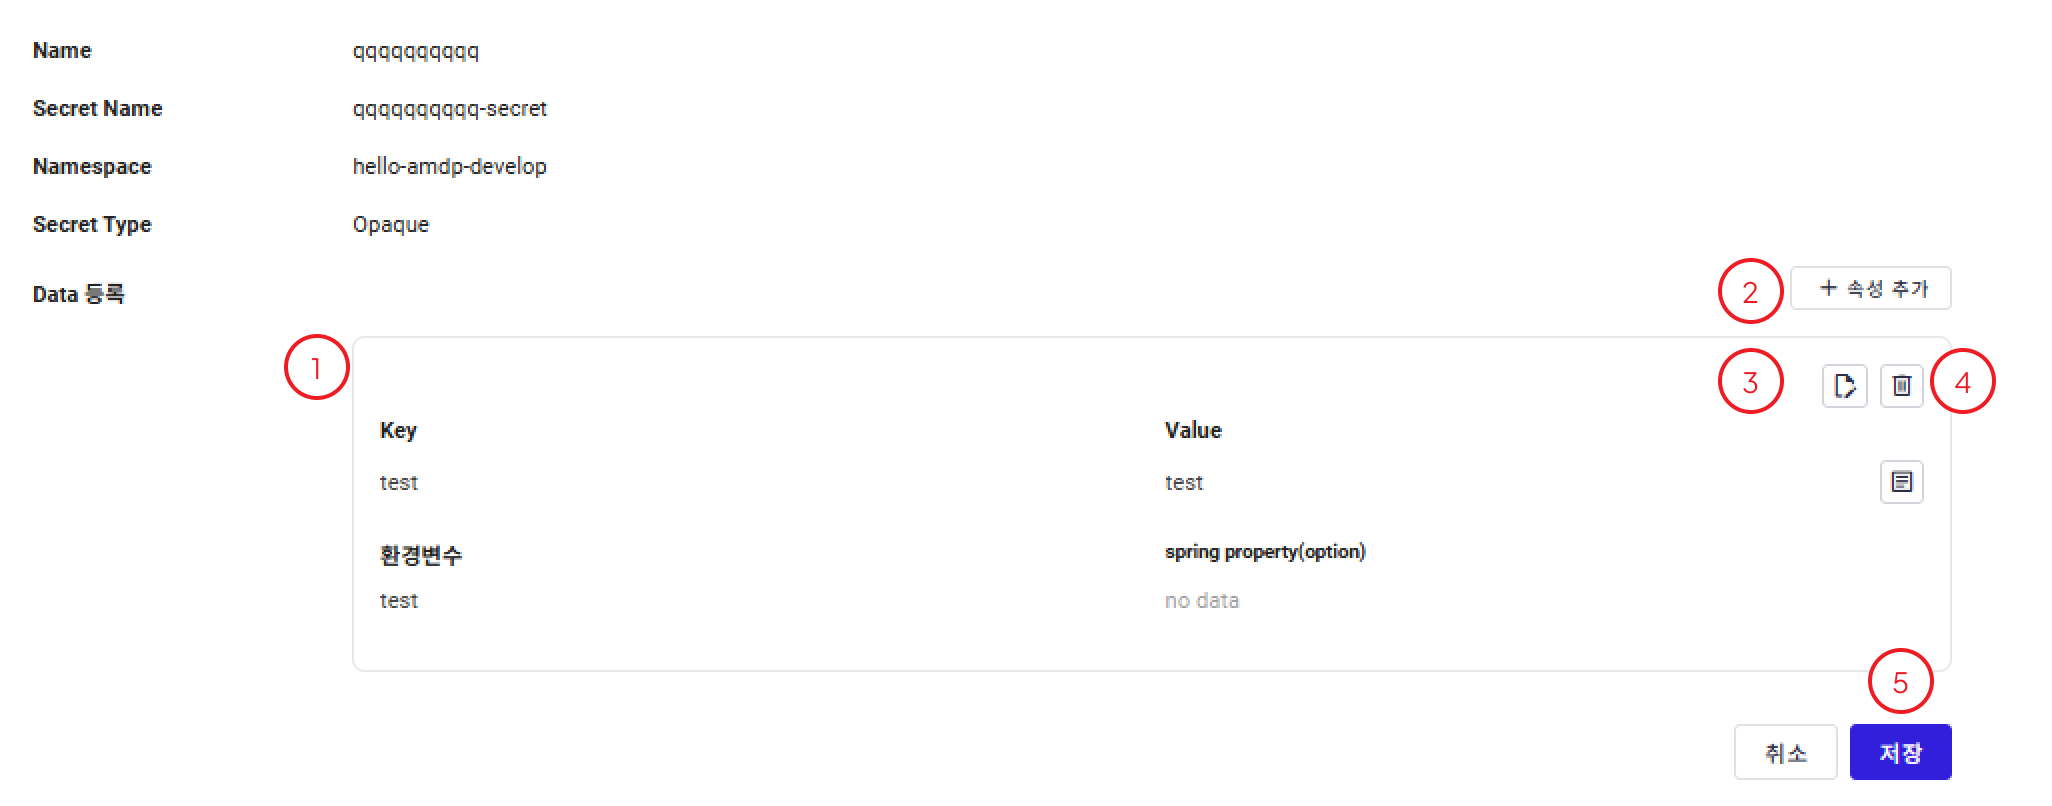
Editing a ConfigMap (Property)
This section provides a detailed description of each item on the ConfigMap editing page for the Property type.
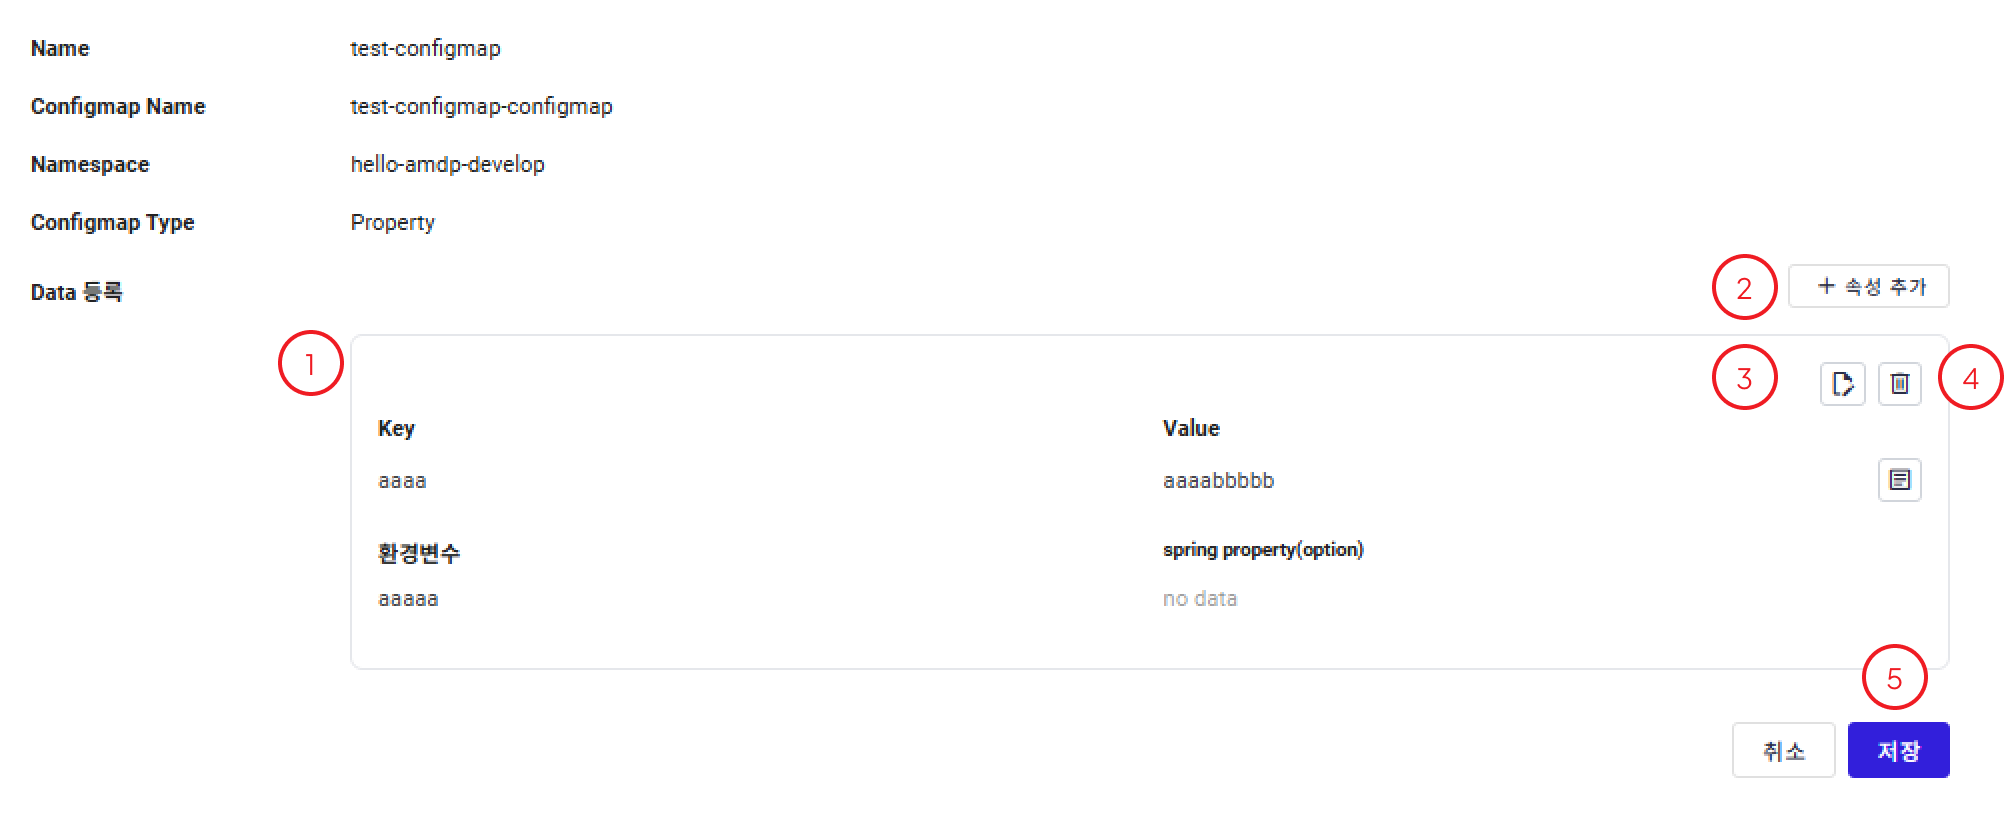
① Data (Data Registration): Display the detailed data of the selected Secret.
② Add Property: Allow user to add new property:
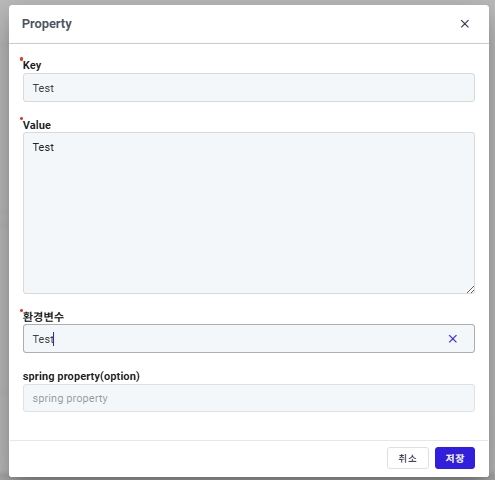
③ Edit Button: When clicked, a modal popup opens for editing selected one.
④ Delete Button: Delete existing properties
⑤ Save Button: Save the entered information.
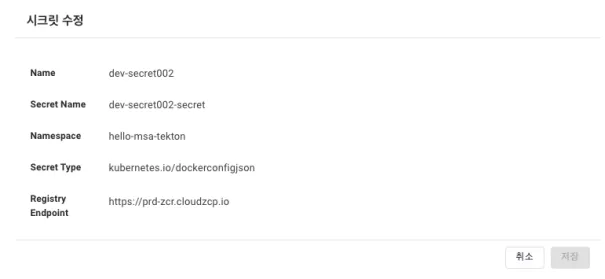
Editing a Secret (kubernetes.io/dockerconfigjson)
Secrets of the dockerconfigjson type cannot be edited.
Editing a Secret (Opaque)
This section provides a detailed description of each item on the Secret editing page for the Opaque type.
① Data (Data Registration): Display the detailed data of the selected Secret.
② Add Property: Allow user to add new property:
③ Edit Button: When clicked, a modal popup opens for editing selected one.
⑤ Save Button: Save the entered information.
Editing a Secret (File)
This section provides a detailed description.
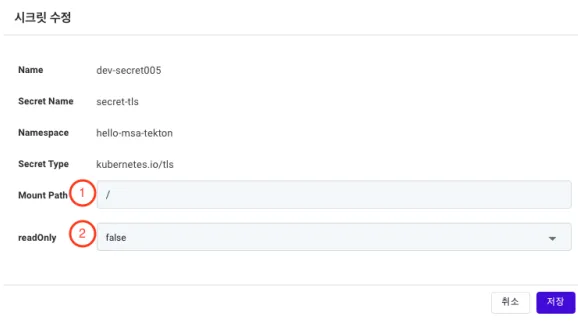
① Mount Path: If the File format is chosen, enter the path where the file will be mounted in the application.
② File Registration: Add new configuration files or modify existing ones.
Editing Secrets (Other Types - Token Type)
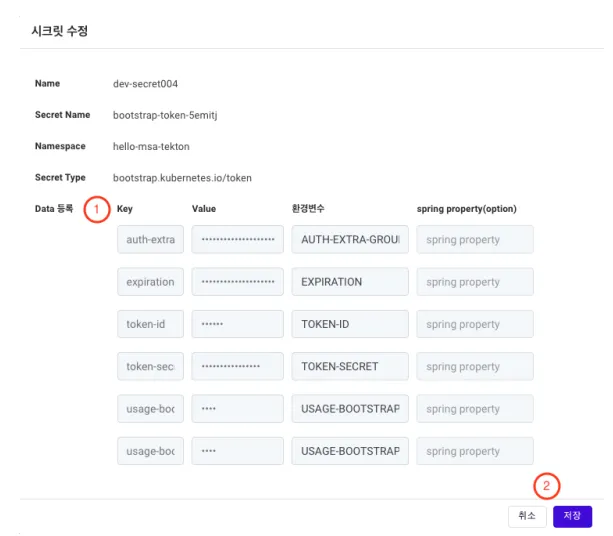
① Data (Data Registration): Display the detailed data of the selected Secret.
② Save Button: Save the entered information.