Profile Creation and Configuration
AMDP profiles are a strategy for structuring and deploying native services separately for development, testing, operation... Before using a profile, you must first register Git information for profile management in project management and Git information containing the application code. Additionally, you can choose a registered cluster and select a cluster for deployment per profile.
Profile Configuration
Creating a Profile
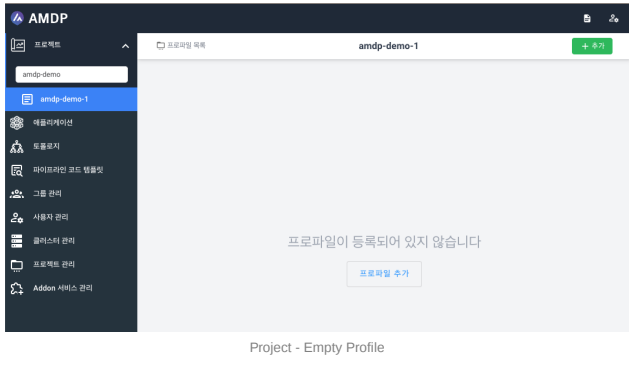
After completing the project registration and configuration, accessing the created project through the left project menu will display the screen for adding a profile. Here, you can start configuring the deployment environment profile for deploying applications.
- Pressing the add profile button displays the following initial profile creation screen.
- Fill out each item to proceed with creating a profile.
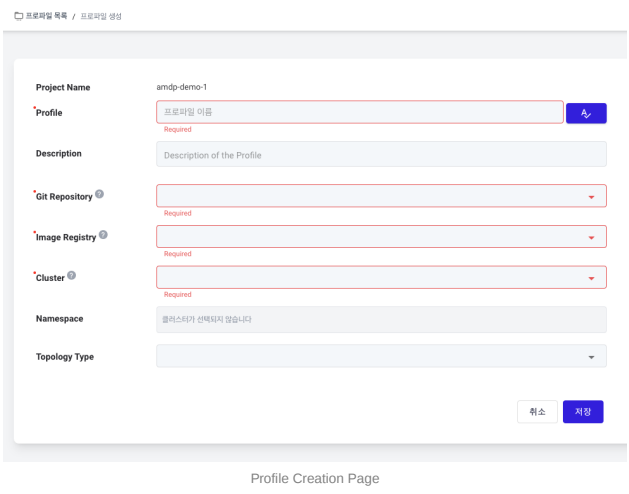
- Profile: Enter the name for the profile to be created. Commonly, a name like dev, indicating a development environment, is entered. Use the duplicate check button next to it to confirm the name's uniqueness.
- Type: Select the profile type (Develop / Test / Staging / Production).
- Description: Enter a description of the profile. This will be displayed later along with the list of profiles within the project.
- Git Repository: Select the git repository configured for the profile in the project.
- Image Registry: Choose the image registry configured for the profile in the project.
- Cluster: Select the cluster configured in Cluster Registration Management. This is the environment where the application will actually be deployed.
- Namespace: This is the namespace in the cluster where application deployment is allowed. Typically, applications of a profile can be deployed in one namespace, but if namespace separation is required, register multiple namespaces here.
- Topology Type: Select a topology type ( NONE / NODE_GROUP / TOPOLOGY_SPREAD ) to determine the distribution method of cluster nodes.
- NONE: The default selection, with no specific nodes designated.
- NODE_GROUP: Deployment is specified only to nodes containing the same Label,
using Node Affinity settings
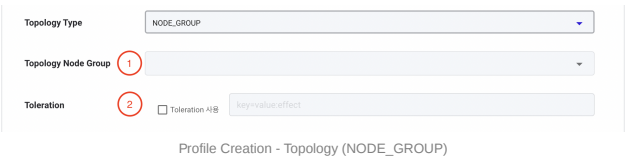
① Topology Node Group: Enter the Label of the nodes to specify for deployment.
② Toleration: Settings for key, value, effect to deploy on specific nodes with Taint settings
- TOPOLOGY_SPREAD : Settings for distributing deployment over one or more topology domains based on a specified topology key.
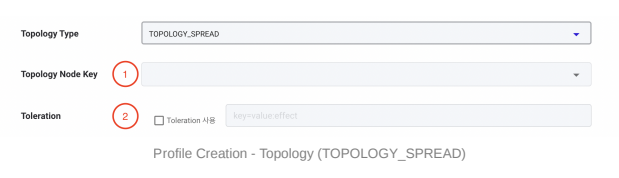
① Topology Node Key: Settings for distributing deployment using a common key in the node Label.
② Toleration: Same as NODE_GROUP
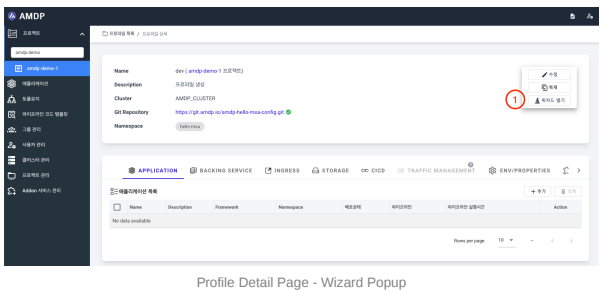
- After saving, the new profile will be displayed as follows. By default, you configure it directly, but if you need help, you can open the wizard by pressing the Open Wizard button (①) to display the wizard screen on the left side of the profile configuration information page and get help with the settings.
Profile Configuration Information
This section provides a description of the profiles registered in the project. You can check various components and basic settings such as the APPLICATION tab, BACKING SERVICE tab, etc.
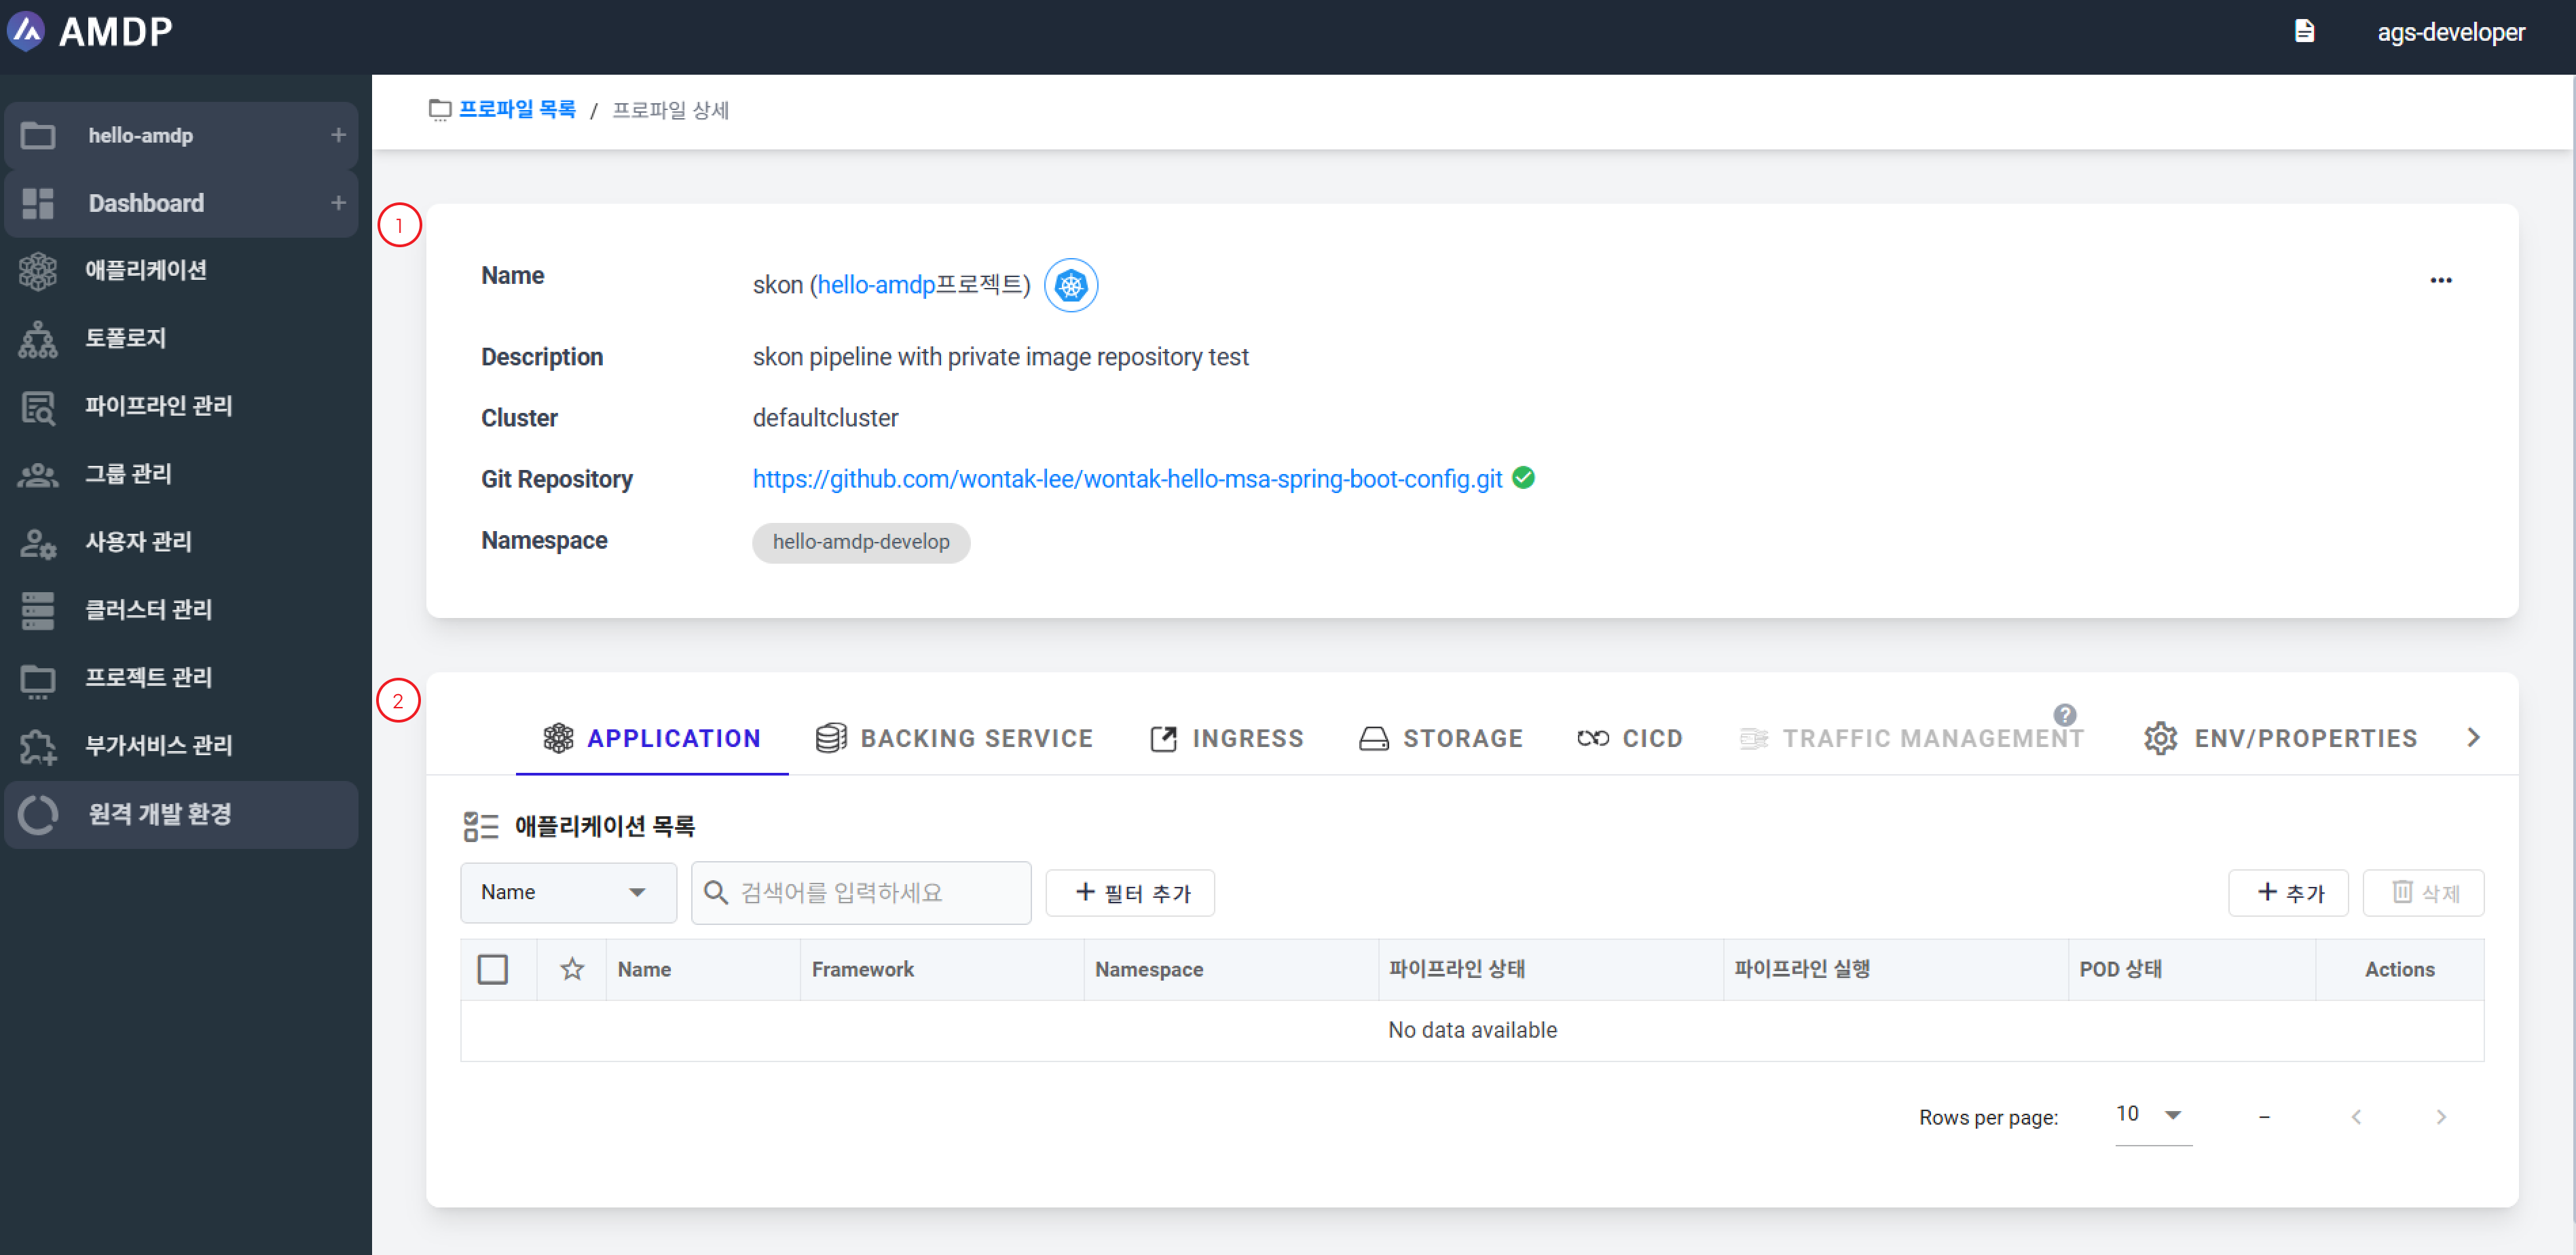
① Displays the name, description, deployment cluster, configuration Git information, and designated Namespace of the profile.
② You can manage applications and configuration information belonging to the profile in each tab.
Profile Wizard
On the Profile Details page, click the three-dot (⋯) button in the top-right corner to open the action menu, then select Open Wizard to view the Profile Wizard.

The wizard guides through a total of 7 steps for deploying an application. If each step is completed, the checkbox is activated to indicate the user has correctly set it up.
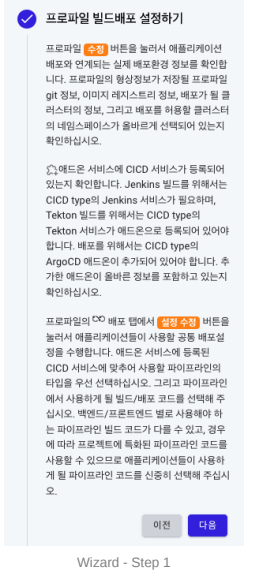
- This is the profile setting for building and deploying. It guides the necessary settings before the application-specific settings. Refer to the profile deployment settings section of this document.
- This step involves registering additional resources that the application will use. Register resources that can be used when the application operates, such as Backing Service, Storage, ConfigMap/Secret.
- This is the actual registration of the application. Refer to the application management section of this document.
- This step involves actually using the registered additional resources in the application settings.
- This step involves configuring the application's pipeline. Refer to the CICD Pipeline Management document.
- This is the execution stage of the actual pipeline. Refer to the CICD Pipeline Management document.
- This step involves setting up the ingress if you want to expose the application externally. Refer to the Ingress Setup section of this document.
Modifying / Cloning / Reopening Creation Wizard of Profile
These features are available through three-dot (⋯) button at the top right of the profile configuration information.
This function is only available to project administrators (owners) .
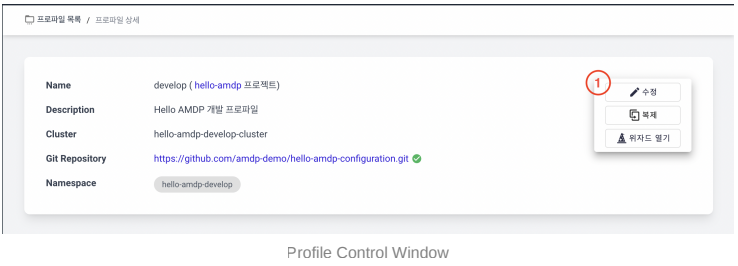
Modifying Profile
Clicking the Edit button takes you to a page where you can change the basic settings of the profile.
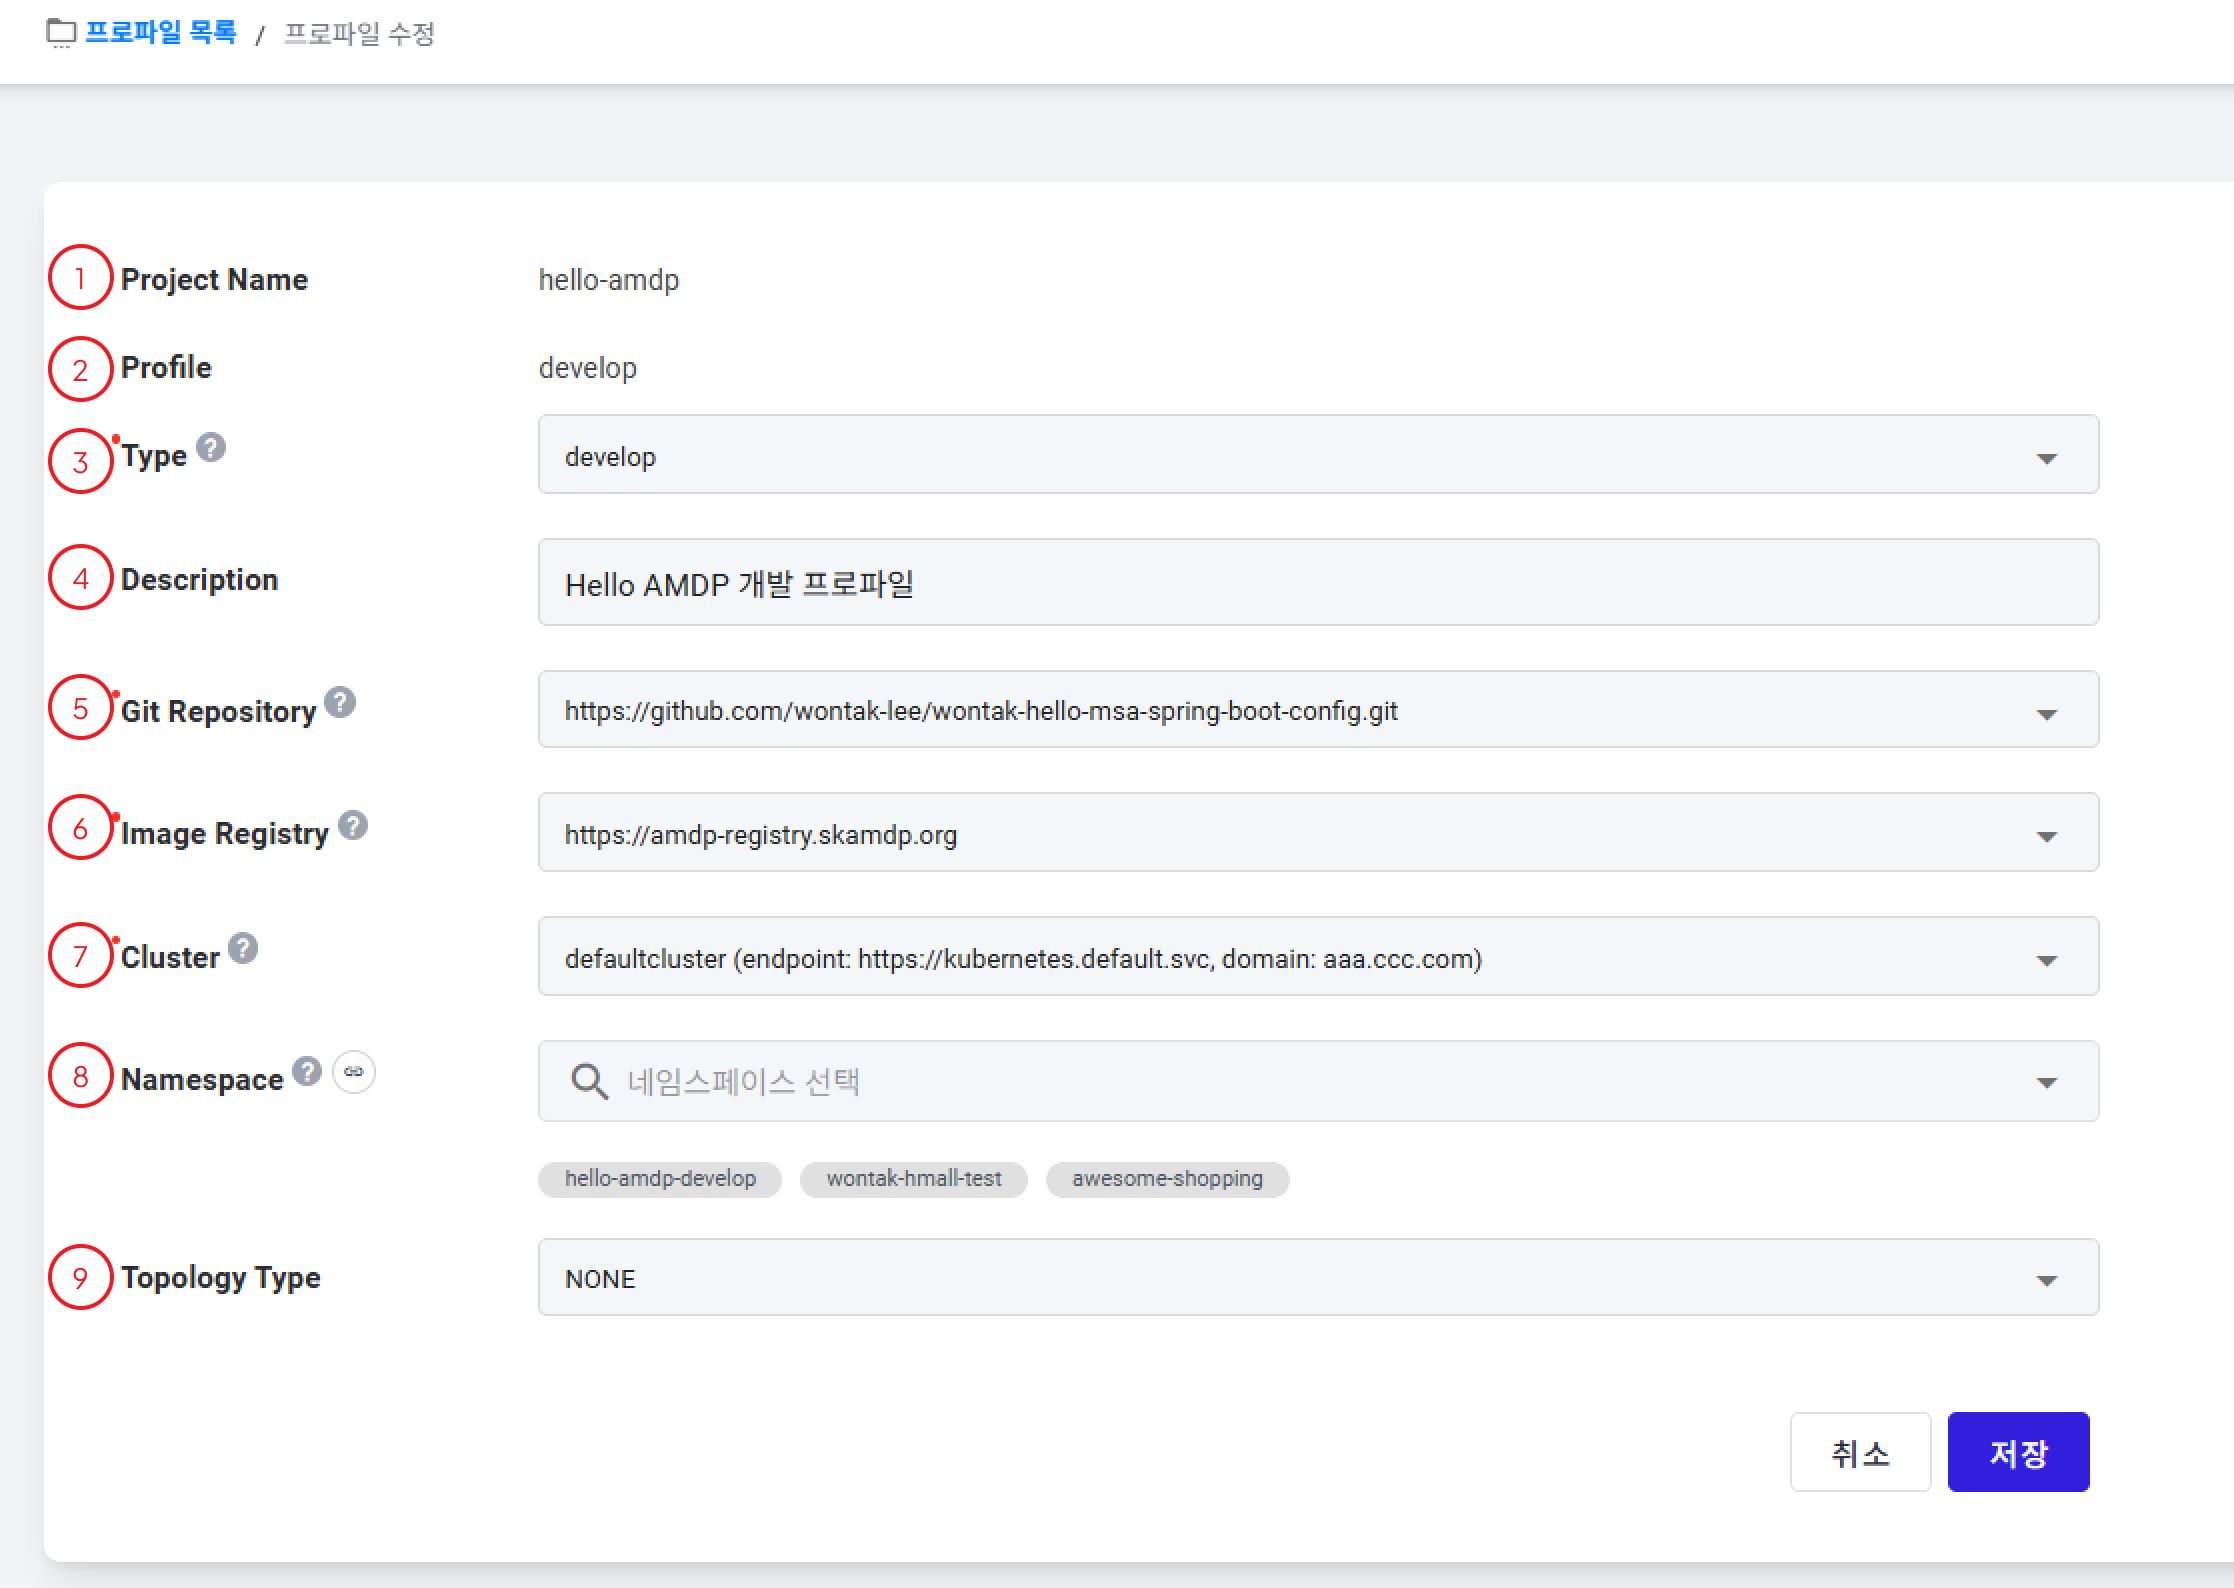
① Project Name: The name of the associated project. Cannot be changed.
② Profile: The current name of the profile. Cannot be changed.
③ Type: Profile type (Develop / Test / Staging / Production).
④ Description: A description of the profile. You can change it to any content you want.
⑤ Git Repository: [ Mandatory ] Git information to store profile settings. It can be changed to other registered profile setting Git information.
⑥ Image Registry: [ Mandatory ] Image repository information for storing container images created after building applications registered in the profile. It can be changed to another registered image repository.
⑦ Cluster: [ Mandatory ] Kubernetes cluster information where the resources of the profile will be deployed. It can be changed to another registered cluster.
⑧ Namespace: You can specify the Namespace for managing the deployment of the profile's resources. Only the namespaces registered here can be specified as the Namespace when registering resources.
⑨ Topology Type: You can choose a topology type to determine the distribution method of cluster nodes.
- NONE: The default choice, no specific nodes are designated.
- NODE_GROUP: Deployment is specified only to nodes containing the same Label, using
Node Affinity settings.
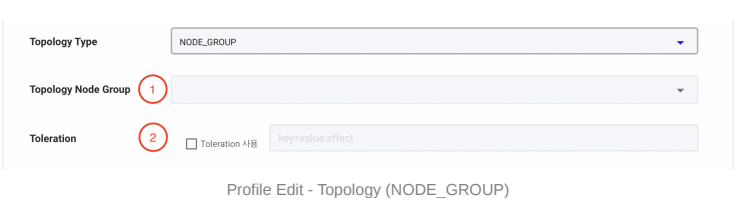
① Topology Node Group: Enter the Label of the nodes to specify for deployment.
② Toleration: Settings for key, value, effect to deploy on specific nodes with Taint settings.
- TOPOLOGY_SPREAD: This is a setting for distributing deployment across one or more topology domains based on a specified topology key.
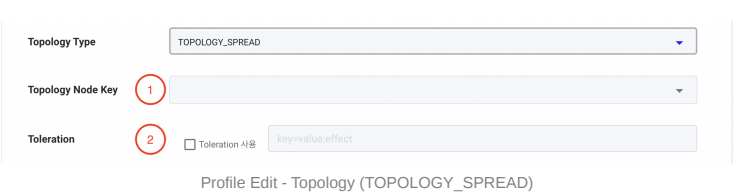
① Topology Node Key: This setting is used for distributing deployment by utilizing a key commonly used in node Labels.
② Toleration: It is the same as NODE_GROUP .
Profile Cloning
Clicking the Clone button takes you to a page where you can clone all information (Git, Image registry, applications, etc.) associated with a profile. The image below shows the default settings for profile cloning.
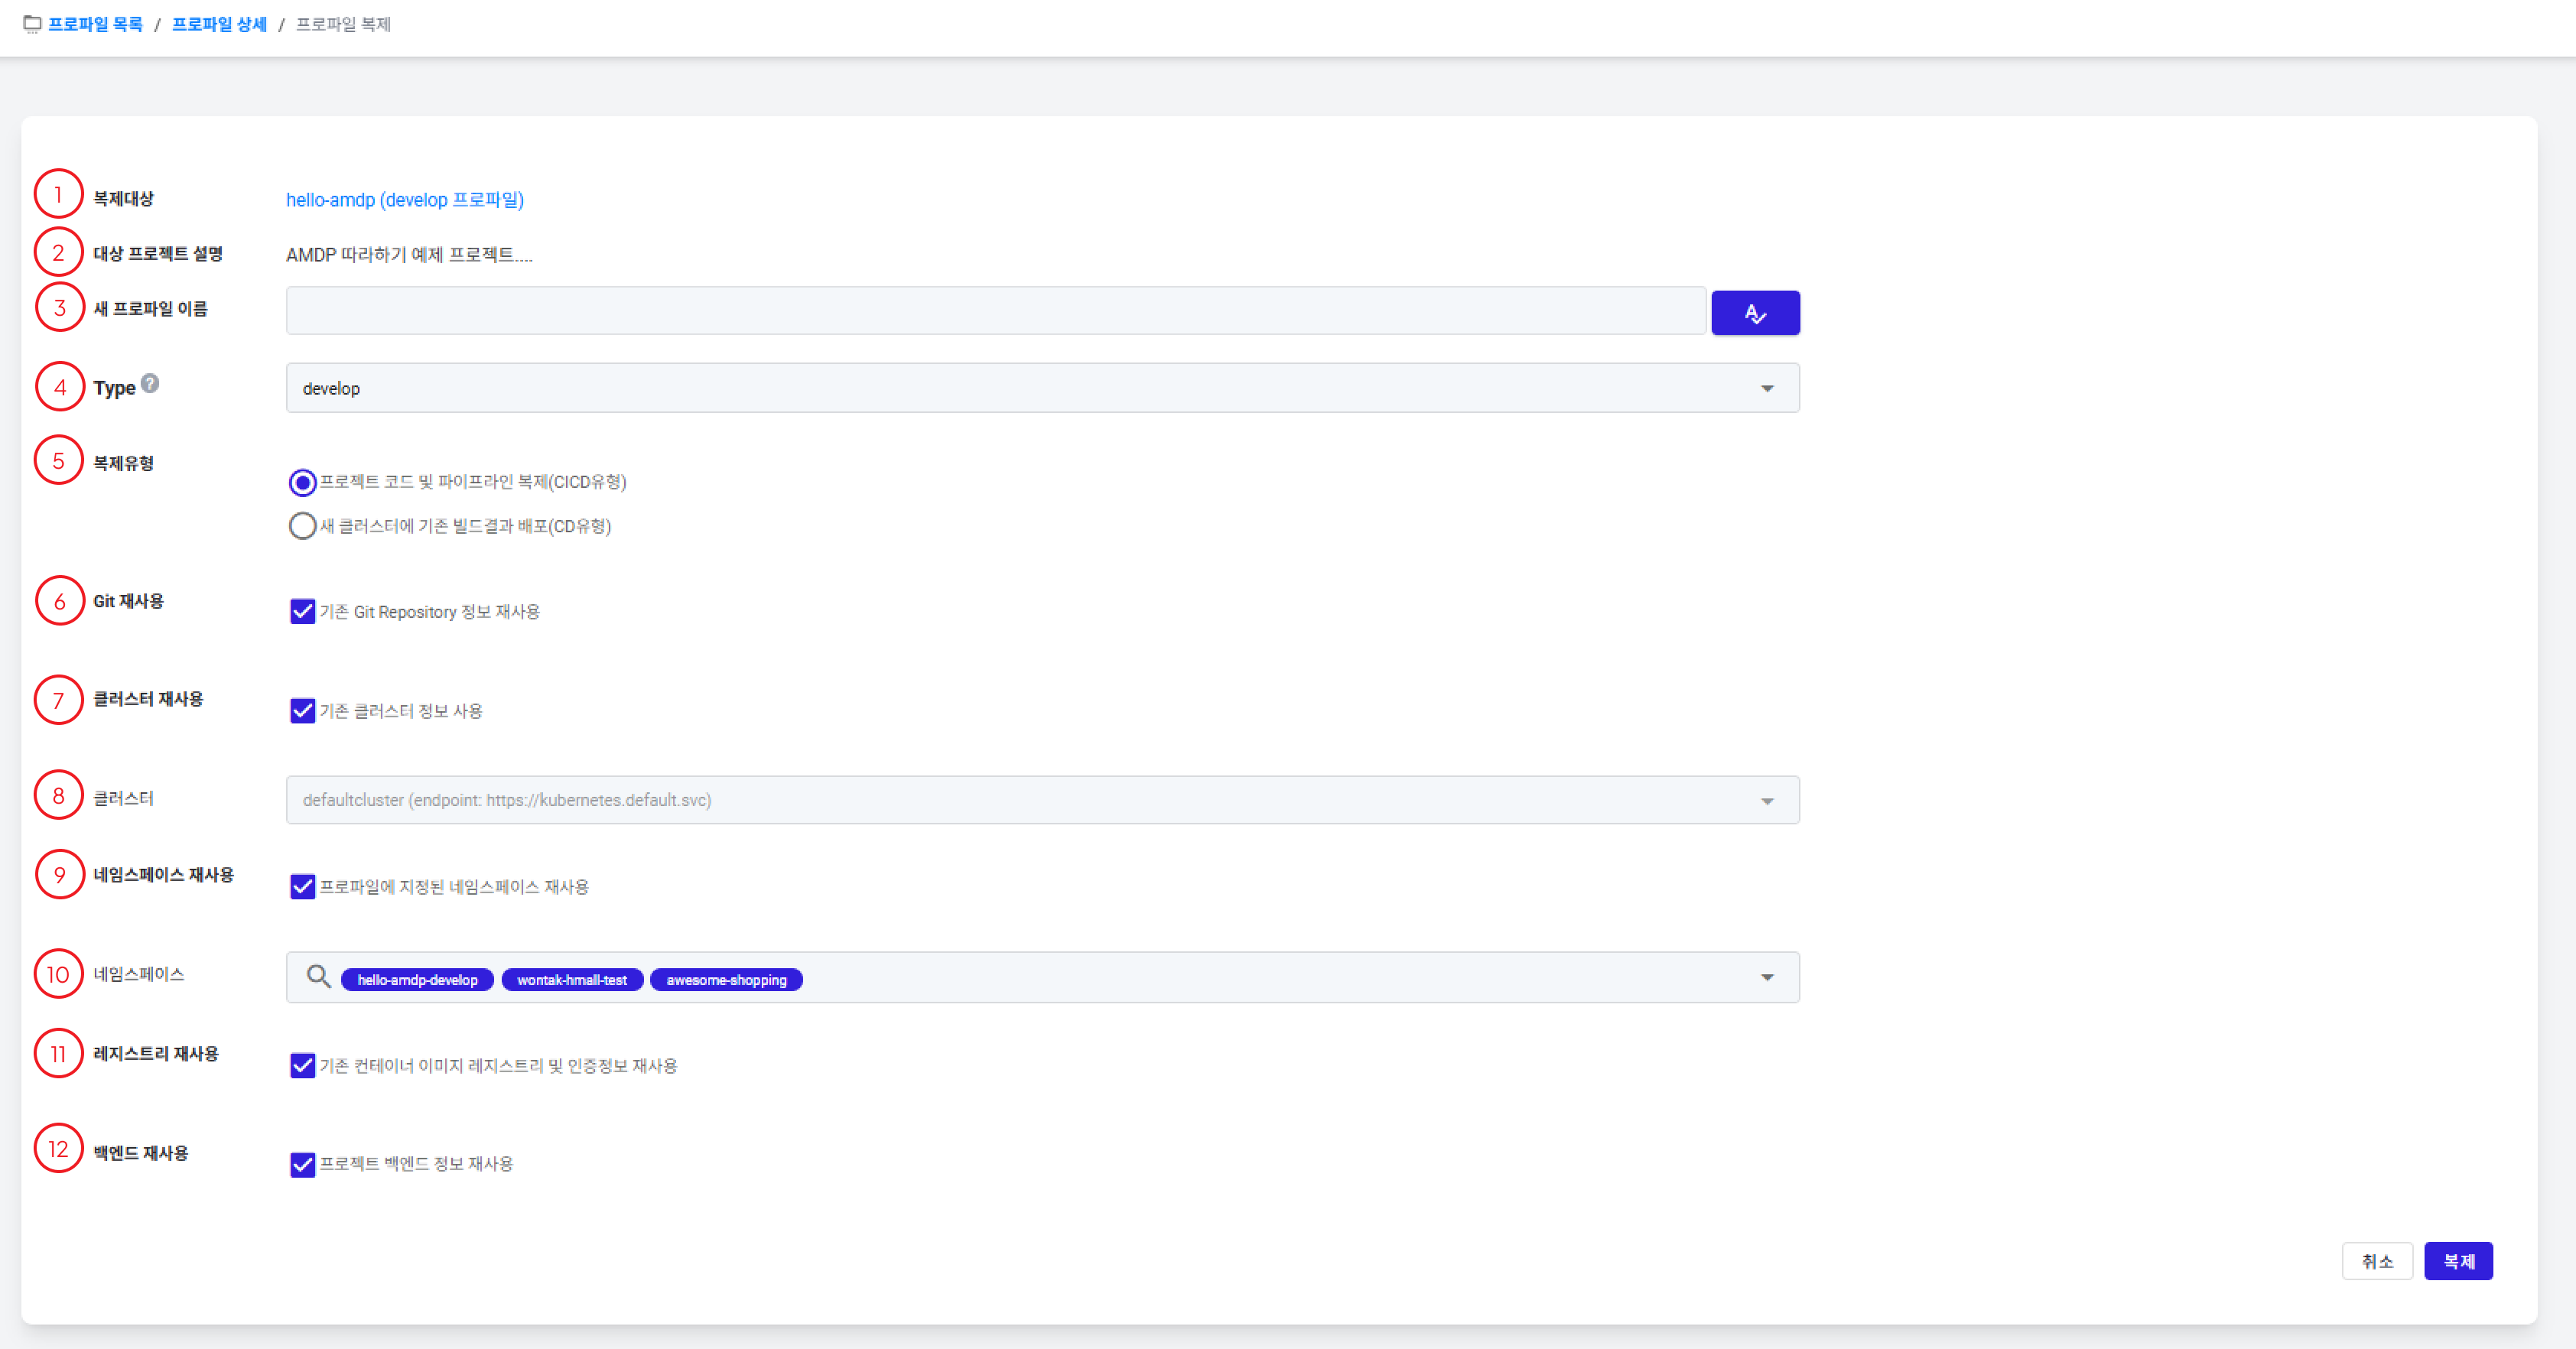
① Target for Cloning: The name of the profile being cloned.
② Description of Target Project: The description of the project being cloned.
③ New Profile Name: Enter the name of the new profile being created. Use the button on the right to check if the profile name already exists in the project and ensure a unique profile is created.
④ Type: Profile type (Develop / Test / Staging / Production).
⑤ Type of Cloning: Depending on the project deployment settings in the CICD tab of the profile details, choose one of two types.
- Clone project code and pipeline (CICD type): If the profile has CICD settings.
- Deploy existing build results to a new cluster (CD type): If the profile has only CD settings.
⑥ Reuse Git: This option is available only if the CICD type is selected. Select this if you want to use the same Git information as the profile being cloned. If you want to use different profile setting Git information, unselect this and choose from the displayed Git repository options.
New profile setting Git information must be registered in project management to be selectable. For more details, see Project Management.
⑦ Reuse Cluster: Select this if you want to deploy to the same cluster as the profile being cloned. If you want to deploy to a different cluster, unselect this and choose from the cluster list.
The cluster to be changed must be registered in cluster management to be selectable. For more details, see Cluster Registration Management.
⑧ Cluster: Activated if option ⑥ is deselected.
⑨ Reuse Namespace: Select this to use the same namespace as the profile being cloned. However, this option is only available if you use the existing cluster information.
⑩ Namespace: If not reusing the namespace, additional selection and changes are possible.
⑪ Reuse Registry: Selecting this reuses the container image registry of the profile being cloned. To use a different container image registry, unselect this and choose from the displayed image registry options.
New container image registry must be registered in project management to be selectable. For more details, see Project Configuration Management.
⑫ Reuse Backend: Select this if you want to register the BACKING SERVICE.
After setting up profile cloning, click the clone button at the bottom right to proceed with the application cloning process in the profile cloning wizard.
The first step is the actualization of backend, volume, and configuration information. When you access the BACKING SERVICE, STORAGE, ENV/PROPERTIES tabs, an actualize button appears for each database and storage. Click this button to reconfirm the current settings and save them.
If new values need to be applied to match the new profile, modifications can be made. For example, if the database address includes the database name, it may need to be modified. Also, for storage, since the namespace and storage class are empty, new values must be specified.
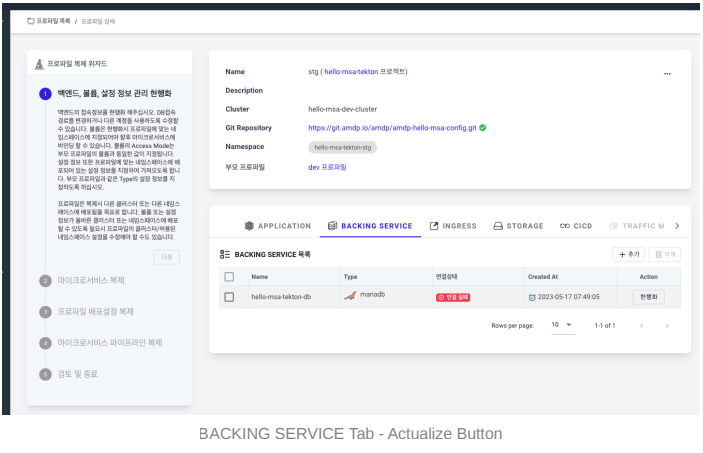
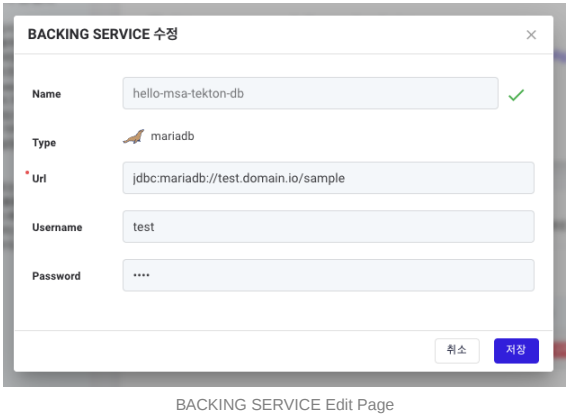
When clicking the BACKING SERVICE actualize button, an edit dialog appears, and you modify the address, access account according to the cloned profile.
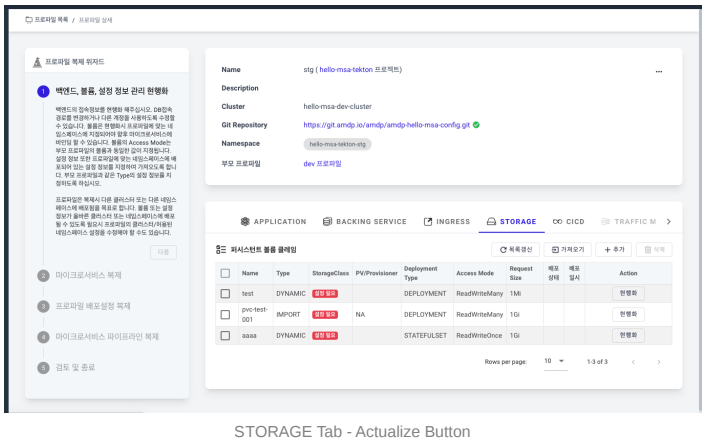
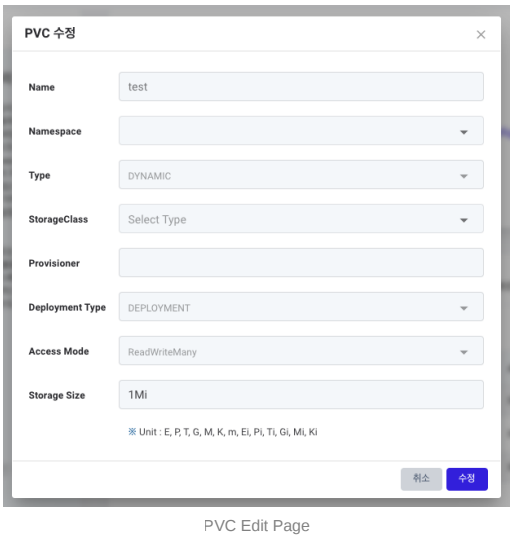
When clicking the PVC actualize button, an edit dialog appears, and you specify namespace value, storage class, and storage size value for the cloned profile.
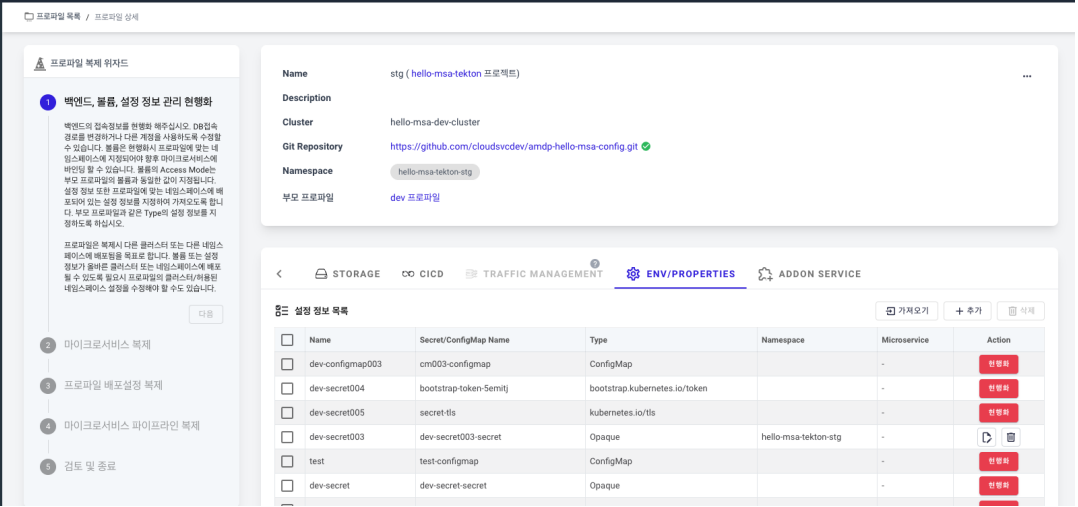
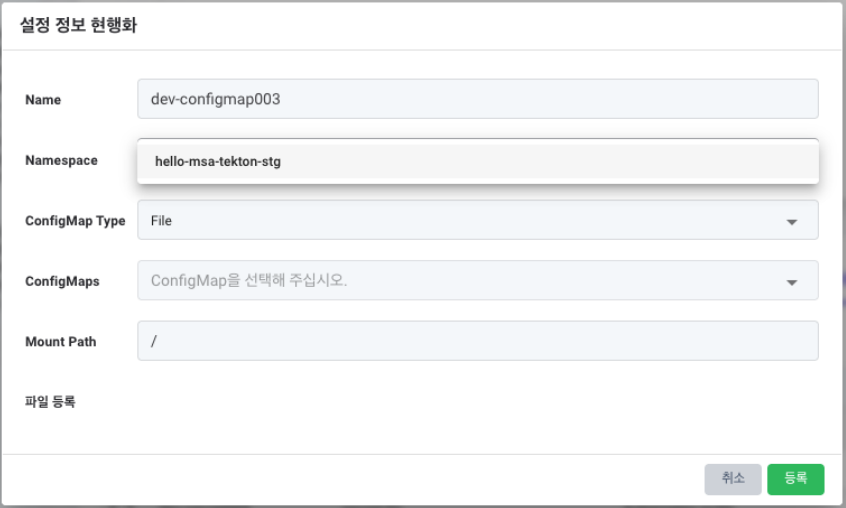
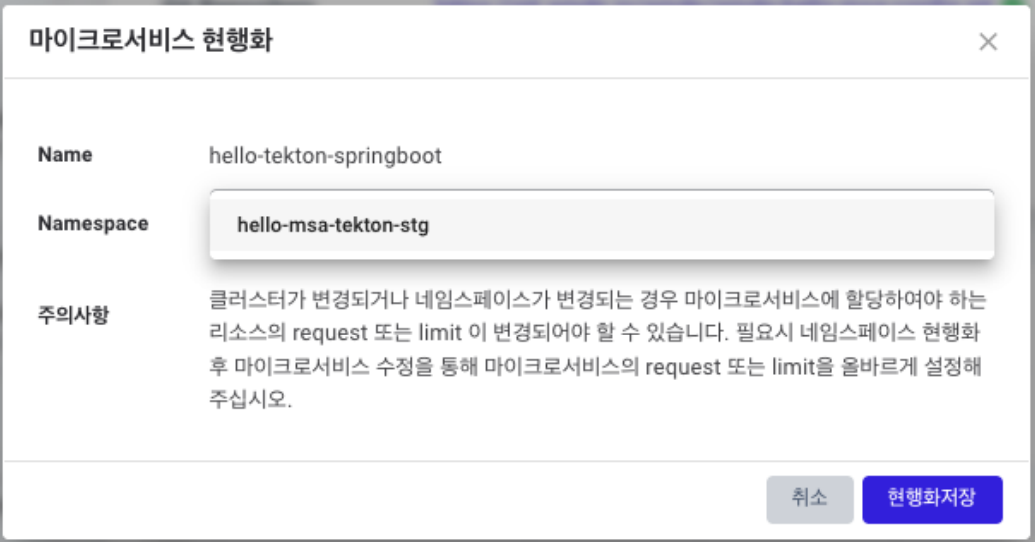
Actualize the configuration information by checking the namespace and config map reference methods.
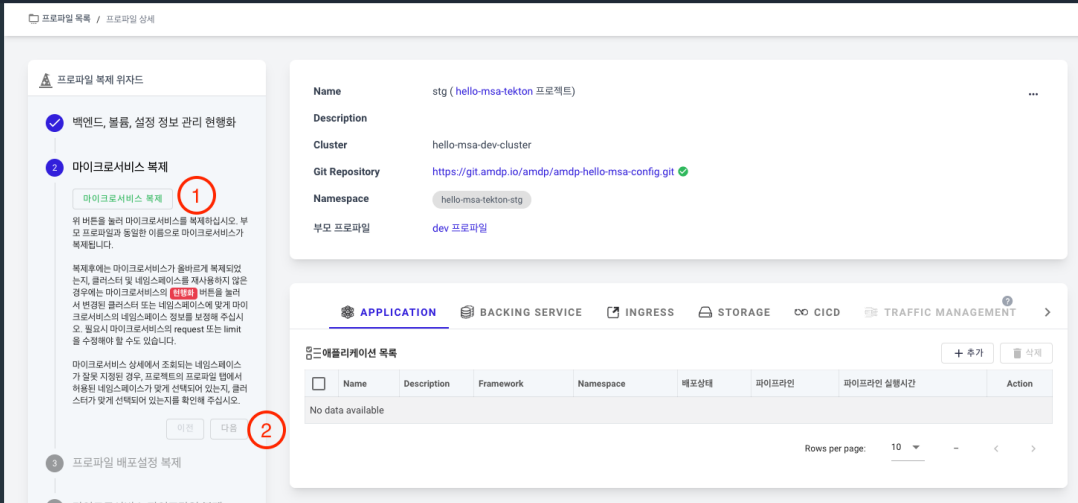
After completing the actualization of backend, volume, and configuration information management, proceed to the application cloning step. Click the Clone Microservices button (①) to clone the application to the new profile.
Click the actualize button in the cloned application list to proceed with the actualization.
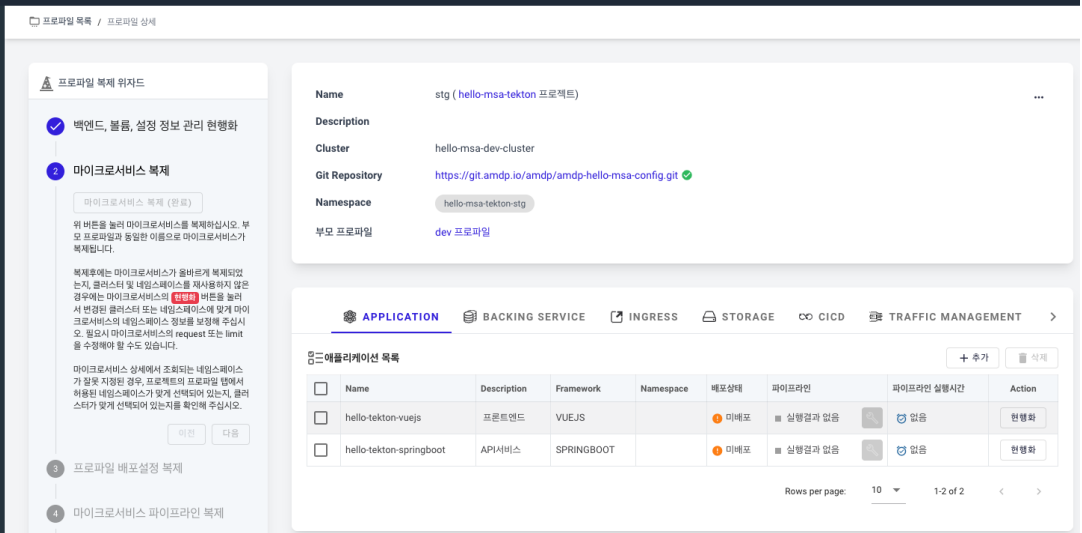
When the application actualization popup appears, specify the namespace where the application will be deployed and complete the actualization. Once the application cloning step is completed, click Next to proceed to the next step.
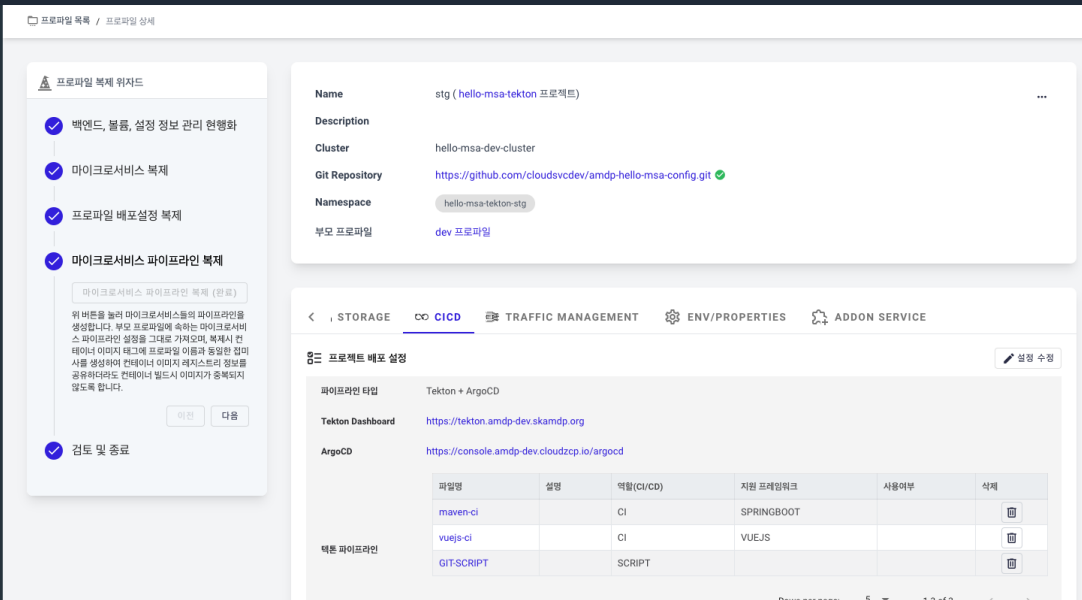
Clone the profile deployment settings to import the same settings as the original profile. Clicking the button confirms that the entire settings have been carried over identically.

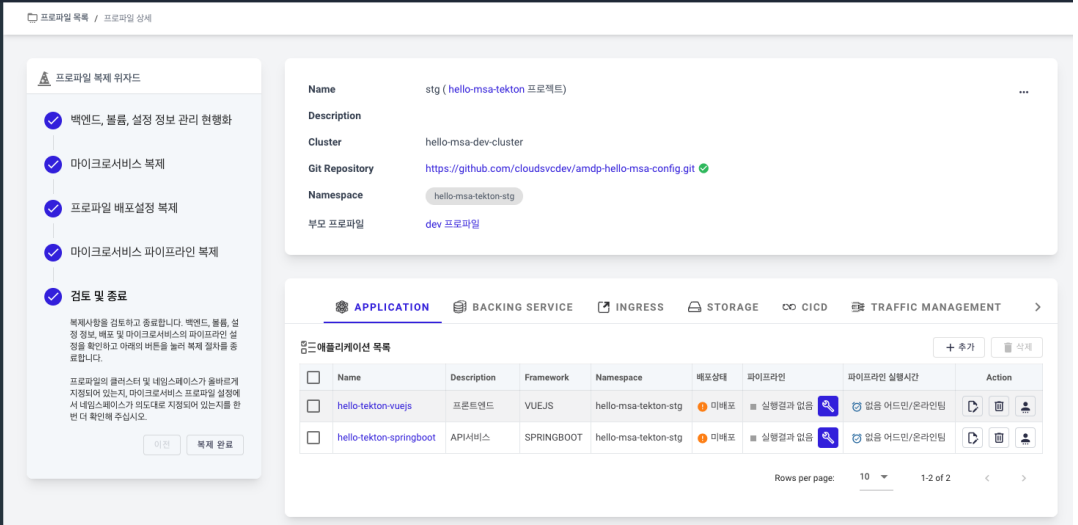
After the final review of the settings, complete the profile cloning.
Once the cloning is complete, it appears like a regular profile, and you can activate the application's pipeline to build and deploy the actual application. For detailed information, refer to the CICD Pipeline Management document.
Reopening Profile Creation Wizard
Although the wizard is not displayed by default after profile creation, you can reopen it to review the settings for any issues. Use the Open Wizard menu to reopen the profile creation wizard
This cannot be done with cloned profiles.