Application CICD Pipeline Execution
Application CICD Pipeline Execution
Once the pipeline settings are completed, the execution tab allows the actual build and deployment necessary during the development process. Automation can be configured through webhook and scheduling settings.
Pipeline Execution Configuration
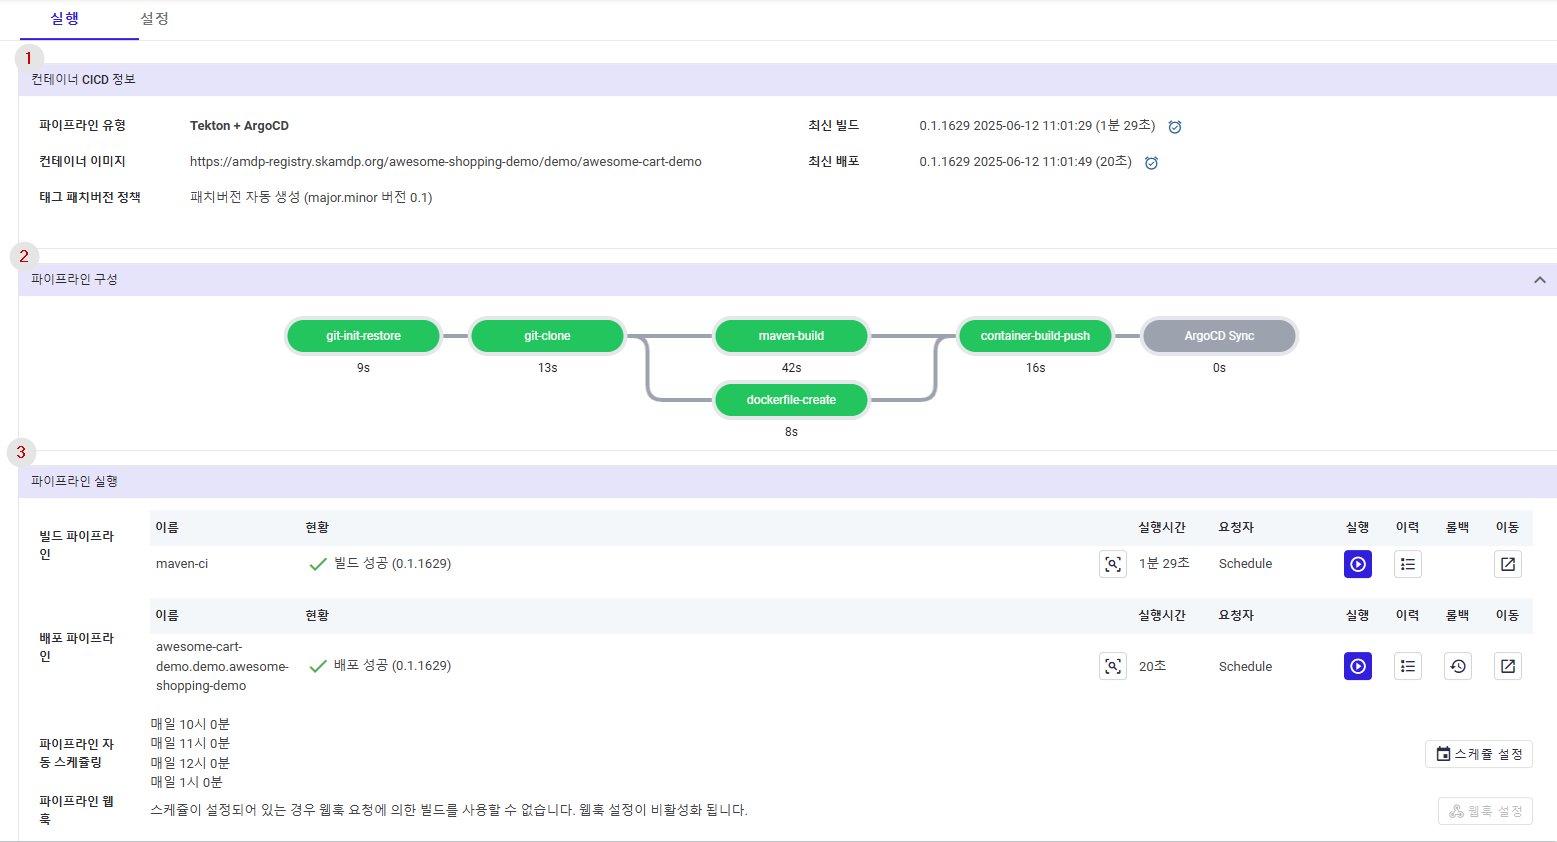
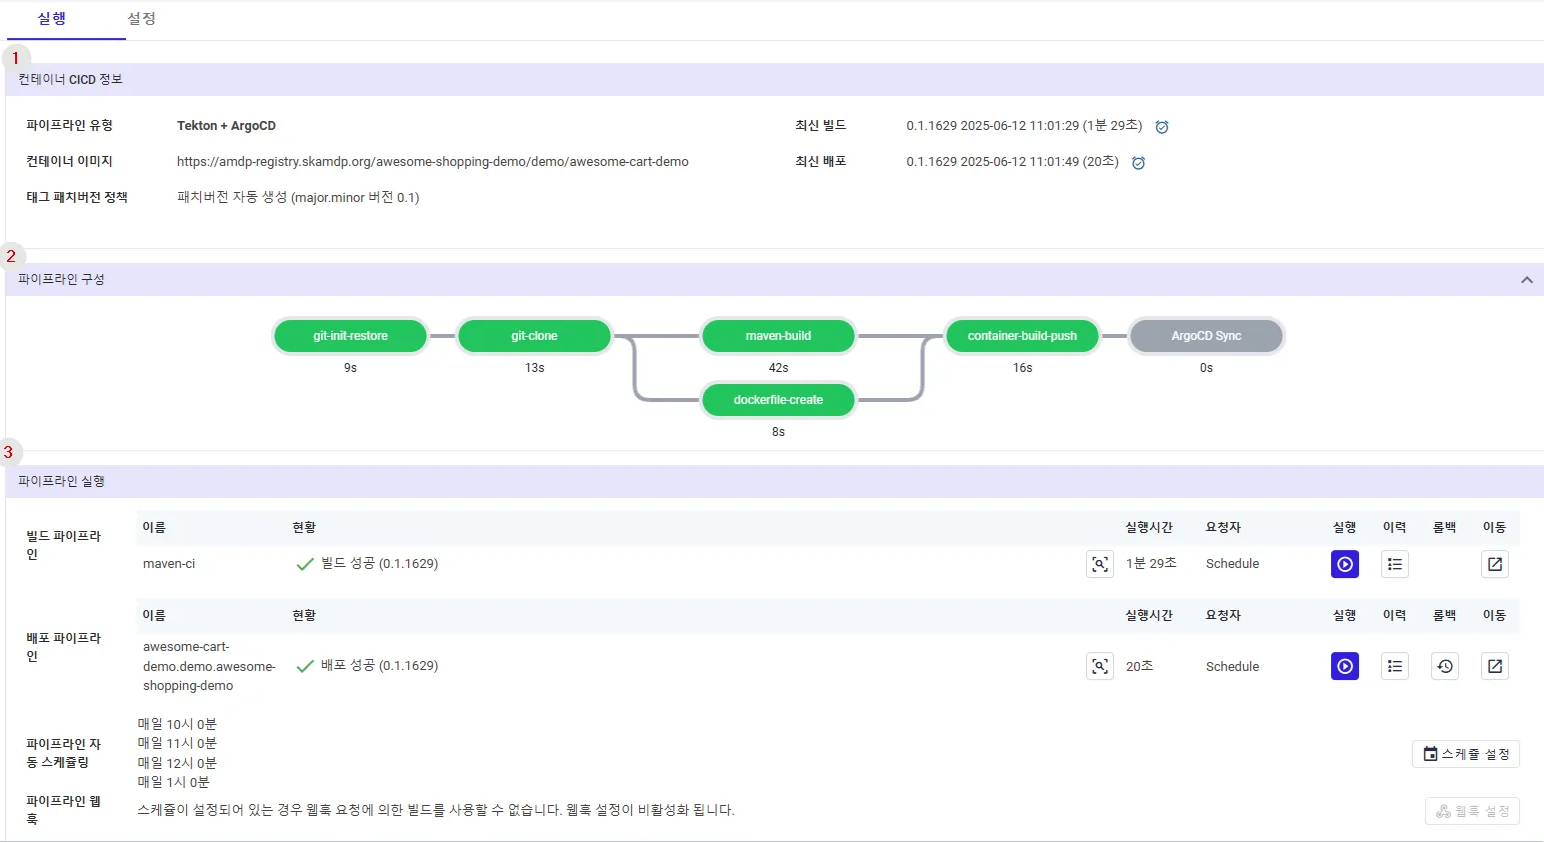

① Displays overall information about the build and deployment.
- Pipeline Type : Displays the selected pipeline type. Tekton+ ArgoCD or Jenkins + ArgoCD.
- Container Image : The actual container image address used during build and deployment.
- Tag Patch Version Policy : Indicates whether the patch version is automatically or manually generated, as defined in the settings tab.
- Last Build Successful Tag/Time : Information about the last successful build image tag version and execution time.
- Last Deployment Successful Tag/Time : Information about the last successful deployment image tag version and execution time.
② Pipeline Configuration: Show the flow of tasks with actual time to handle theses task in detail.
③ Pipeline Execution : Provides the functionality to execute the build and deployment as per user request. You can view the history and detailed information about each execution.
④ Script Execution : If the deployment policy settings in the profile include a pipeline code with a script role, an additional script execution area is displayed. These are independent tasks executed in the form of scripts, separate from microservice build and deployment.
Pipeline Execution
The pipeline execution area is most frequently used by users to deploy developed microservices to clusters. It contains the name of the registered pipeline code, the last executed status, execution time, who executed it, and buttons for actual execution and management.
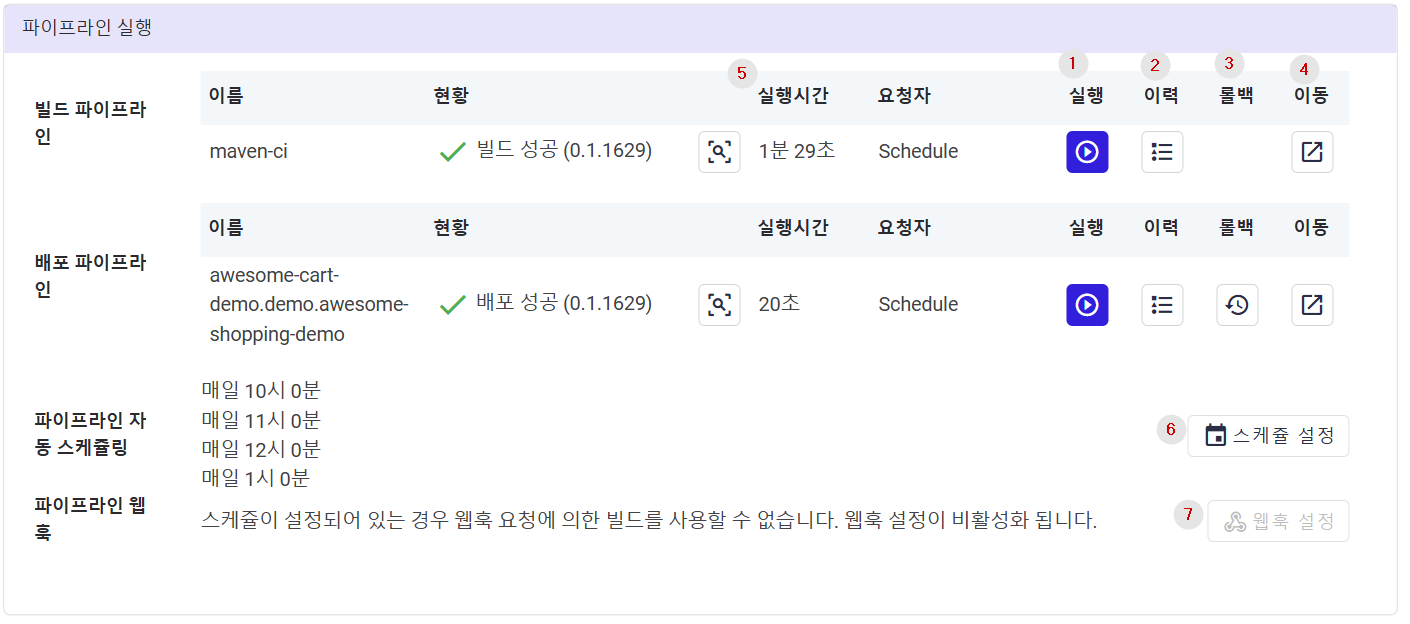
① Execute: Executes the build or deployment pipeline. Upon execution, a dialog suitable for build and deployment is displayed.
② History: Opens a dialog to view the history of the build or deployment. You can view the history and navigate to detailed information about the execution.
③ Rollback: For deployment pipelines, you can proceed with rollback. It displays a dialog to move to a particular version based on the previous deployment history.
④ Go To: If a web address is available for accessing the Addon service of the pipeline tool, use the Go To button to navigate to the respective webpage.
⑤ Pipeline Execution: Navigate to the execution history page to view errors or logs that occurred during the pipeline execution.
⑥ Schedule Setting Button : Provides a scheduling feature that can be executed periodically. The webhook and scheduling functions cannot be used simultaneously.
⑦ Webhook Setting Button : Online git services offer the functionality to call an external address whenever a commit (push) occurs. This generates an address that can be called by the webhook event triggered by the git service.
Pipeline Execution Dialog
When the execute button for the build pipeline in area ① is pressed, the following build pipeline execution dialog is displayed.
1. Build Pipeline Execution - Automatic Patch Version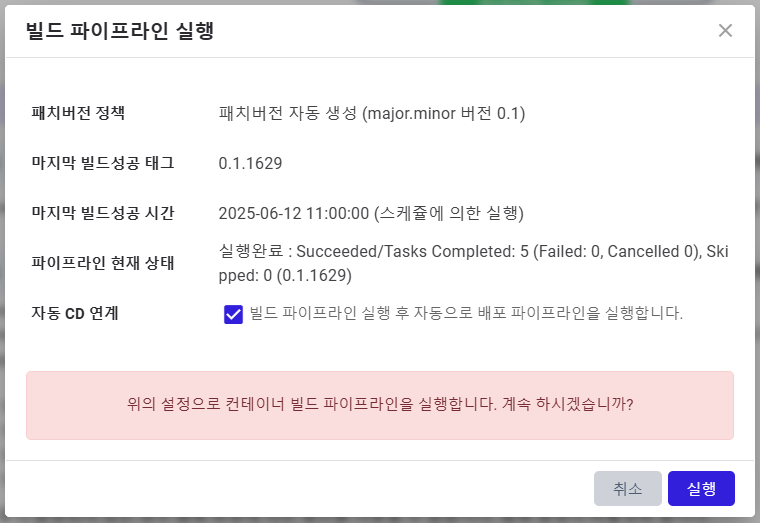
If Automatically create patch version is set in the pipeline settings, the dialog appears as above.
- Patch Version Policy : Indicates whether the patch version is created automatically or manually.
- Last Build Successful Tag : Displays the version of the last successful build, which increases by 1 in the third patch version for automatic creation.
- Last Build Successful Time : Shows the time of the last successful build.
- Automatic CD Linkage: If you wish to execute the deployment pipeline automatically after the build, click the checkbox in the automatic CD linkage area and then press the execute button.
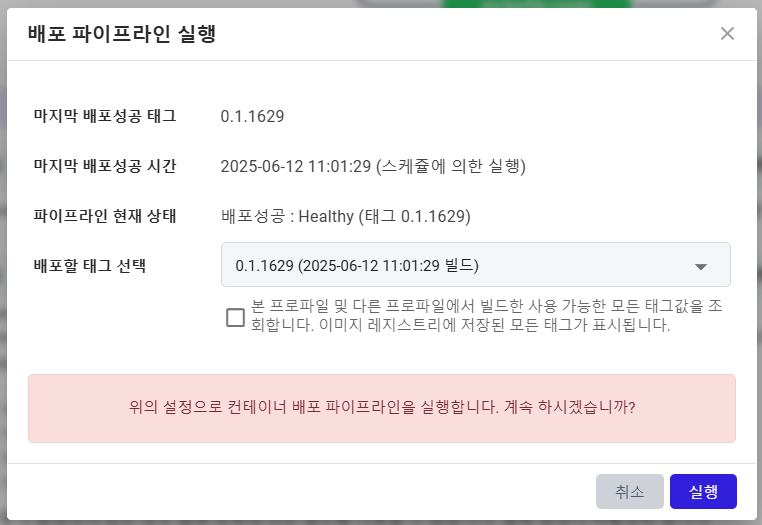
When the execute button in the deployment pipeline area is pressed, the dialog above is displayed. Unlike the build pipeline, the following field is additionally displayed:
- Select Tag to Deploy : Choose the version you want to deploy and execute it to deploy the previously built container image to the cluster.
- If you want to deploy based on versions stored in the container image registry irrespective of deployment history, check the checkbox in the “Select Tag to Deploy” area. A list of versions stored in the container image registry will be displayed
Pipeline Execution History
When the history button in area ② is pressed, a dialog to view deployment history is displayed. You can view detailed information about the pipeline execution by clicking the magnifying glass icon in the Success Status column.
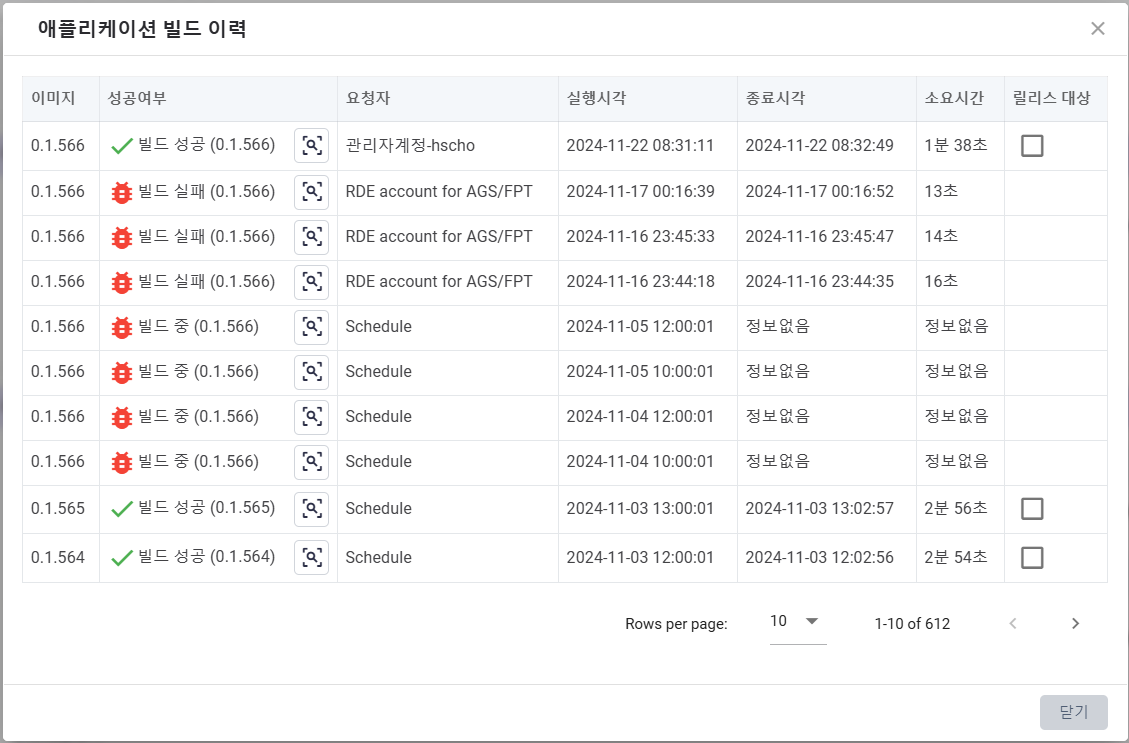
- Pipeline Name : The name of the pipeline code whose execution history is being viewed.
- Pipeline Role : Indicates whether it is a build (CI), deployment (CD), or script (SCRIPT).
- The table provides overall information about the pipeline execution history. Click the magnifying glass button in the “Success Status” column for detailed information.
Application Deployment Rollback
When the rollback button of the deployment pipeline is pressed, the following dialog is displayed.
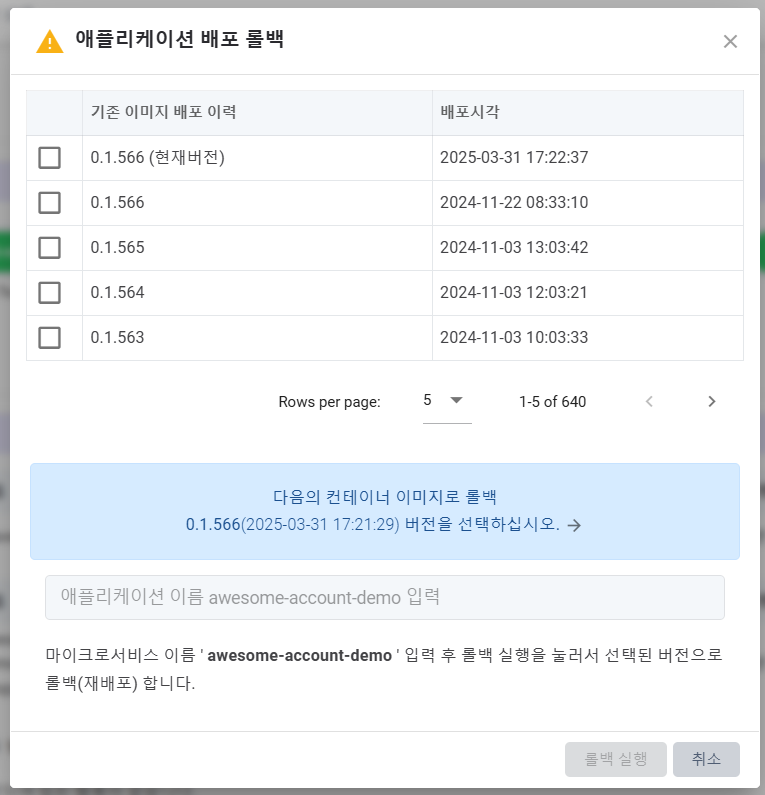
- Use the checkbox in the table to select the deployment history you want to rollback to.
- The Application Name Entry Area requires entering the name of the application. This is a safety measure to prevent accidental rollbacks.
- Once the rollback target version is checked and the application name is entered, the Execute Rollback button becomes active, allowing you to proceed with the rollback.
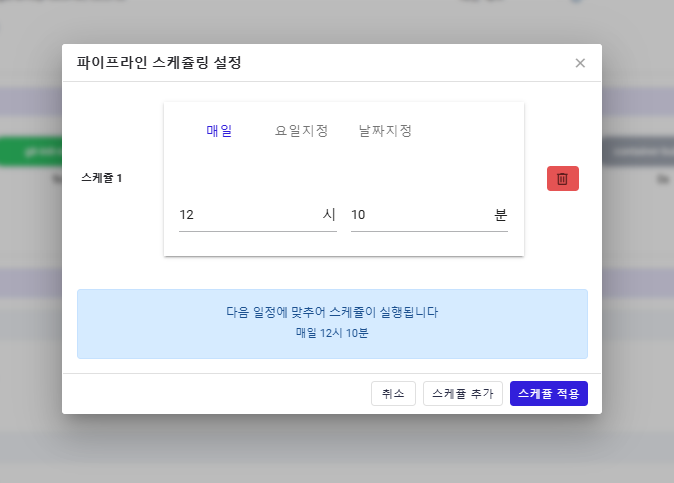
Build and Deployment Scheduling Settings
Setting a schedule allows you to execute the pipeline on the designated date/time. The build and deployment will automatically execute on the specified schedule date.
When click on the “Schedule setting”, there is an popup displayed. Click on button Add Schedule to have 3 setting options:
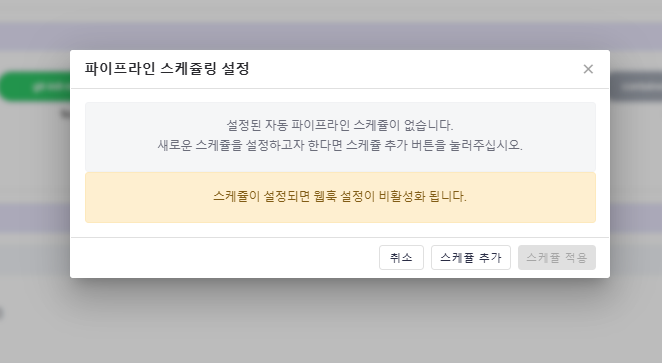
Daily setting: Defines a schedule for what time it will execute in a daily basic.
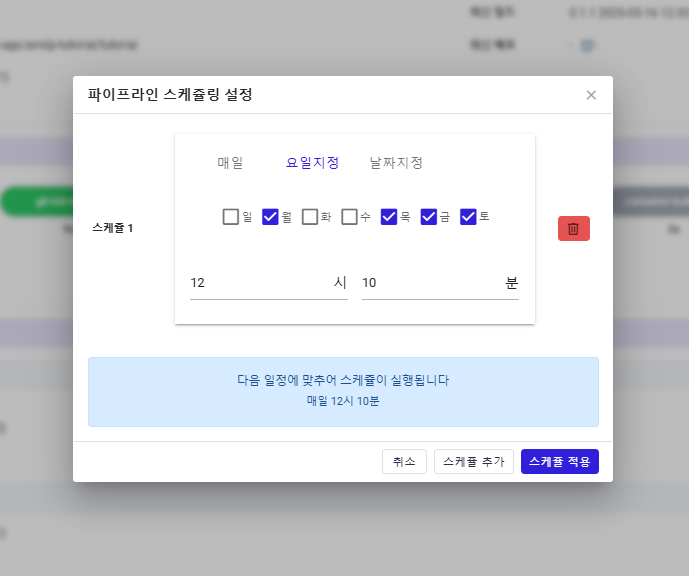
Day of the Week: Defines a schedule for what time it will execute on the selected day in a week (Monday, Tuesday, Wednesday, etc.).
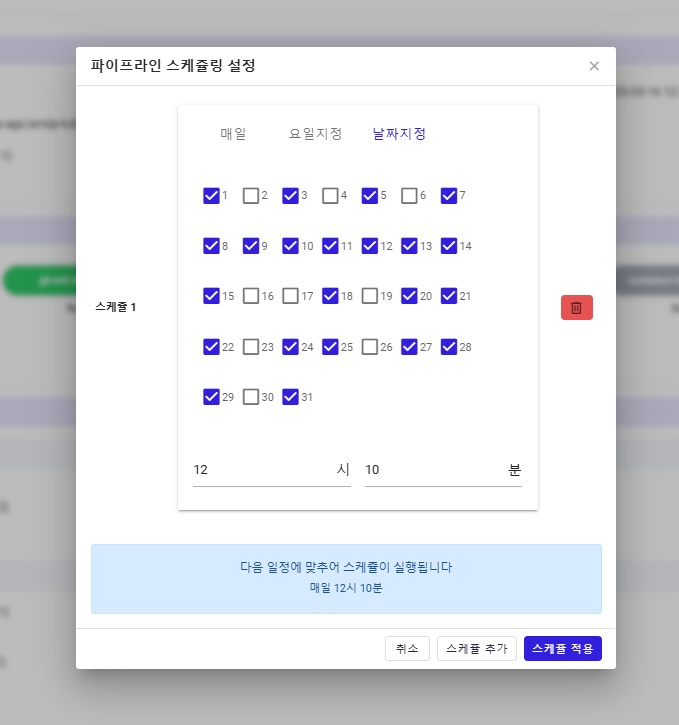
Date Specified : Defines a schedule for what time it will execute on the selected date in a month (1st, 2nd, …, 31st).
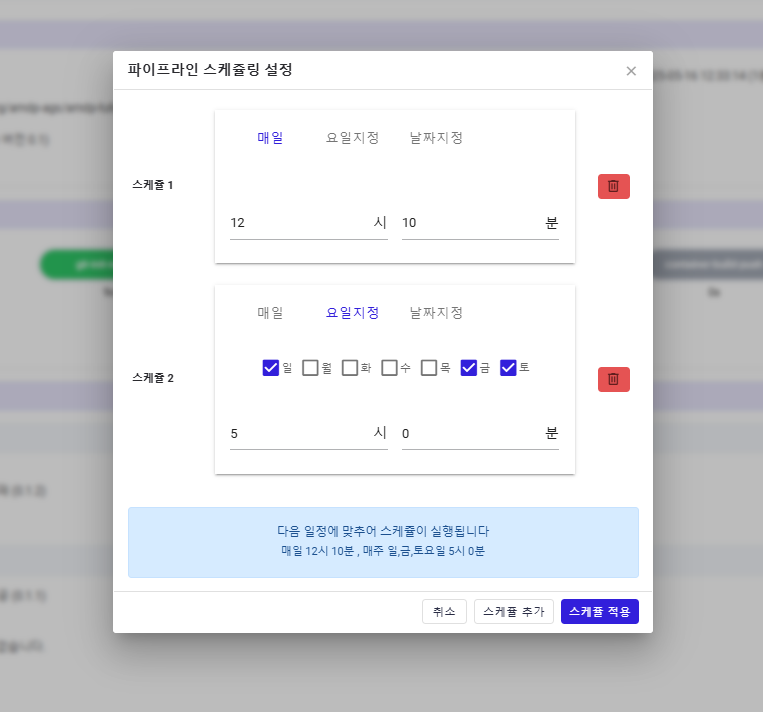
Multiple schedules can be set using the “Add Schedule” button.
Webhook Settings
Pressing the webhook setting button displays the following dialog. As shown below, if you wish to register a build and deployment pipeline code and webhook with a git repository, select the checkbox.
If you want to manually call the pipeline via an API call instead of a git webhook event, uncheck the box. Once the webhook is saved, the webhook address is displayed on the upper screen. Copy this and register it with the required webhook to use it.
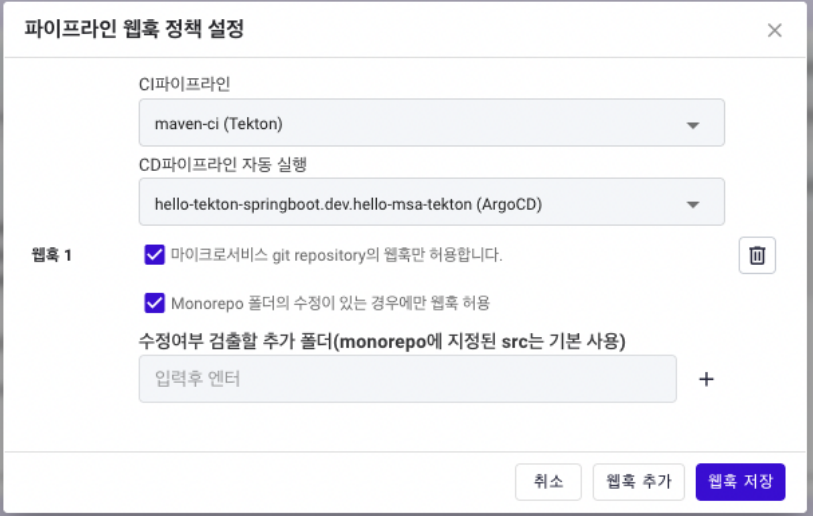
- Add Webhook Button : Allows the creation of multiple webhook endpoints for a single microservice.
- CI (CI Pipeline) : Specifies the CI pipeline to be executed upon webhook call.
- CD (Automatic Execution of CD Pipeline) : Select the ArgoCD pipeline if you wish to execute deployment after the build.
- First Checkbox : By default, the webhook only executes if the git repository and branch of the application match exactly. Uncheck this box to execute the pipeline via an API call instead of a git service.
- Second Checkbox and Additional Folder Input : In frontend development, a single git repository might contain multiple application codes (monorepo structure), allowing easy sharing of common code.
If this monorepo path information is specified for the application, this checkbox and input box are additionally displayed.
Although other applications' code updates may trigger the webhook due to the use of the same git repo, AMDP by default only executes the webhook if there are modifications under the specified monorepo path of the microservice.
- Folder for Detecting Modifications: If a common library is stored in a folder within the monorepo, specify it here. If the common library is modified, applications dependent on it should also be built.
Script Pipeline Execution
Clicking the execute button for the script pipeline displays the following dialog, allowing you to select and execute a script code stored in the pipeline code.
Script provision and writing are consulting areas, so please consult with the AMDP representative.
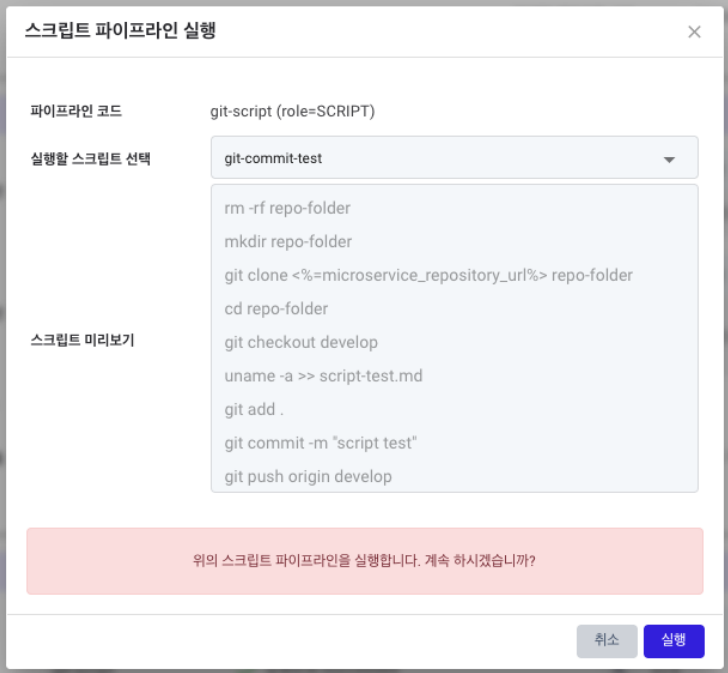
- Pipeline Code : The name of the pipeline code set to perform the script role. The example specified here is a script pipeline code with a git cli included container as the base, customizable depending on whether git cli or another tool is included in the base container.
- Select Script to Execute : Predefined scripts in the base code template or pipeline code registration settings are displayed. Select the desired script.
- Script Preview : Displays the script selected earlier for the user.
- Execute Button : Use this button to actually execute the script.