Manage Applications
ZCP console allows you to manage the basic information of the application, including:
- Manage the application name
- Manage the source repository to build from
- Manage the image registry to deploy after building
You can select the name of the application from the application search screen or click the detail button on the Actions menu to view the application in detail.
The details screen is organized into three tabs: Overview, Basic Info, and Build Pipeline
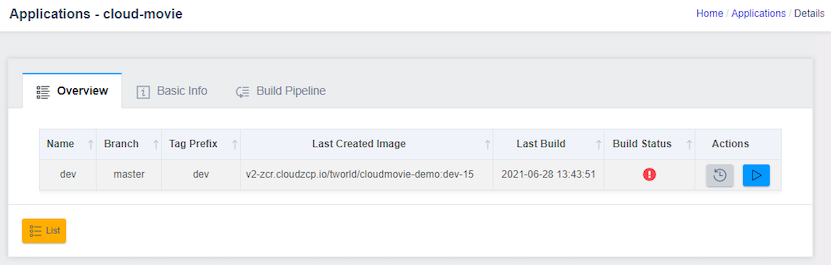
Overview
On the Overview tab, you can view a list of the application's pipelines, and information about each pipeline.
-
Name: The pipeline name to identify the pipeline.
-
Branch: The name of the branch to check out sources to when performing a build.
-
Tag Prefix: The prefix name that is prefixed to the tag name when automatically generating tags during a build. Valid only if Auto Tagging is set to Yes.
-
Last Created Image: The URL of the Image that was created the last time this pipeline ran.
-
Last Build: The time the last build was run.
-
Build Status: The result of the build, with each icon meaning Build Successful, Build Failed, or Running.

-
Actions: Buttons to perform actions on the pipeline, such as viewing history/logs and running a build.

Build an Application
The Overview tab screen shows a list of pipelines in your application. You can perform a build by clicking the Build icon on the Actions of the pipeline you want to build:

In the Build pop-up window, you can view a log of the build process. You can close the popup by clicking the OK button, at which point the build will continue on the server side and the build history will be updated when the build is complete.
While the build is performing, you can stop the build by clicking the Build Abort button:
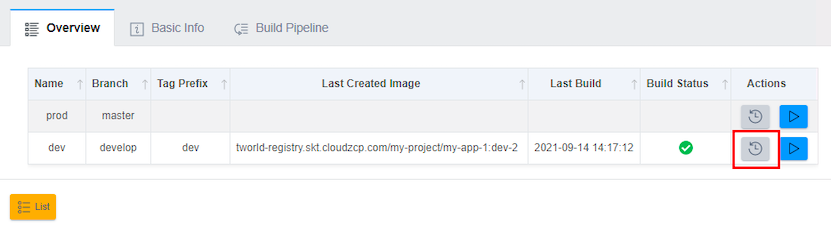
View Application Build History
The Overview tab screen shows a list of pipelines in your application. You can view the build history by clicking the History icon on the Actions of the pipeline you want to check:
The execution history of the last build is displayed in a card UI:

The details of each item are shown below:
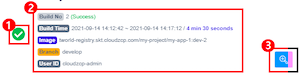
- The run result icon for the build. There are three states: build succeeded, build failed, and running.
- A summary of the build results.
- Build No: The build number. The build number is automatically picked each time a build is run. Each pipeline has its own build number. The content in parentheses is the build result.
- Build Time: The start time of the build and the end time of the build. The right side shows the overall duration of the build.
- Image: The URL of the Image that is the result of the build run. It consists of the Image Registry, project, repository, and tag number.
- Branch: The branch name of the source code used to perform the build.
- User ID: The ID of the user who performed this build.
- View build log button.
The build pipeline execution phases are structured into Tasks (parent menu) and Steps (child menu). Generally, tasks are divided into three stages: Source Checkout, Build, and Image Build & Push. If no specific build tools are configured for the pipeline, only Source Checkout and Image Build & Push stages will be perform. You can click on each stage to see the execution log for that stage.

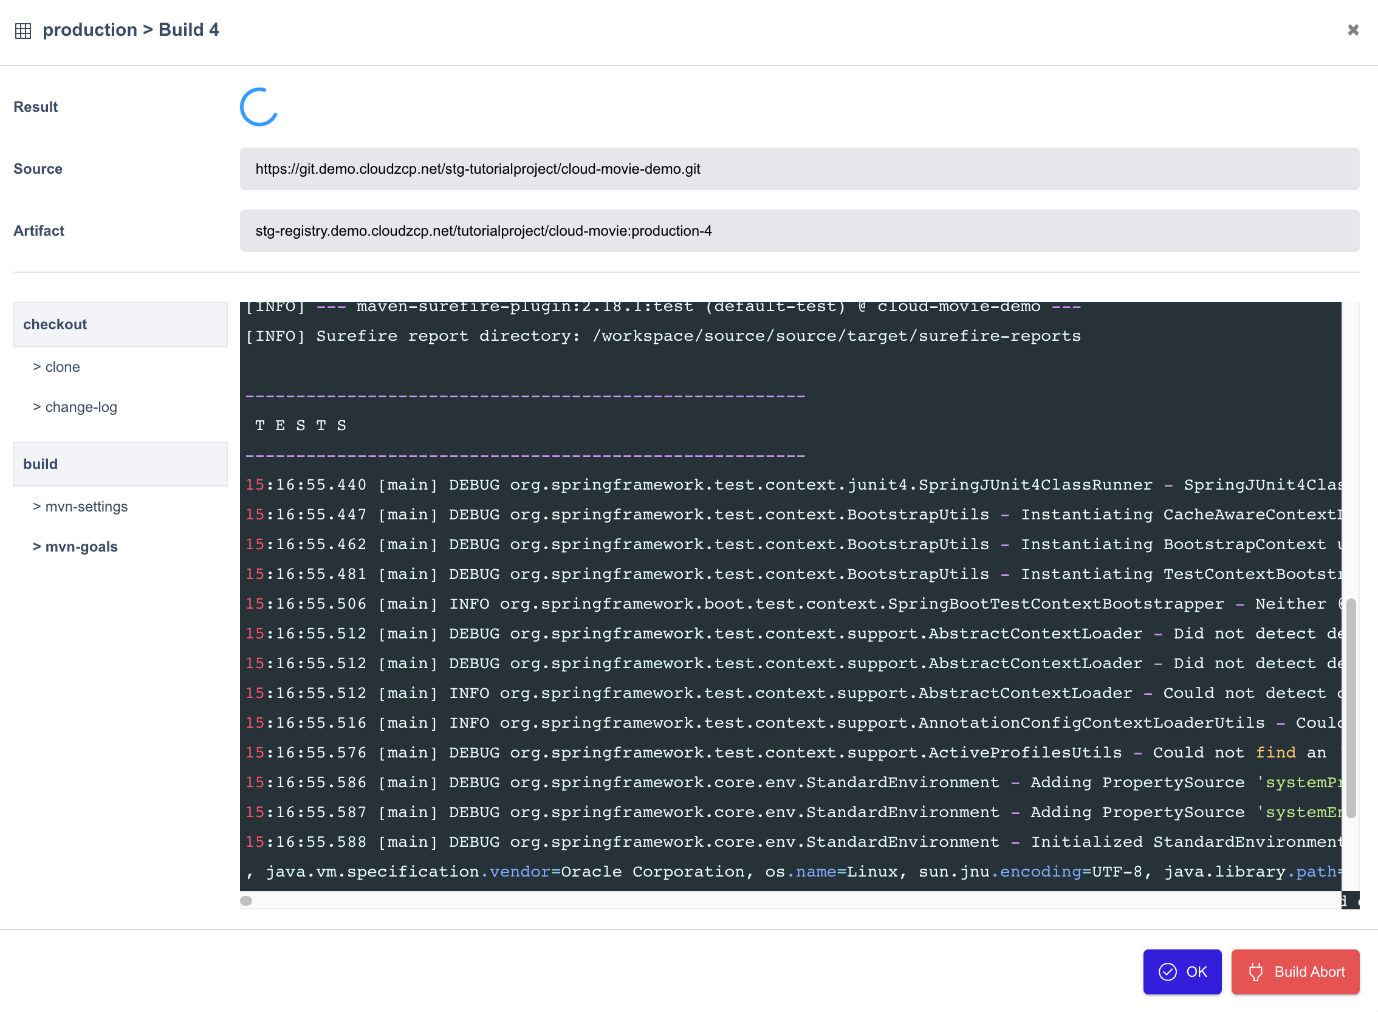
View Build Logs
This is the log detail screen output by the View Build Log button:
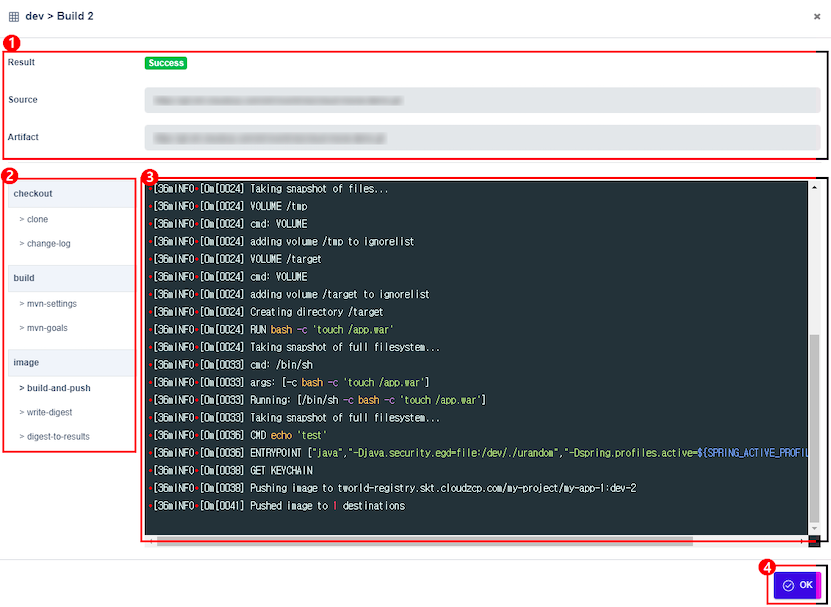
- The Build information section.
- The Build Steps section. Builds are performed according to three different steps, and each step selection outputs the log for that step.
- Result: Displays the result of running the build. If a build is running, a spinner is displayed.
- Source: Repository URL of the source code used when building.
- Artifact: Information about the output of the build. This is the URL of the Image that will be generated by this build.
- The Logs section, which displays the logs of the running build in real time. You can also view logs from past builds that have already finished running.
- Click the OK button to close the build log popup screen.
Application Pipeline
An application can create multiple build pipelines, each of which can be configured by specifying a buildBranch, buildTool, and buildOption to organize the pipeline. Additionally, you can limit the number of build histories and set the tagging of the images to be deployed.
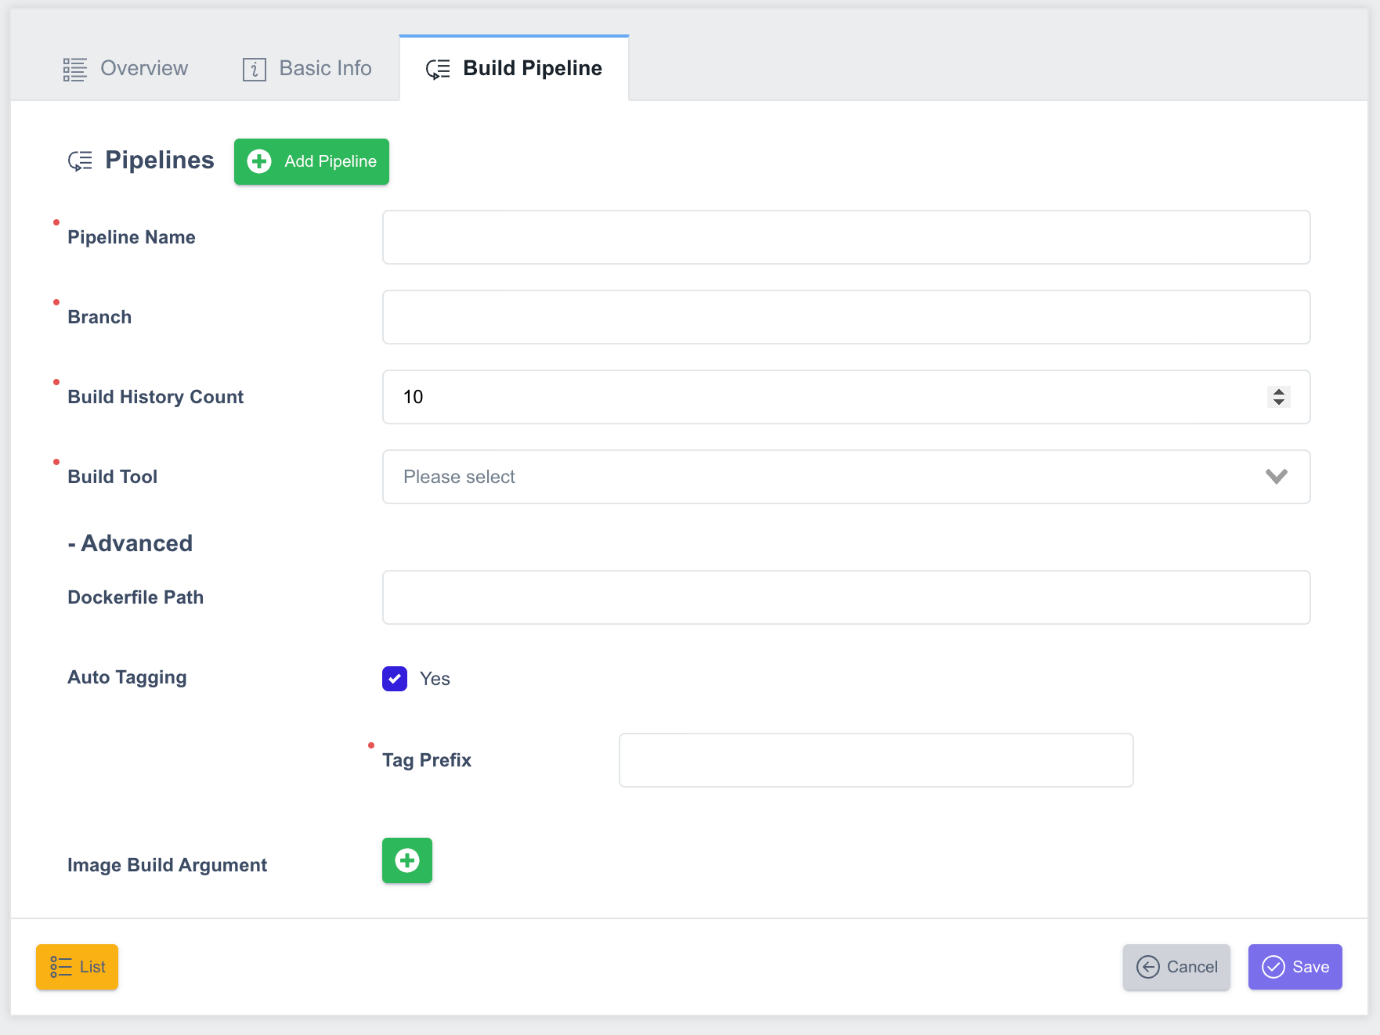
- Pipeline Name: A name for users to identify the pipeline.
- Branch: The name of the branch where the source will be checked out when the pipeline runs. You can build multiple branches in one source repository, each with a separate pipeline. For example, an application with develop, staging, and master branches can have a separate pipeline for each branch.
- Build History: Sets the number of build histories to manage.
- Build Tool: Select the build tool to use when building. Supported build tools are Maven, Gradle, and NPM. If you need to use an unsupported build tool (ant, yarn, etc.), you'll need to set the Build Tool entry to None and have the build run inside a Dockerfile.
-
Maven:
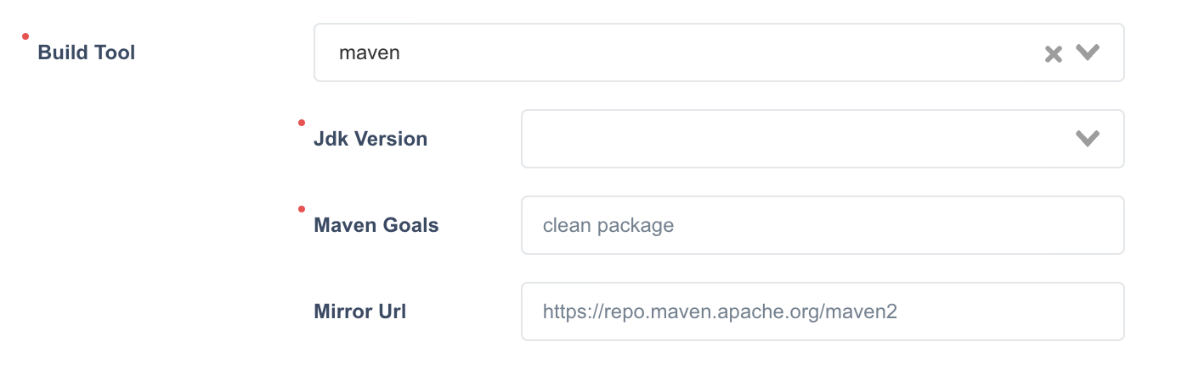
- Jdk Version: Specifies the version of the JDK to build.
- Maven Goals: Specifies Maven commands. Typically, we use a goal called package to create an artifact.
- Mirror Url: If you don't have direct access to a public Maven repository, use a Nexus or Artifactory that acts as a mirror. You can specify the path to the mirror to use when building Maven. The mirror must be public (accessible without an ID or password).
-
Gradle:
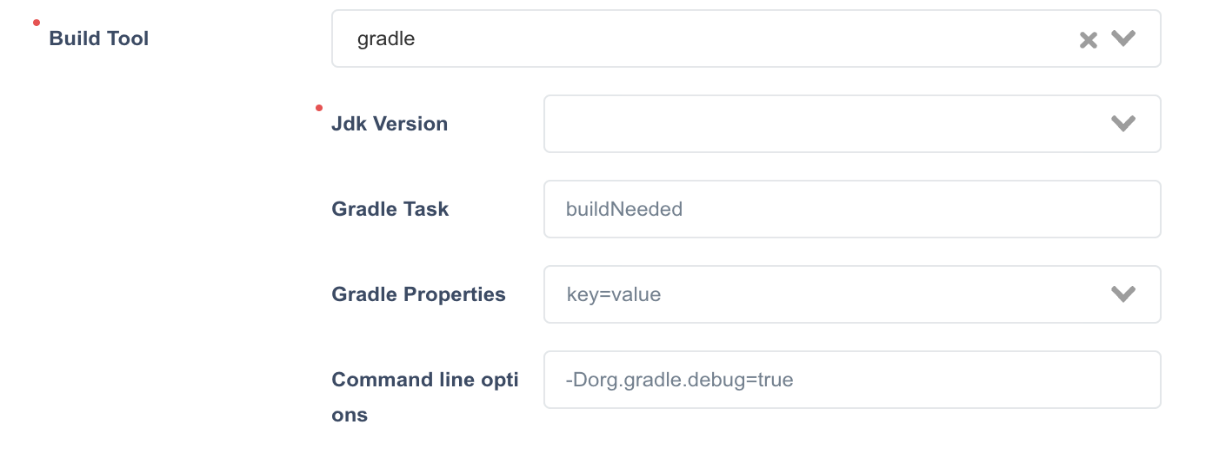
- Jdk Version: Specifies the version of the JDK to build.
- Gradle Task: The name of the Gradle Task to use to generate artifacts when building Gradle. Typically, buildNeeded is used, and if it's a Spring Boot app, BootJar is often used as well.
- Gradle Properties: Specifies the value of the property used at build time in the form of key=value. It is also used to overwrite the value in the gradle.properties file.
- Command line options: You can enter additional options that can be appended to the gradle command when running the build.
-
NPM: Defaults to root if no input is given.
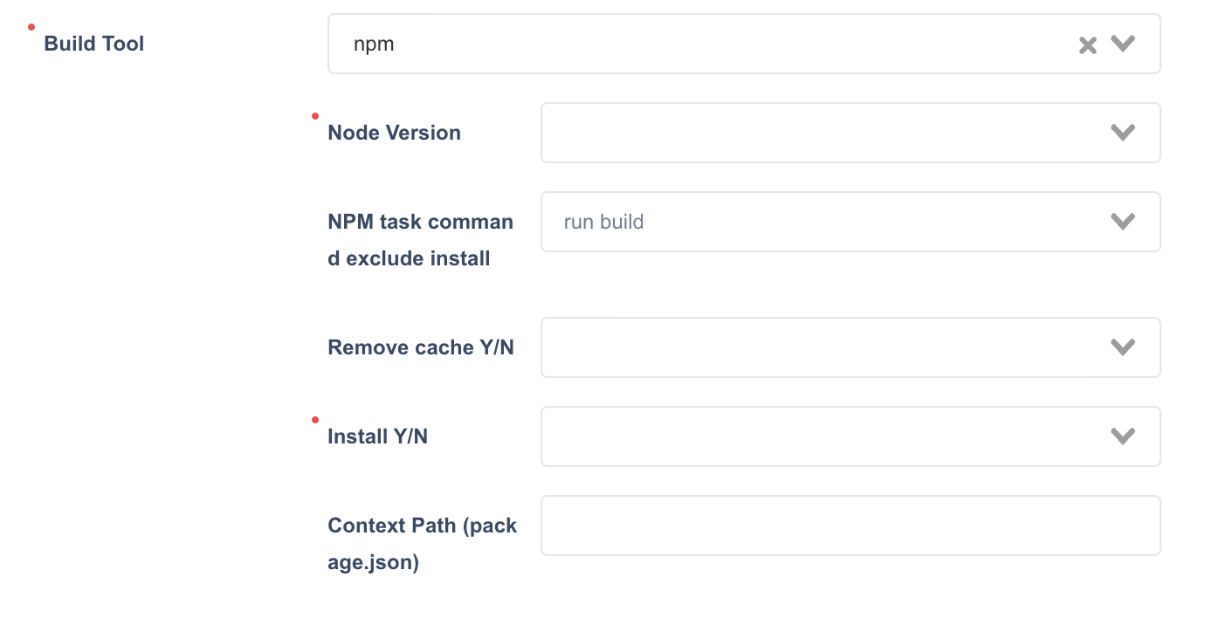
- Node Version: Specifies the version of the Node to build.
- NPM task command exclude install: Specifies the task command to perform when building The Install task is determined by the Install Y/N below.
- Remove cache Y/N: Determines whether to delete cache and dependency modules saved from previous builds.
- Install Y/N: Determines whether to perform an npm install.
- Context Path: Specifies the relative path to package.json, the base script of the NPM build.
-
None:
- If you specify Build tool as None, it will only build the Container using a Dockerfile.
-
- Dockerfile Path: Specifies the path to the Dockerfile to use when building the image. You can use different Dockerfiles for different pipelines. If not specified, the Dockerfile specified in Basic Info is used. If not specified in Basic Info, the Dockerfile in the Source Repository root is used by default.
- Auto Tagging: Sets whether to automatically generate a Tag for the Image that is created as the Image is built. If set to Yes, the automatically generated build number will be used as the tag for the Image each time a build is run. If not set to Yes, the user must manually enter the Image tag each time a build is performed.
- Tag Prefix: Specify a prefix to the tag name when performing Auto Tagging. This setting is only required if Auto Tagging is Yes. For example, if Tag Prefix is dev, Tag names are automatically generated as dev-1, dev-2 .…