Test Models with Playground
Playgroundは、デプロイされたモデルをリアルタイムでテストし、そのパフォーマンスを検証するためのインタラクティブな環境です。
コードを書くことなく、ブラウザから直接テストを実行できます。
- デフォルトでは、OpenAI Compatible APIをサポートしています。
- 他のフォーマットについては、Custom API Request機能を使用してテストを実行できます。
始めに
デプロイされたモデルのリストで、右側のアクションメニューをクリックし、Playgroundを選択します。
- Playgroundは、すでにデプロイされたモデルのみをサポートしています。
- モデルがまだデプロイされていない場合は、まずユーザーガイドに従ってDeploy a Model to a Clusterのデプロイメントプロセスを完了してください。
- Playgroundでは、完全にデプロイされたモデルのみをテストできます。
- Inference Service ListのStatusが
Runningでない場合、Playgroundボタンは無効になります。
Playgroundの主な機能
- Automatic Registration:モデルタイプを選択すると、自動的にPlaygroundに登録されます。
- Instant Testing:コードを書くことなくモデルの応答を確認できます。
- Real-Time Responses:チャットおよびテキストモデルの場合、応答はストリーミングで表示できます。
- Supports Multiple Types: Chat, Text, Embedding, Image, Audio, and Custom APIモデルと互換性があります。
- Parameter Adjustment: Temperature、Max Tokensなどの設定を構成できます。
テストプロセス
ステップ1: モデルを選択
- Inference Service Listからテストしたいモデルを選択します。
- モデル詳細ページで、Open in Playgroundをクリックします。
ステップ2: モデルを登録
-
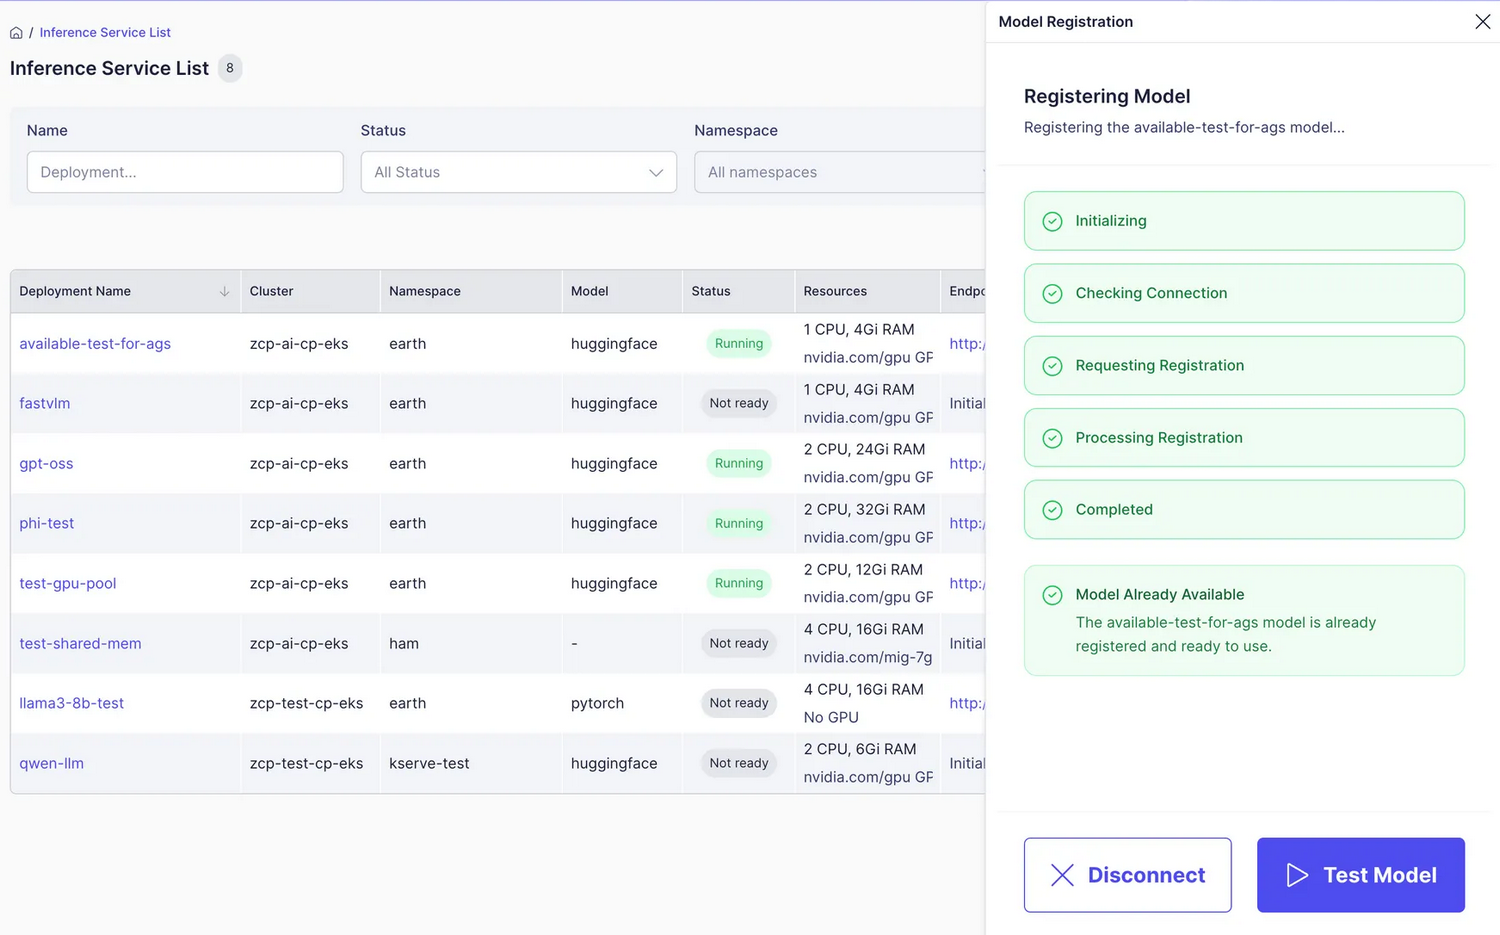
モデルはModel Registrationプロセスを通じて自動的に登録されます。
-
登録が完了したら、Test Modelをクリックしてください。
-
登録をキャンセルしたい場合は、代わりにDisconnectをクリックしてください。
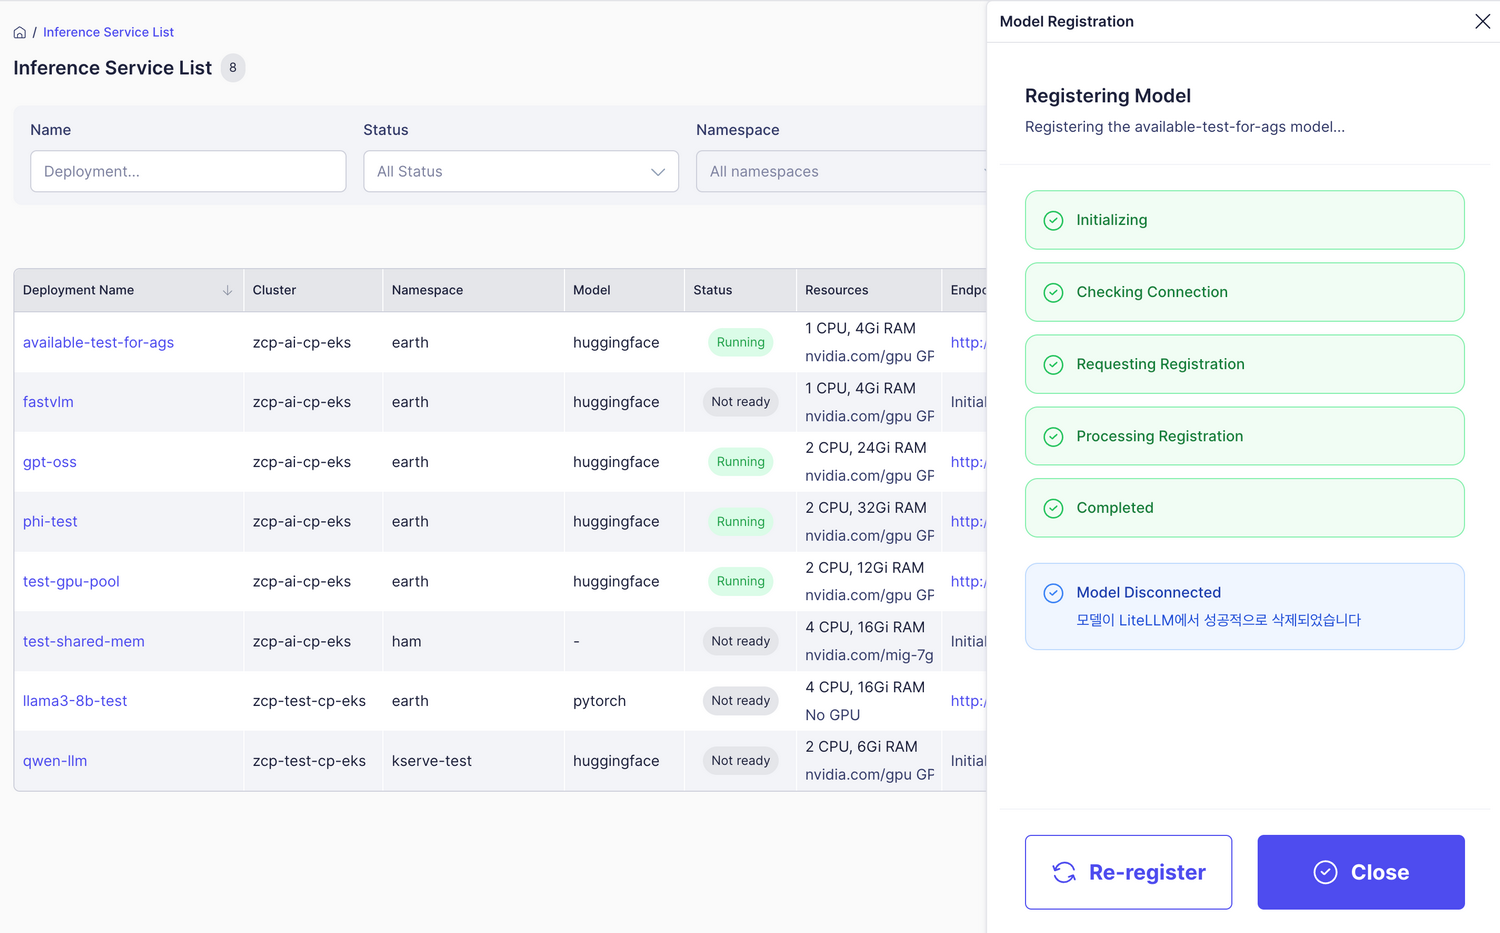
-
「再登録」をクリックすると、モデルを再度登録できます。
- モデルが正常に動作していない場合、登録が失敗することがあります。
- モデルがすでに登録されている場合、Test Modelボタンがすぐに表示されます。
ステップ 3: モデルタイプの選択
Playgroundは、以下の4つのモデルタイプをサポートしています:
| Typea | Description |
|---|---|
| チャット | 会話モデル |
| テキスト補完 | テキスト自動補完 |
| 埋め込み | 文からベクトルへの変換 |
| カスタムAPI | カスタムAPIリクエストとテスト |
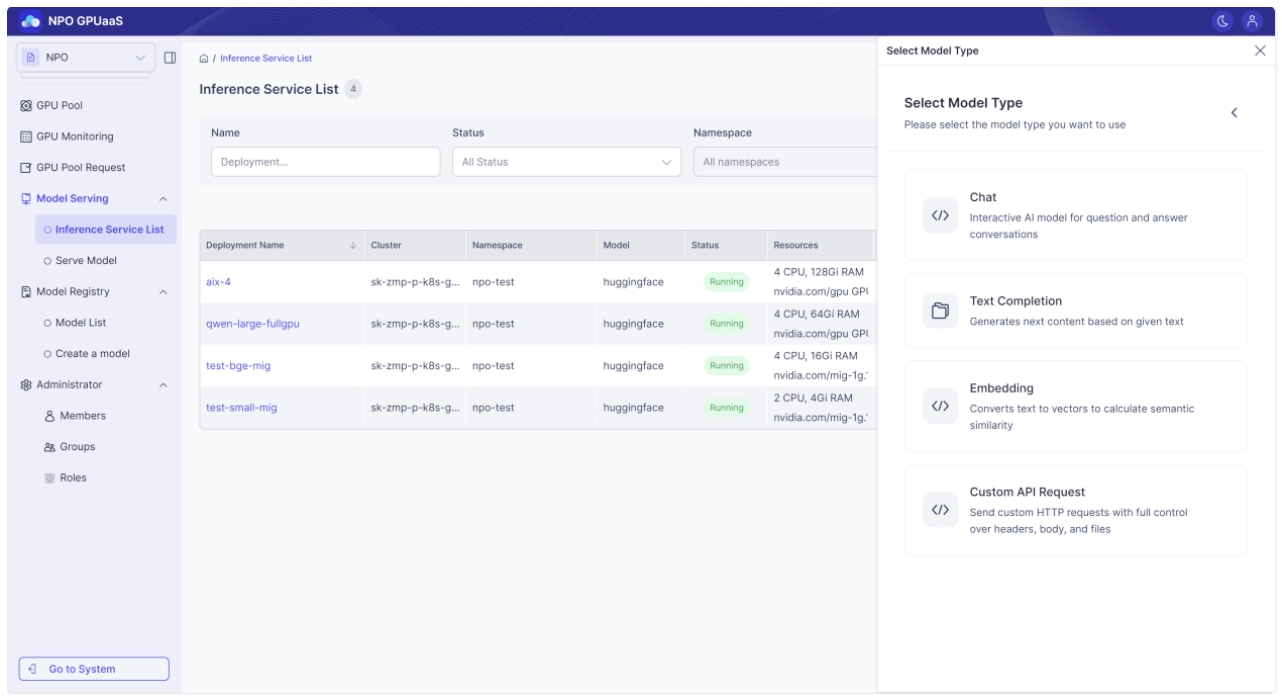
モデルに合ったタイプをクリックして、テストを進めてください。
モデルに合わないタイプを選択すると、正しく応答しません。
例えば:Stable DiffusionモデルにChatタイプを使用 → 不正解
ステップ 4: モデルオプションの調整(オプション)
必要に応じて、モデルの設定やパラメータを変更できます。
すべてのモデルが利用可能な設定をサポートしているわけではありません。
チャットモデルテスト
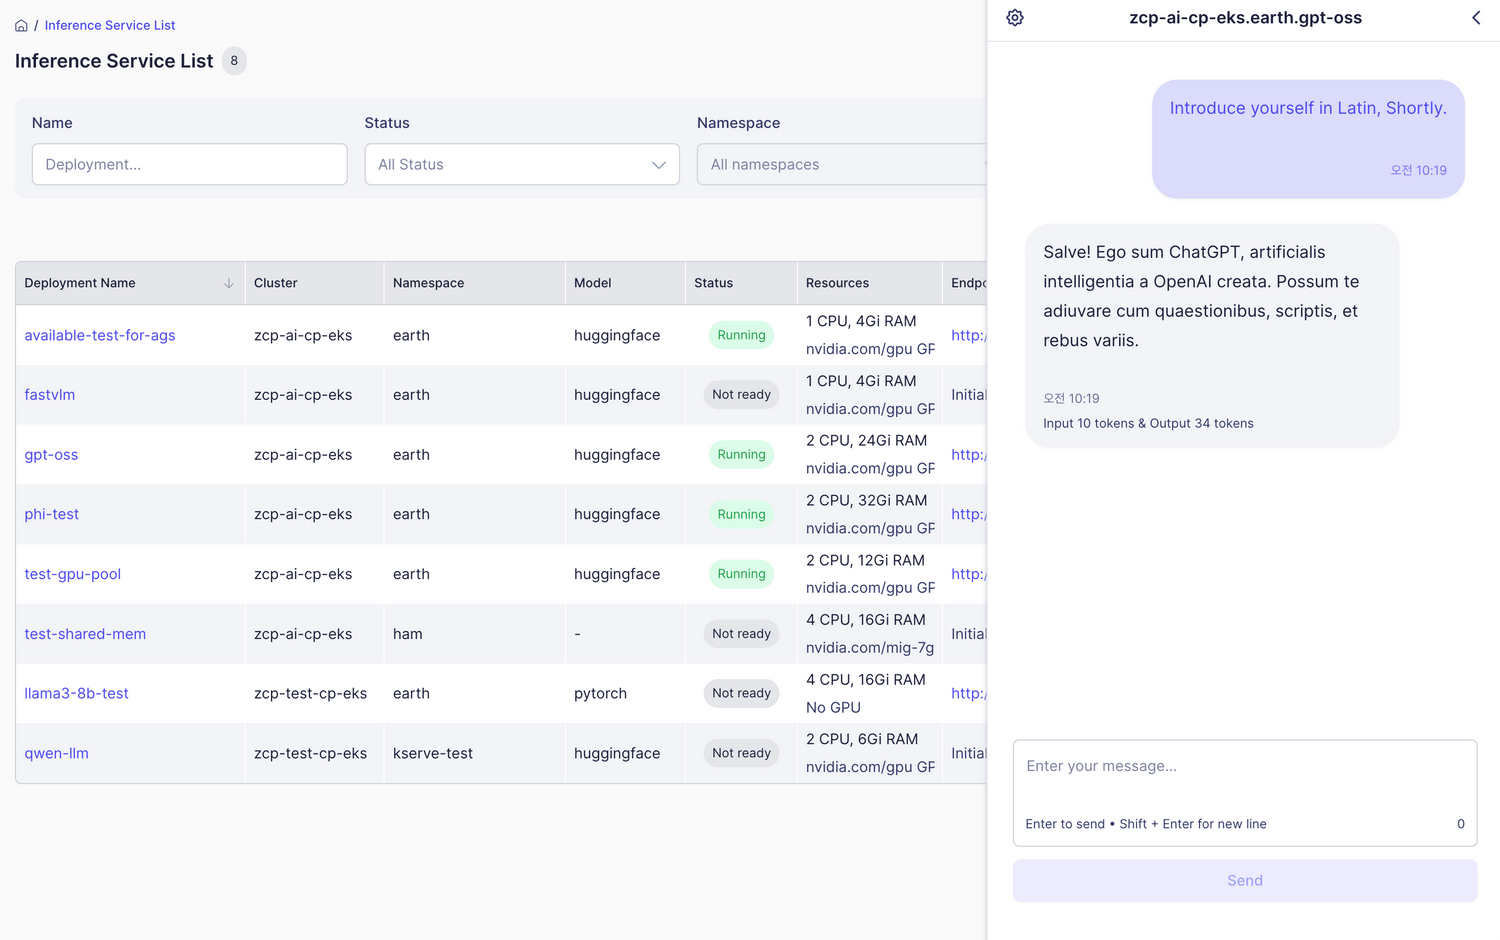
チャットモデルテストは、GPTやLLaMAのような会話構造を持つモデルを検証するために使用されます。チャットモデルは、マルチターンの会話シナリオに特化しており、以前のやり取りをコンテキストとして記憶し、ユーザーの現在の質問に対して最も適切で一貫した応答を生成します。ユーザーは「システムプロンプト」を通じてモデルに特定の役割や振る舞いを割り当てることもできます。
コンテキスト
チャットモデルは会話履歴をコンテキストとして使用し、注意メカニズムとシステムプロンプトに依存して適切な応答を生成し、一貫したペルソナを維持します。
目的
ユーザーがウェブインターフェースを介してモデルをテストし、正確性、一貫性、創造性を評価し、システムプロンプトを使用してAIの役割を定義できるようにします。
使用方法
- チャットモデルのタイプを選択し、インターフェースを開く
- メッセージを入力して送信
- Enterキーを押すか、送信ボタンをクリック
- モデルの応答を表示
モデルパラメータの調整
左上隅の設定ボタンをクリックすることで、モデルの応答を制御するためのさまざまなパラメータを微調整できます:
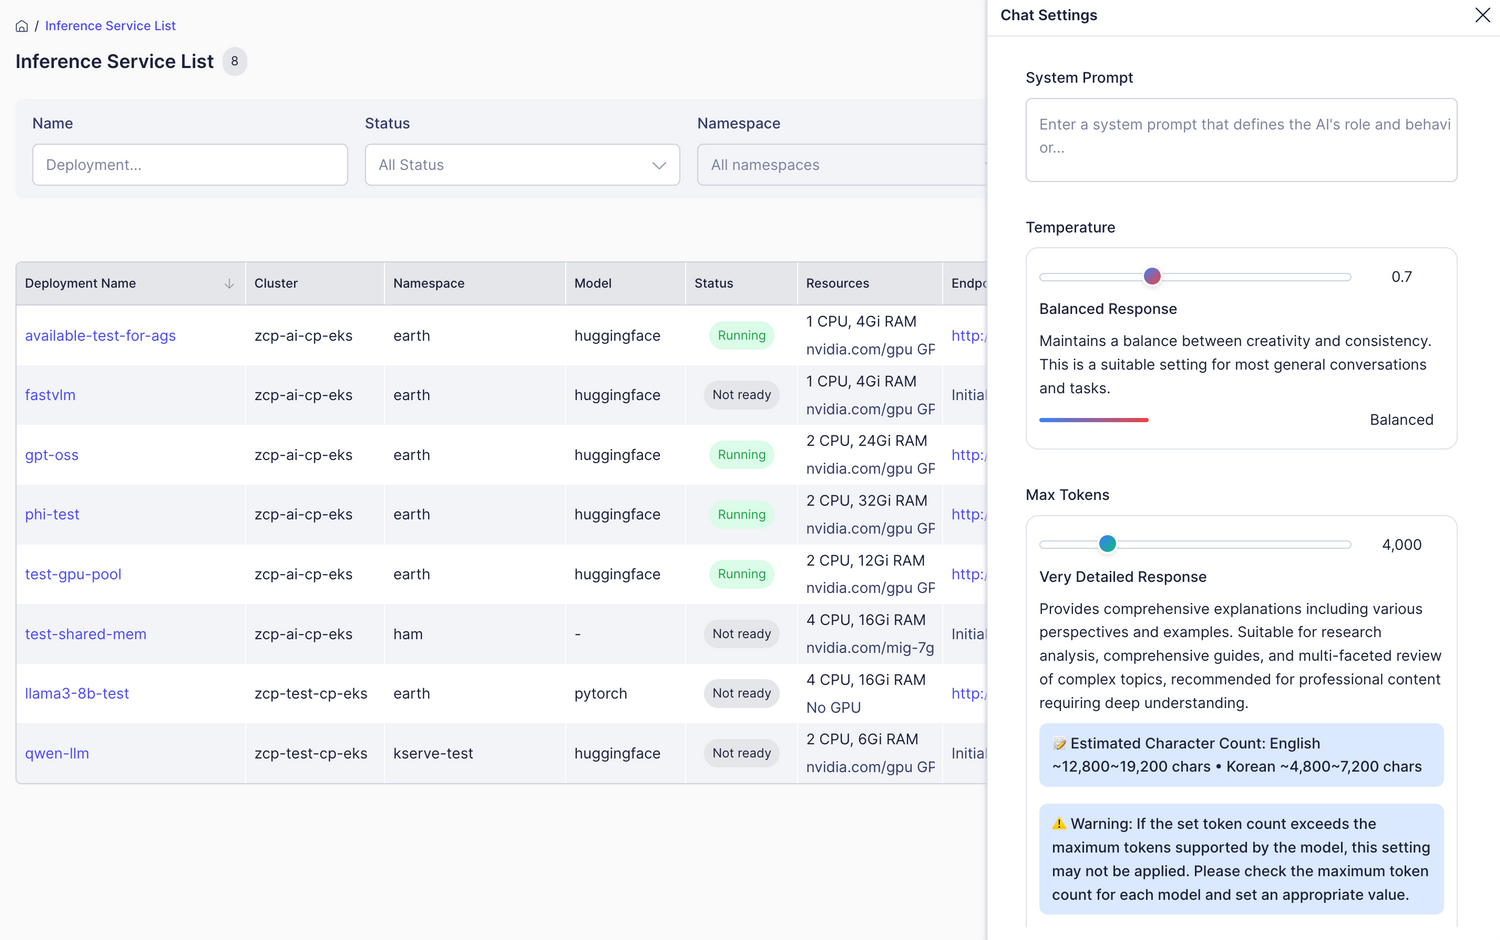
| Parameter | Range/Options | 説明 | Recommended Value |
|---|---|---|---|
| System Prompt | テキスト | AIの役割と振る舞いを定義する指示 | - |
| Temperature | 0.0~2.0 | 創造性と一貫性を制御(低いほど一貫性が高い) | 0.7(一般的なチャット) |
| Max Tokens | 100~20,000 | 生成するトークンの最大数(長さ制限) | 4,000(中程度の長さ) |
| Top P | 0.0~1.0 | 多様性を制御(温度と共に使用) | 0.9~1.0 |
| Frequency Penalty | -2.0~2.0 | 繰り返しの言葉/フレーズを避ける | 0.1~0.3 |
| Presence Penalty | -2.0~2.0 | 新しいトピックの導入を促進する | 0.0~0.2 |
| Stop Sequences | テキストの配列 | 指定されたテキストで生成を停止する(複数設定可能) | - |
| Seed | 数字(オプション) | 再現可能な結果のためのシード値 | - |
| Metadata | キー-バリューのペア | ロギング/分析のための追加情報(オプション) | - |
- Max Tokens: モデルの最大トークン制限を超えないように注意してください。
- Stop Sequences: 停止シーケンスに遭遇した場合、生成は停止します。
- Seed: 同じ入力とシードを使用すると、再現可能な結果が得られます。
テキスト補完テスト
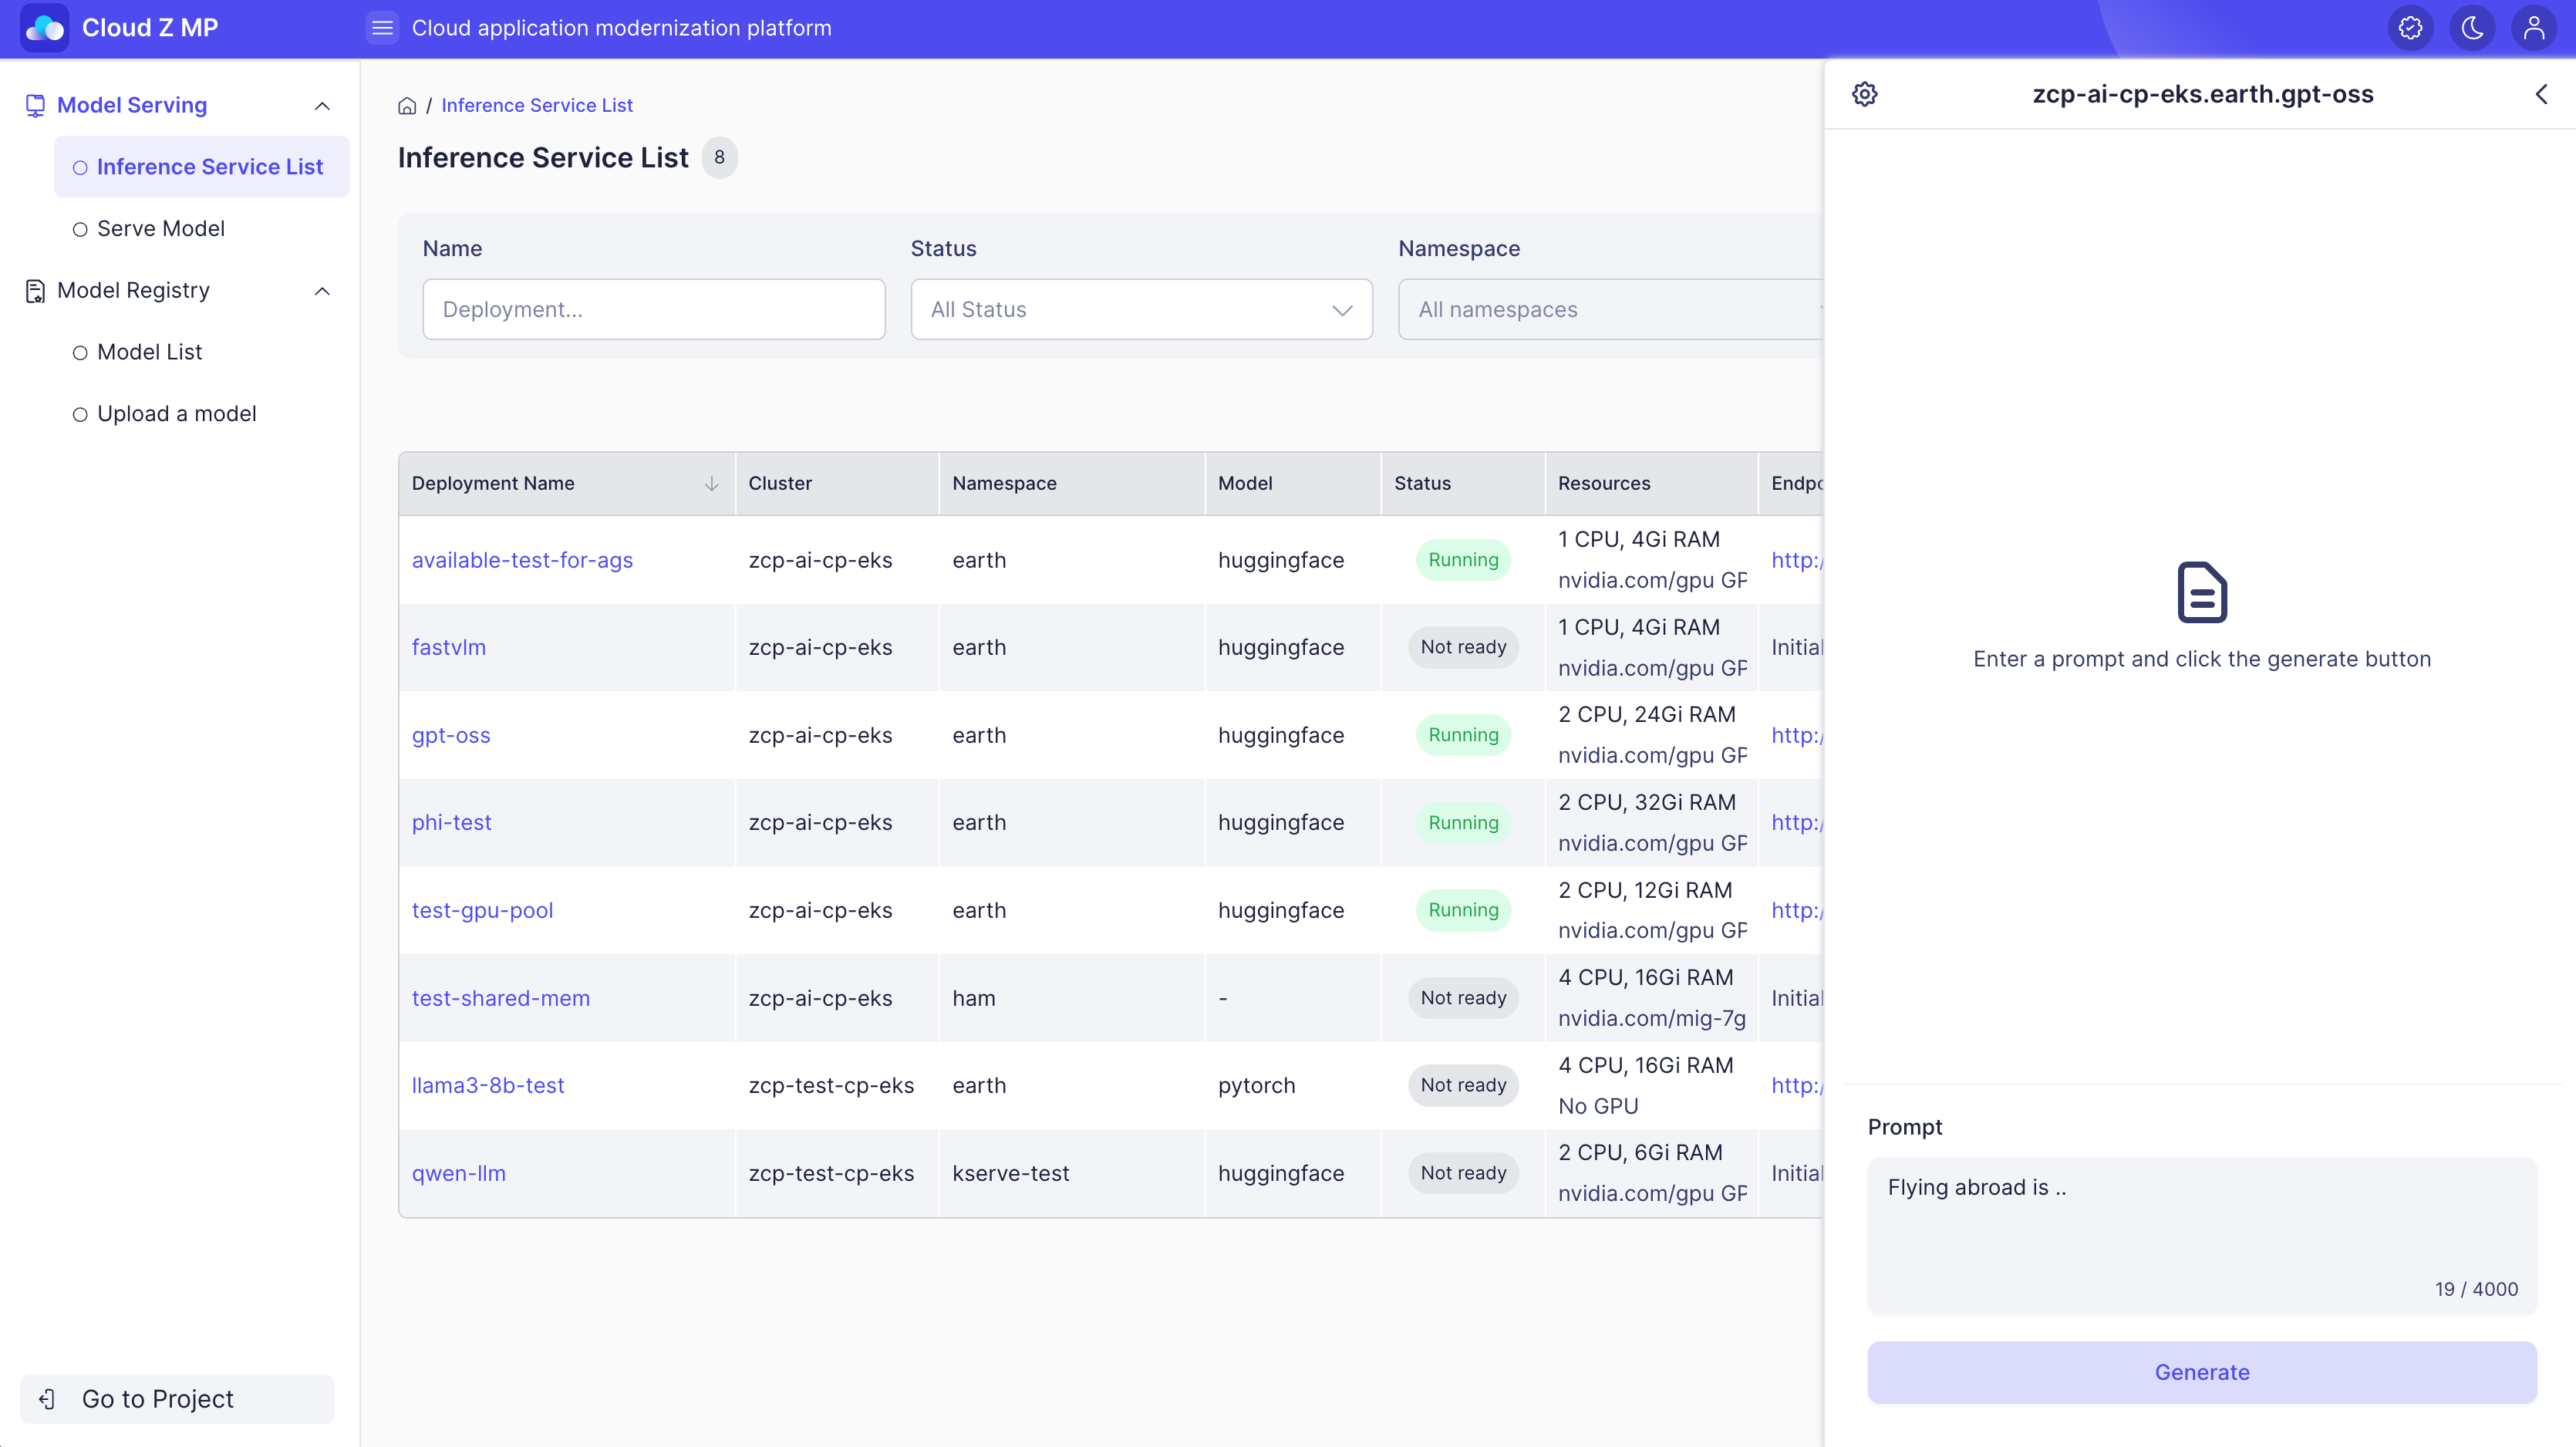
テキスト補完は、プロンプトが与えられた後に自動的に文を完成させるモデルをテストするために使用されます。テキスト補完モデルは、ユーザーが提供した入力テキスト(プロンプト)のパターンとコンテキストを分析し、最も可能性の高い次の単語やフレーズを継続的に生成します。このプロセスを通じて、モデルは自動的に文、段落、または長いテキストを完成させることができます。
コンテキスト
テキスト補完モデルは、自己回帰生成に基づいており、モデルの予測トークン確率分布を使用して次のトークンを順次生成します。このプロセス中に、パラメータがトークンサンプリングに介入し、応答の多様性を制御します—これが理論的なコアです。
目的
ユーザーはプロンプトを入力して、次の文を自動的に生成し、生成されたテキストの品質を確認します。特に、サフィックスパラメータを使用して生成されたテキストの後にサフィックスを追加することができ、特定の方向にテキスト補完を導くテストを可能にします。
使用方法
-
テキスト補完のタイプを選択します。
-
プロンプトを入力してください。
-
Generate をクリックすると、モデルが自動的にプロンプトの続きの内容を生成します。
-
結果をコピーするか、必要に応じて再生成できます。
モデルパラメータの調整
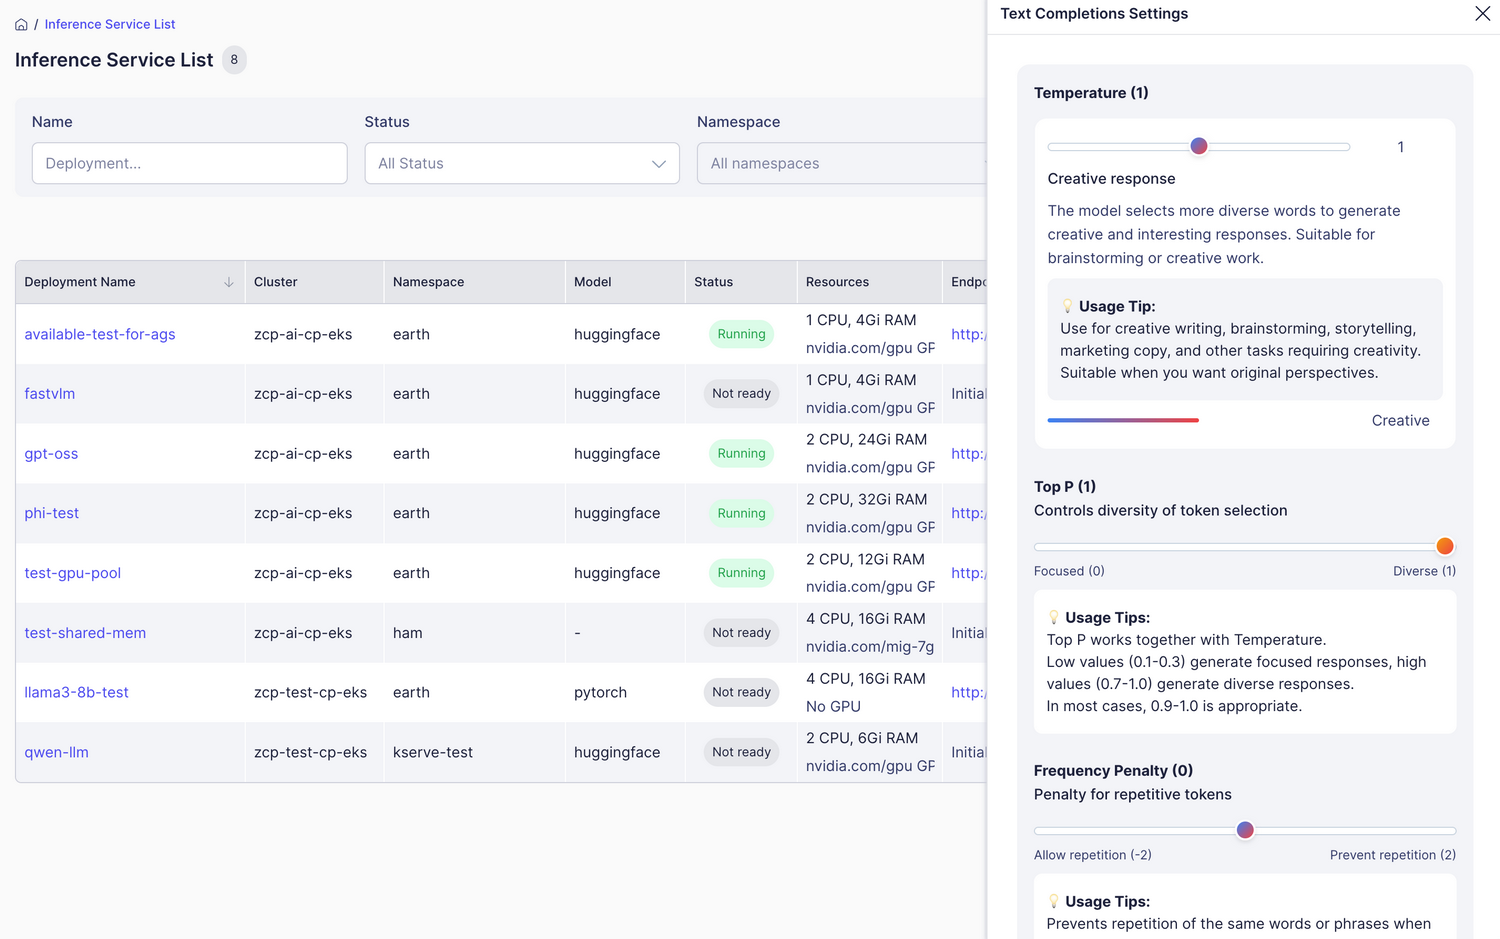
左上の設定ボタンをクリックすることで、Text Completion モデルの応答パラメータを微調整できます。
| Parameter | Range/Options | 説明 | Recommended Value |
|---|---|---|---|
| Temperature | 0.0~2.0 | 創造性と一貫性を制御します | 1.0 (創造的) |
| Max Tokens | 100~4,000 | 生成するトークンの最大数 | 1,000 (中程度の長さ) |
| Top P | 0.0~1.0 | 多様性を制御します(温度と併用) | 1.0 |
| Frequency Penalty | -2.0~2.0 | 繰り返しの単語/フレーズを避けます | 0.0~0.3 |
| Presence Penalty | -2.0~2.0 | 新しいトピックの導入を促します | 0.0~0.2 |
| Suffix | テキスト(オプション) | 生成されたテキストにサフィックスを追加します | - |
| Stop Sequences | テキストの配列 | 指定されたテキストで生成を停止します | - |
| Stream | true/false | 長文のリアルタイムストリーミングを有効にします | true (推奨) |
サフィックス使用例
| 使用例 | サフィックス例 | 効果 |
|---|---|---|
| 要約をリクエスト | "要約すると:" | モデルに要約を生成させる |
| 結論 | "結論として、" | 論理的な結論でテキストを締めくくる |
| 特定のフォーマット | "### 主なポイント:" | 構造化されたフォーマットでテキストを生成する |
- Stop Sequences: 自然な停止点を作成するには
\\n\\n,###, またはendを使用してください。 - Stream: ストリーミングを有効にして、長文がリアルタイムで生成される様子を表示します。
- Suffix: モデルの完了方向をガイドするためにサフィックスを使用します。
埋め込み生成テスト
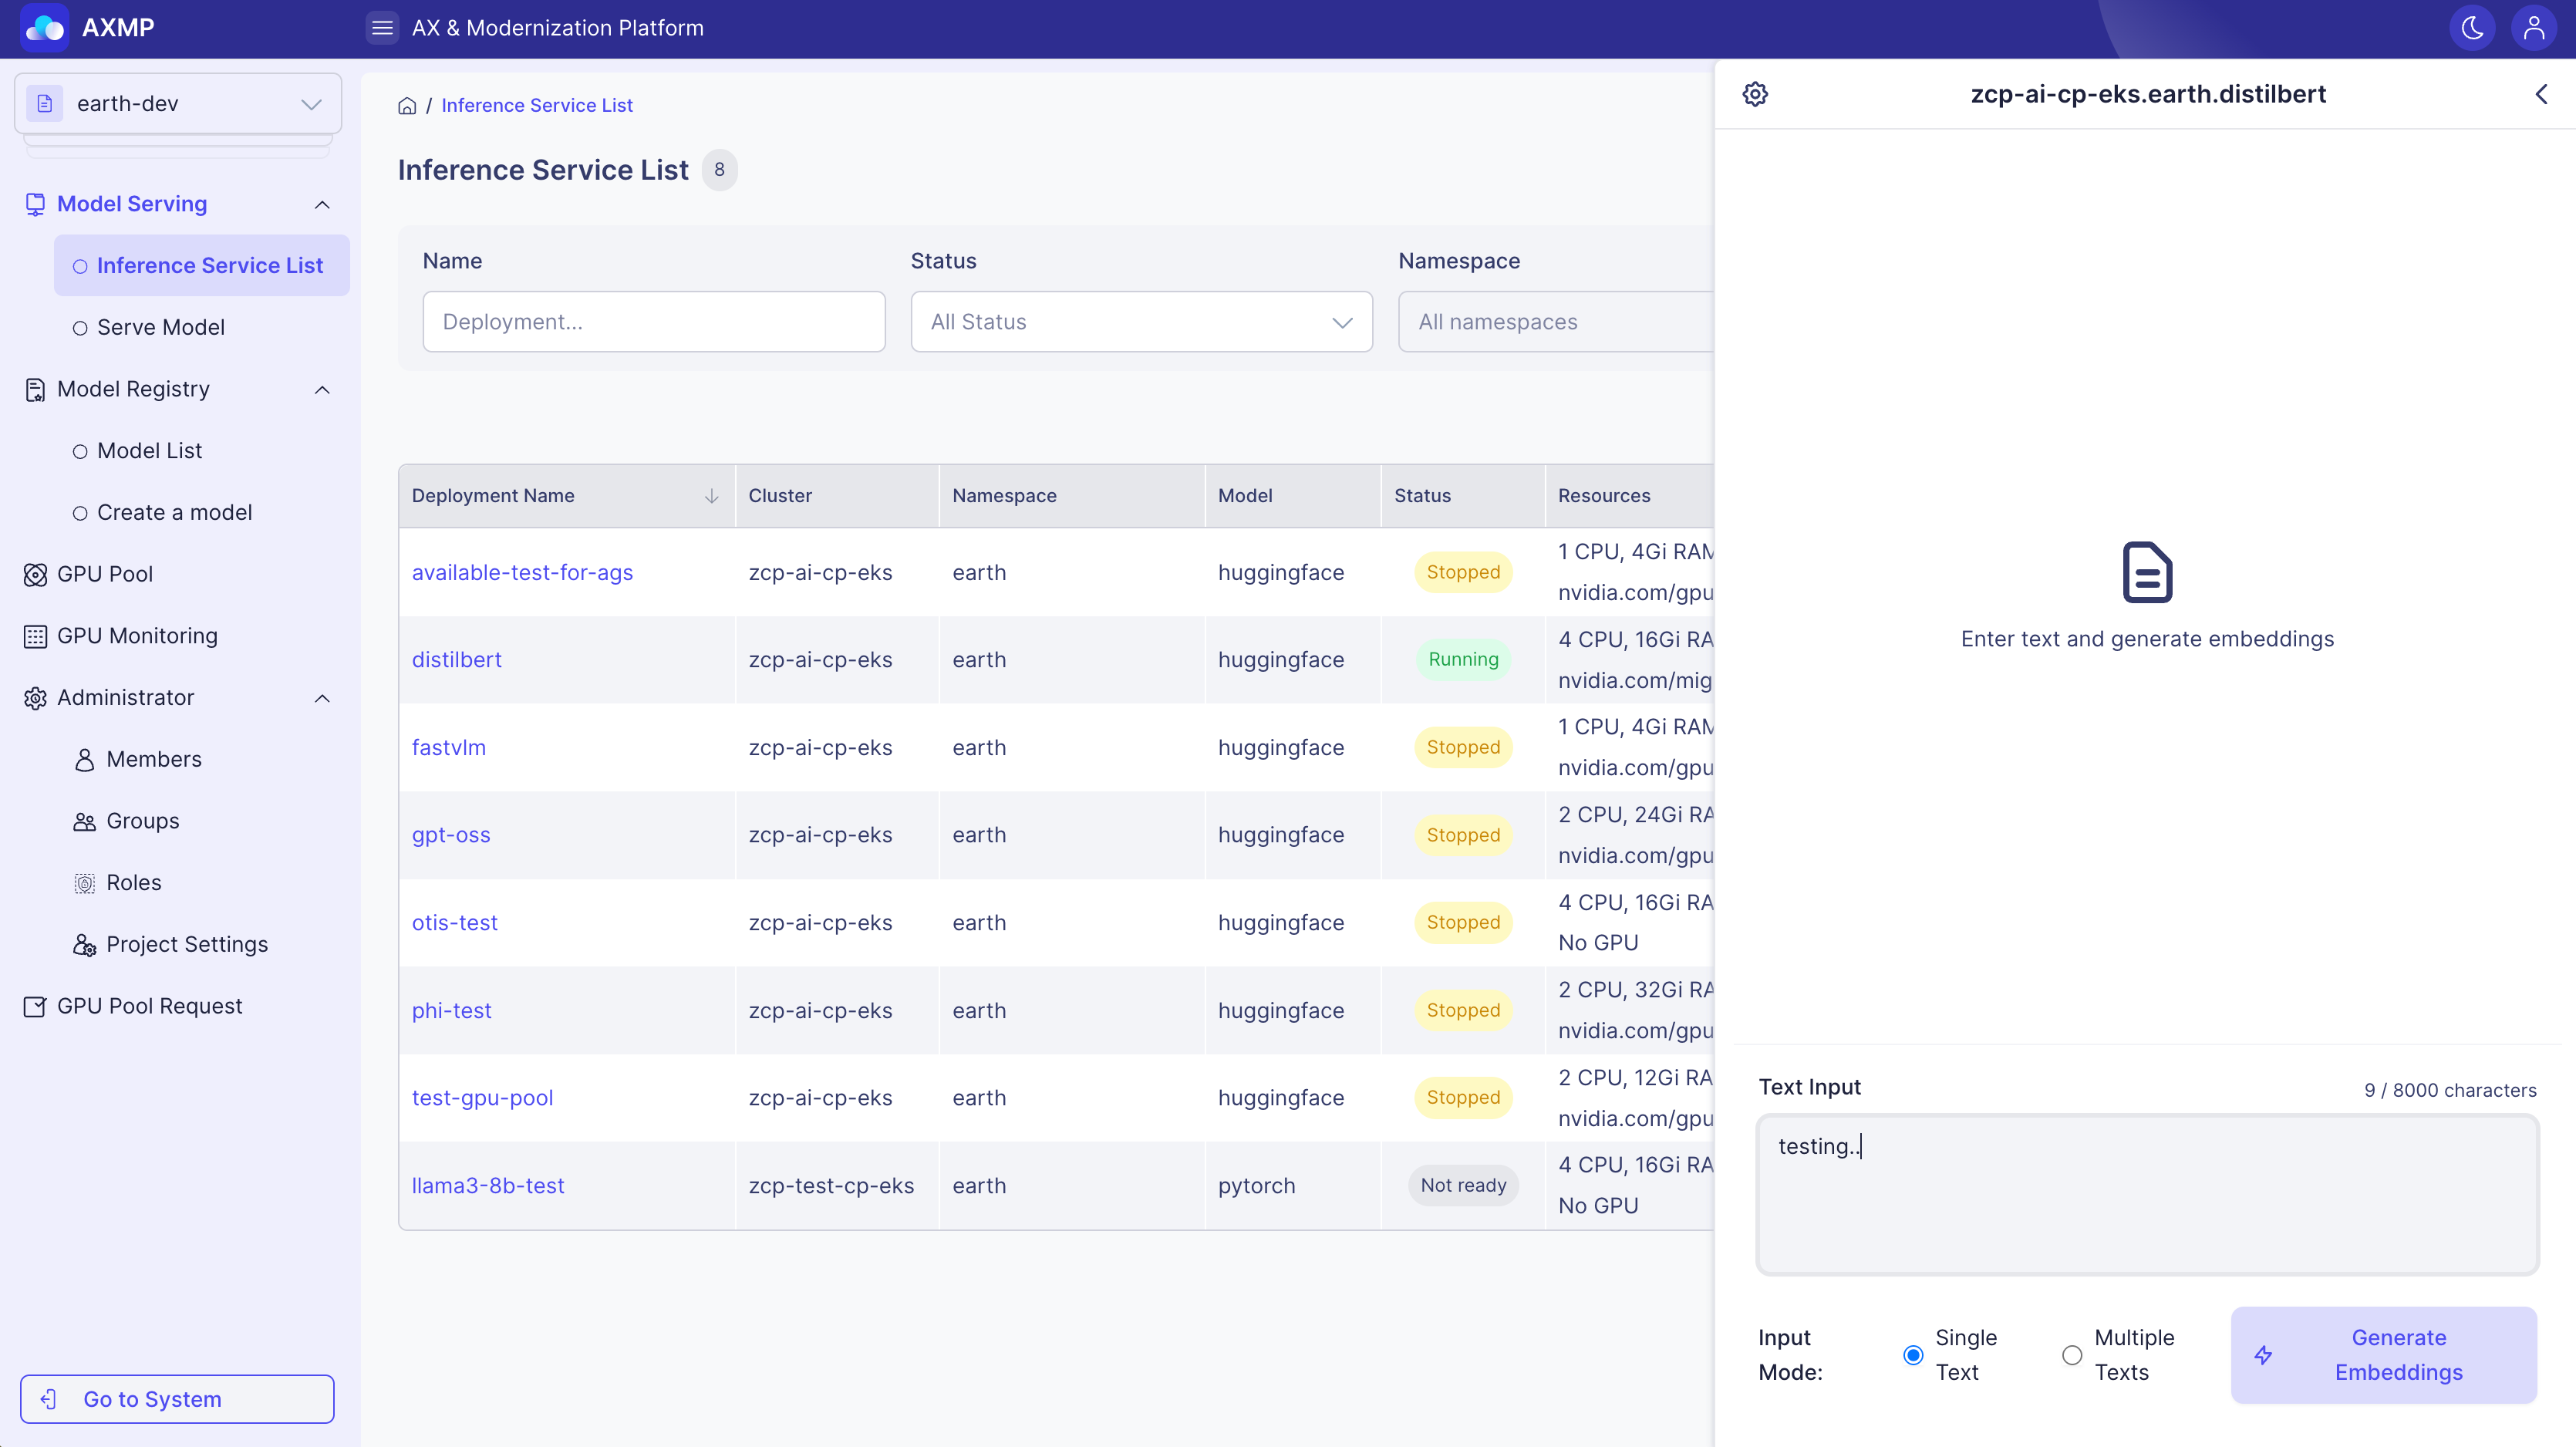
埋め込みは、テキストを意味のあるベクトル値に変換するモデルをテストするために使用されます。モデルは、入力テキストを高次元空間の数値配列に変換し、これらのベクトル値はテキストの意味的特徴を表します。ベクトルが似ているほど、元のテキストの意味も似ています。
コンテキスト
埋め込みは、分散表現の理論に基づいており、単語や文の意味を高次元空間の数値ベクトルに変換します。この空間では、「コサイン類似度」などの類似性測定が使用され、ベクトル間の類似性を計算し、元のテキスト間の意味的類似性を示します。
目的
単一または複数の文を入力することで、ユーザーはモデルによって生成されたベクトル値と文間の類似性を検証できます。さらに、エンコーディング形式や次元数などのパラメータを調整して、意図した環境に最適なベクトル形式を探ることができます。
使用方法
-
埋め込みタイプを選択します
-
1つまたは複数の文を入力します(複数の文は改行で区切ります)
-
Generate Embeddingsをクリックします
-
ベクトル値と類似性スコアを確認します
モデルパラメータの調整
埋め込みベクトル生成のためのパラメータをカスタマイズできます。
| パラメータ | オプション/範囲 | 説明 | 推奨値 |
|---|---|---|---|
| Encoding Format | float / base64 | ベクトルエンコーディング形式 | float (デフォルト) |
| Dimensions | 512, 1024, 1536, 3072 | ベクトル次元数(モデル依存) | モデルのデフォルト |
| User Identifier | テキスト(オプション) | リクエスト追跡/監視のための識別子 | - |
エンコーディングフォーマットの比較
| フォーマット | 特徴 | 使用例 |
|---|---|---|
| Float | 数の配列、直感的 | 開発/デバッグ、手動計算 |
| Base64 | 圧縮された文字列、効率的 | ストレージ/伝送、APIレスポンス |
Example Use Cases:
- Semantic Search: 類似の意味を持つ文書を見つける
- Similarity-Based Recommendations: コンテンツ推薦システム
- Document Clustering: 類似の文書をグループ化する
- Duplicate Detection: 類似のコンテンツを持つ文書を特定する
- Dimensions: 一部のモデルのみが次元カスタマイズをサポート
- Encoding Format: APIレスポンスサイズに影響を与える(Base64は大きなデータに対してより効率的)
カスタムAPIテスト
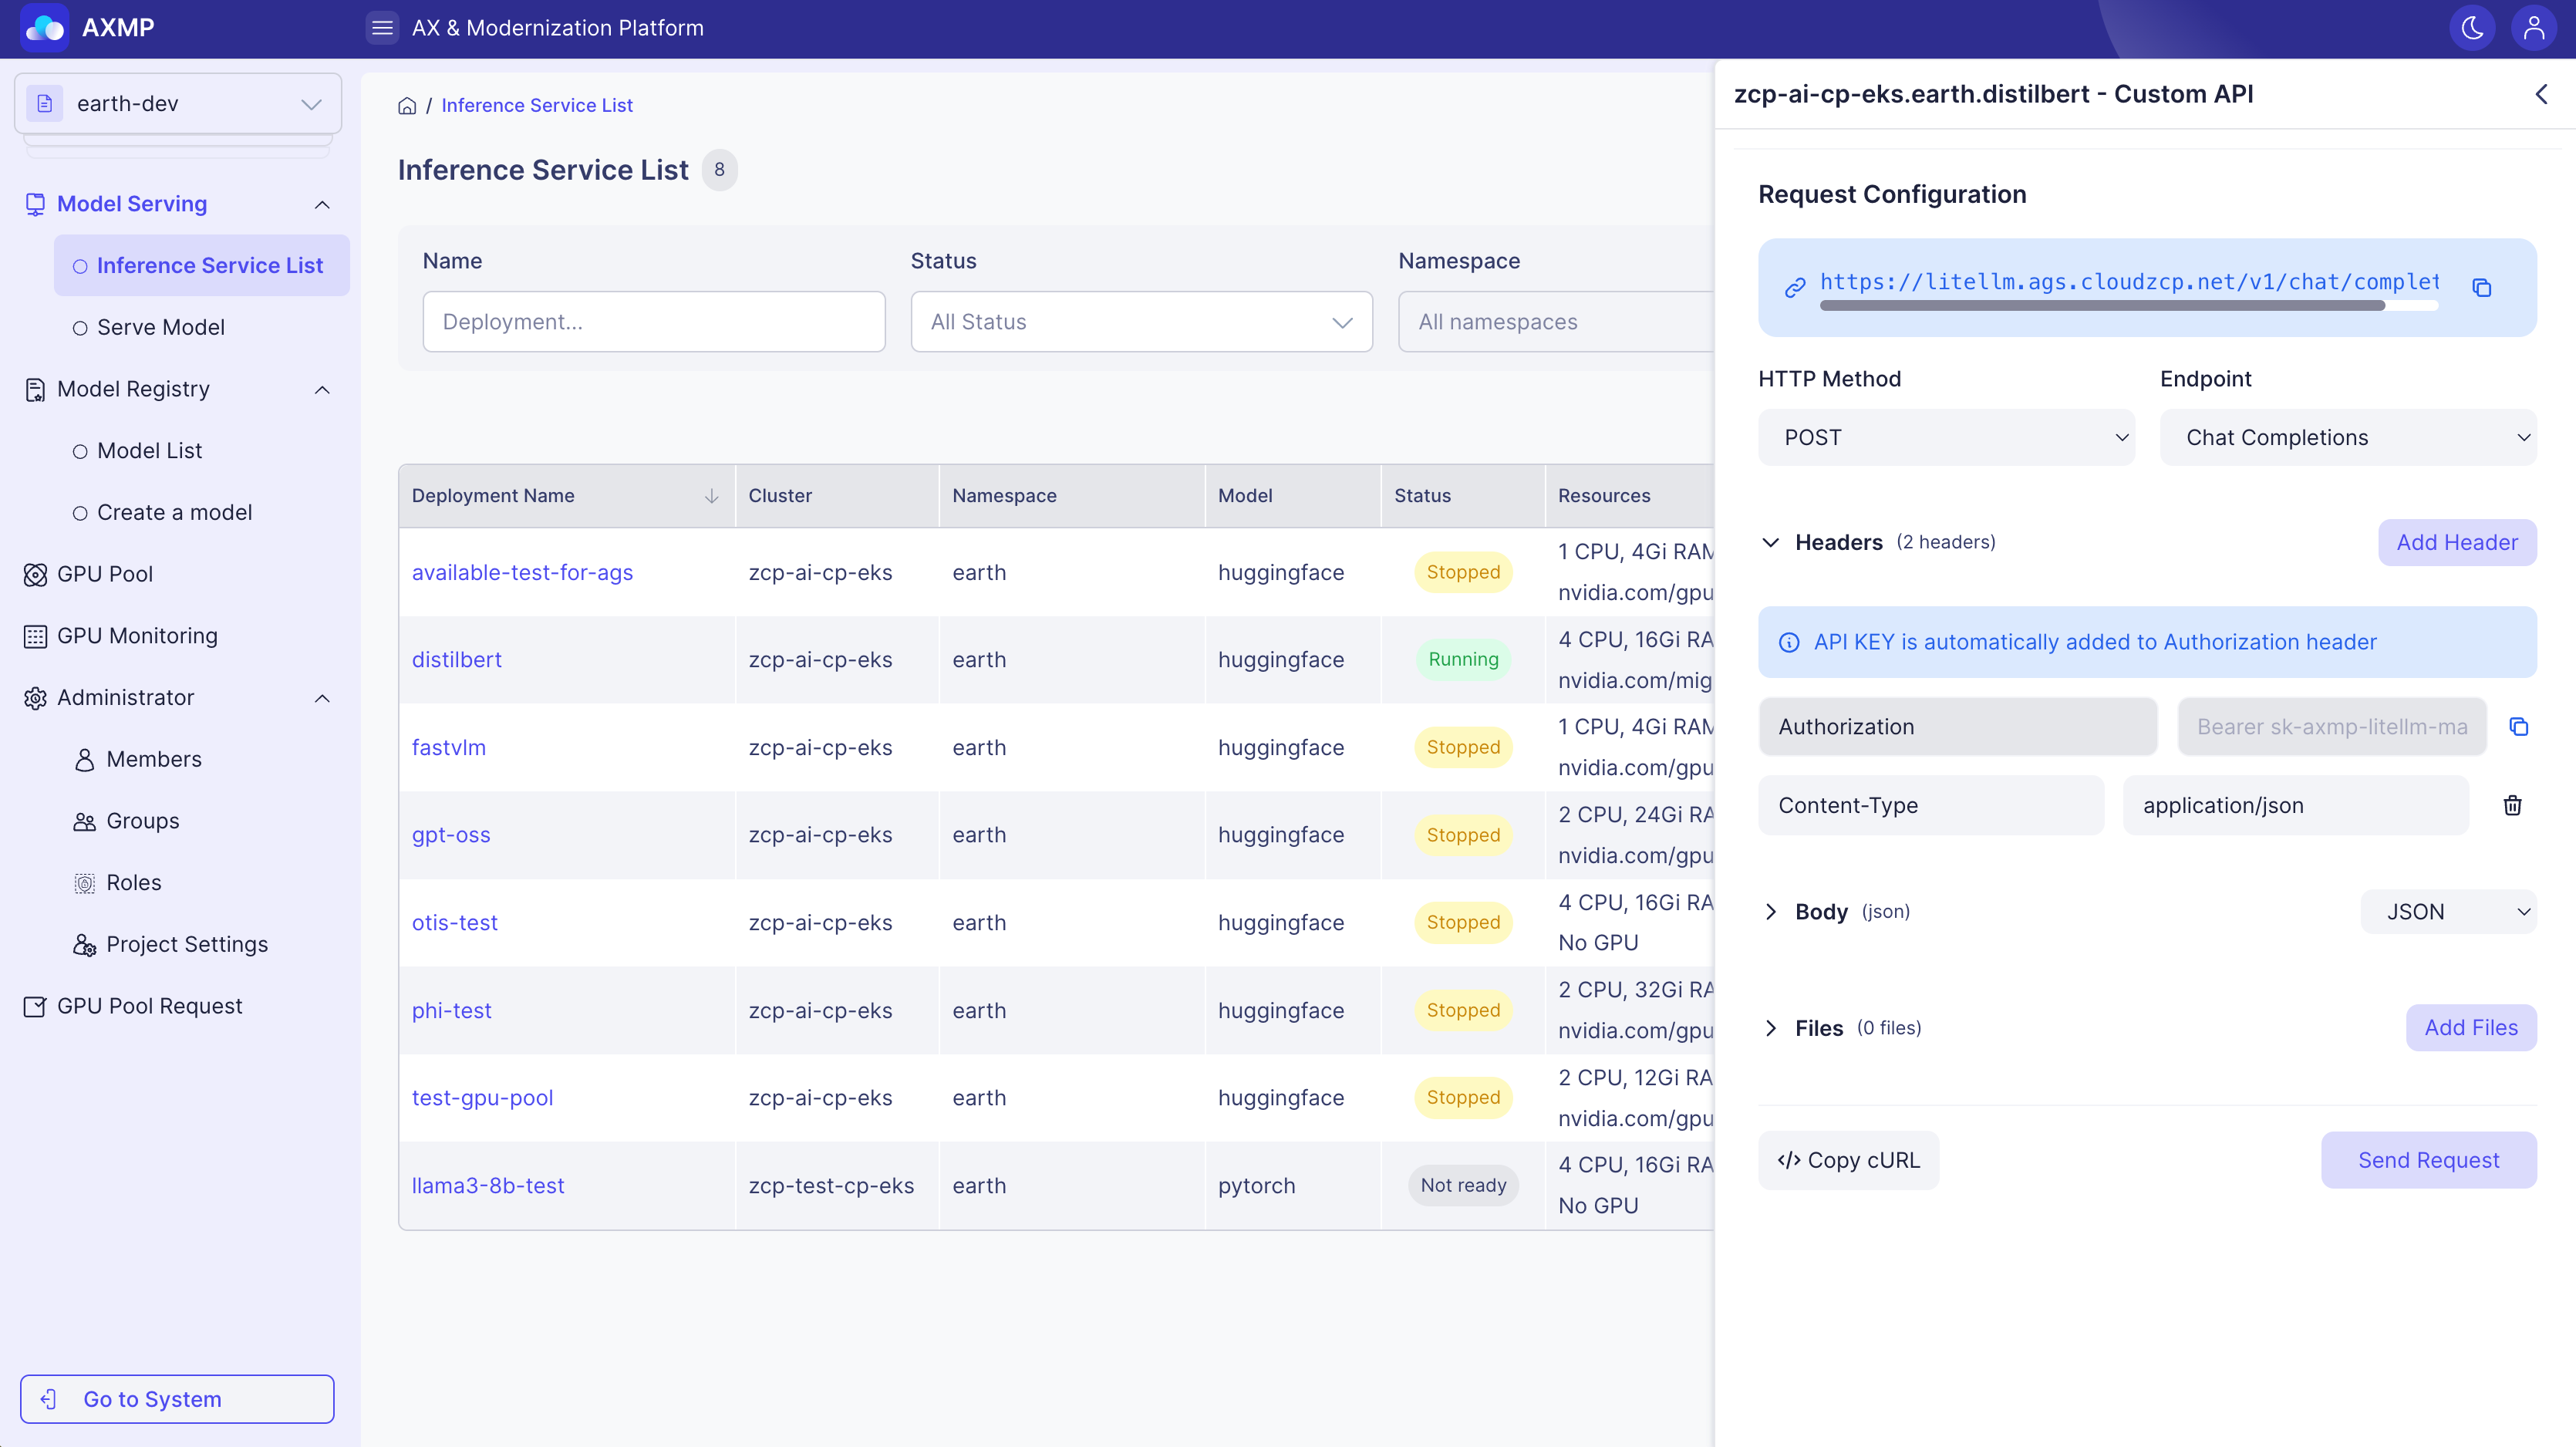
カスタムAPIは、HTTPリクエストを直接構成して送信できる高度な機能です。標準モデルタイプでカバーされていない専門的なAPIやカスタムエンドポイントのテストに特に便利です。
コンテキスト
カスタムAPIテストは、RESTfulアーキテクチャとHTTPプロトコルに基づいています。ユーザーは手動でHTTPメソッド(GET、POSTなど)、ヘッダー、およびボディを設定してモデルサーバーのエンドポイントにリクエストを送信し、ステータスコードとレスポンスデータを分析してAPIの正しい動作を確認します。
目的
API開発中にエンドポイントの動作とレスポンス処理を確認することで、リクエスト/レスポンス構造を迅速に検証およびデバッグできるようにします。複雑なリクエストはGUIで簡単に構築できます。
使用方法
-
カスタムAPIタイプを選択します
-
事前定義されたエンドポイントを選択するか、カスタムURLを入力します
-
リクエストを構成します(必要に応じてヘッダー、ボディ、およびファイルを設定します)
-
Send Request をクリックして結果を確認してください。
サポートされているエンドポイント
カスタムAPIは、8つの定義済みエンドポイントとカスタムエンドポイントをサポートしています。
| エンドポイント | 説明 | HTTPメソッド | ボディタイプ |
|---|---|---|---|
| Chat Completions | 会話モデルAPI | POST | JSON |
| Text Completions | テキスト自動補完API | POST | JSON |
| Embeddings | 文ベクトル変換 | POST | JSON |
| Image Generations | テキストから画像生成API | POST | JSON |
| Audio Speech (TTS) | テキストから音声変換API | POST | JSON |
| Audio Transcriptions (STT) | 音声からテキスト変換API | POST | フォームデータ |
| Audio Translations | 音声翻訳API | POST | フォームデータ |
| Custom... | ユーザー定義エンドポイント | 選択可能 | 選択可能 |
リクエスト設定
Selecting HTTP Method| メソッド | 説明 | 一般的な使用ケース |
|---|---|---|
| GET | データを取得 | モデル情報の確認、ステータスの表示 |
| POST | データを作成/処理 | モデル推論、ファイルアップロード |
| PUT | すべてのデータを更新 | 設定の更新 |
| DELETE | データを削除 | リソースの削除 |
| PATCH | 部分データを更新 | 特定の設定の変更 |
| HEAD | ヘッダーのみ表示 | ステータスチェック |
| OPTIONS | サポートされているメソッドを確認 | CORSプリフライトリクエスト |
- Automatic headers: Authorization、Content-Type、およびX-Model-Nameはデフォルトで追加されます。
- Custom headers: 必要に応じて追加のヘッダーを追加します。
- API key management: AuthorizationヘッダーからAPIキーを簡単にコピーできます。
| Body Type | Description | Use Case |
|---|---|---|
| None | リクエストボディなし | GET、HEAD、OPTIONSリクエスト |
| JSON | JSON形式のデータ | ほとんどのAPIリクエスト |
| Form Data | フォームデータ | ファイルアップロード、フォーム送信 |
| Text | プレーンテキスト | シンプルなテキスト送信 |
- Supported formats: すべてのファイルタイプ
- Size limits: ブラウザとサーバー設定に基づく制限
- Multiple files: 複数のファイルを一度にアップロード
レスポンス処理
Response Modes| Mode | Description | Use Case |
|---|---|---|
| Formatted | 構造化されたJSONツリービュー | 複雑なJSONレスポンスの分析 |
| Raw | オリジナルテキスト形式 | シンプルなレスポンスの表示 |
- Auto-expand: すべてのノードはデフォルトで展開されています
- Copy individual values: 特定のノードからデータを簡単にコピー
- Color coding by type: 文字列(緑)、数値(青)、ブール値(紫)など
- Nested structures: オブジェクトと配列が視覚的に表現されます
| Item | Description | Display Format |
|---|---|---|
| HTTP Status | レスポンスステータスコード | 200, 404, 500など |
| Duration | 処理時間 | 1.23秒、500ミリ秒など |
| Size | レスポンスサイズ | 1.2KB、5.4MBなど |
| Timestamp | リクエスト時間 | 2024-01-15 14:30:25 |
高度な機能
cURL Command Generation- Auto-generation: リクエストをcURLコマンドに変換できます
- Clipboard copy: 生成されたcURLコマンドをワンクリックでコピー
- Real-time URL display: 設定中に最終リクエストURLを確認
- URL copy: 完成したURLをクリップボードにコピー
- Auto-injection: APIキーは自動的にAuthorizationヘッダーに追加されます
- Key copy: APIキーだけを別にコピー
- Development: APIを開発中にリクエストとレスポンスの形式を迅速に確認
- Debugging: 予期しないレスポンスを詳細に分析
- Documentation: 生成されたcURLコマンドを使用してAPIの使用法を文書化する
- Testing: 異なるパラメータの組み合わせでAPIの動作を検証する
- API Key Security: APIキーを公開しないように注意してください
- Request Limits: APIサーバーのレート制限に注意してください
- File Size: 大きなファイルのアップロードのためにネットワークの状態を確認してください
- Endpoint Accuracy: 不正なエンドポイントは404エラーを引き起こす可能性があります
モデルの使用法 – 内部接続エンドポイント
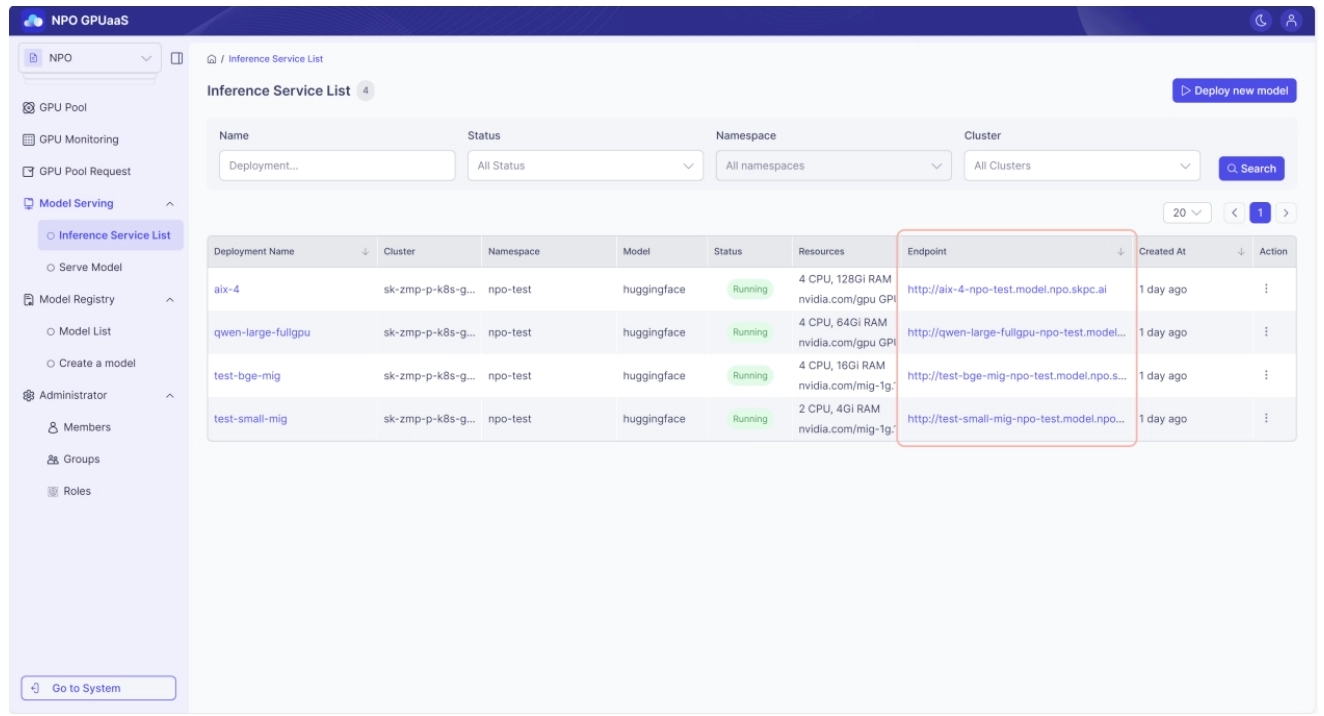
内部推論サービスエンドポイントは、GPUクラスター内でのみ使用できるURLです。デプロイされたモデルに応じて、異なるAPIアドレスパターンやリクエスト形式を持つ場合があり、クラスターの外部からは使用できません。
コンテキスト
モデルがデプロイされている同じクラスター内で実行されている他のワークロードからの迅速かつ安全なモデル呼び出しを可能にするため(例:トレーニングサーバー、バッチサーバー)。
目的
外部に露出することなくモデル推論を行うことで、クラスター内のネットワーク遅延を最小限に抑え、セキュリティを確保します。
主な機能
- GPUクラスター内でのみ使用可能な内部推論サービスエンドポイント。
- デプロイされたモデルタイプおよびランタイムに応じて、複数のエンドポイントパターンをサポート。
- 別途APIキー認証は必要ありません。
確認方法
ホームページまたは左側のナビゲーションメニューからモデルサービング > 推論サービスリストに移動したときに表示されるモデルリストのエンドポイントフィールド。
注意事項
- 内部エンドポイントの場合、エンドポイントURLおよびリクエスト形式は、デプロイメントランタイム、モデルタイプ、および構成に応じて異なる場合があります。
- GPUクラスター内でのみ使用可能です。
モデルの使用 – 外部接続エンドポイント
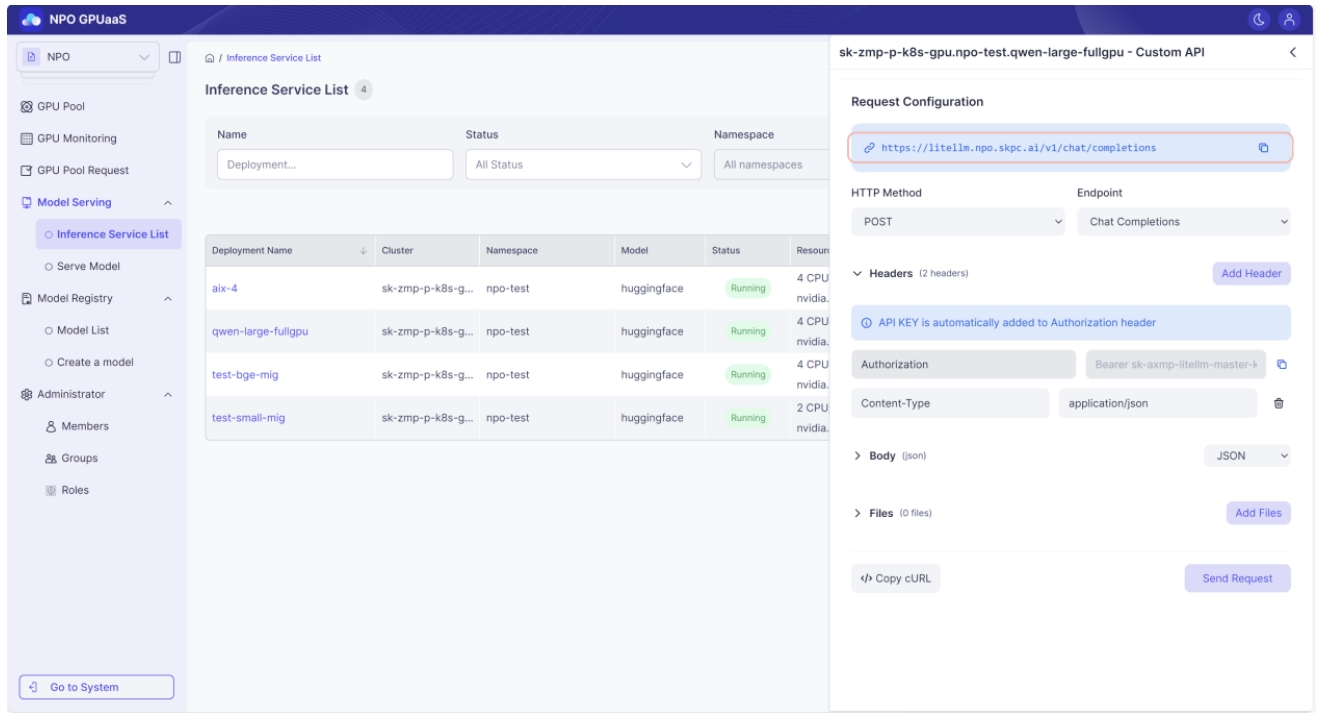
Playgroundに表示される外部接続エンドポイントは、モデルがデプロイされているクラスターの外部からアクセス可能なURLです。このエンドポイントは、OpenAI API互換モデルにのみ対応しています。
コンテキスト
外部のWebサービス、モバイルアプリ、またはクラスターの外部にある開発環境からモデル推論APIにアクセスする必要があるときに使用します。
目的
外部サービスとの統合のためにクラスターの外部からモデルAPIを呼び出し、Playgroundと同様にOpenAI互換API通信を行うことです。
主な機能
- Playgroundを介して発見可能で、クラスターの外部からアクセス可能な外部アクセスURL。
- OpenAI API互換モデルにのみ対応しています。
- アクセスにはAPIキーが必須です。
確認方法
- Endpoint: モデルサービングからPlaygroundを開き、推論サービスリスト > アクションでカスタムAPIリクエストを選択し、リクエスト設定に表示されるエンドポイントを確認します。
- API Key: カスタムAPIリクエスト画面のヘッダーで、Authorizationの隣にあるコピーボタンをクリックします。
注意事項
- 外部接続エンドポイントを使用する際は、デプロイされたモデルを区別するためにリクエストボディにモデル名を指定する必要があります(OpenAI API仕様に従います)。
- OpenAI API仕様に従っているため、外部接続アドレスはOpenAIで利用できないエンドポイントをサポートしていません。