Test Models with Playground
Playground is an interactive environment that allows you to test deployed models in real time and verify their performance.
You can run tests directly from your browser without writing any code.
- By default, it supports the OpenAI Compatible API.
- For other formats, you can use the Custom API Request feature to perform tests.
Getting Started
In the list of deployed models, click the Action menu on the right and select Playground.
- Playground only supports models that are already deployed.
- If your model has not been deployed yet, please first complete the deployment process by following the user guide to Deploy a Model to a Cluster.
- You can only test models in Playground that have been fully deployed.
- If the Status in the Inference Service List is not
Running, the Playground button will be disabled.
Key Features of Playground
- Automatic Registration: When you select a model type, it is automatically registered in Playground.
- Instant Testing: Check model responses without writing any code.
- Real-Time Responses: For chat and text models, responses can be viewed via streaming.
- Supports Multiple Types: Compatible with Chat, Text, Embedding, Image, Audio, and Custom API models.
- Parameter Adjustment: You can configure settings such as Temperature, Max Tokens, and more.
Testing Process
Step 1: Select a Model
- Choose the model you want to test from the Inference Service List.
- On the model detail page, click Open in Playground.
Step 2: Register the Model
-
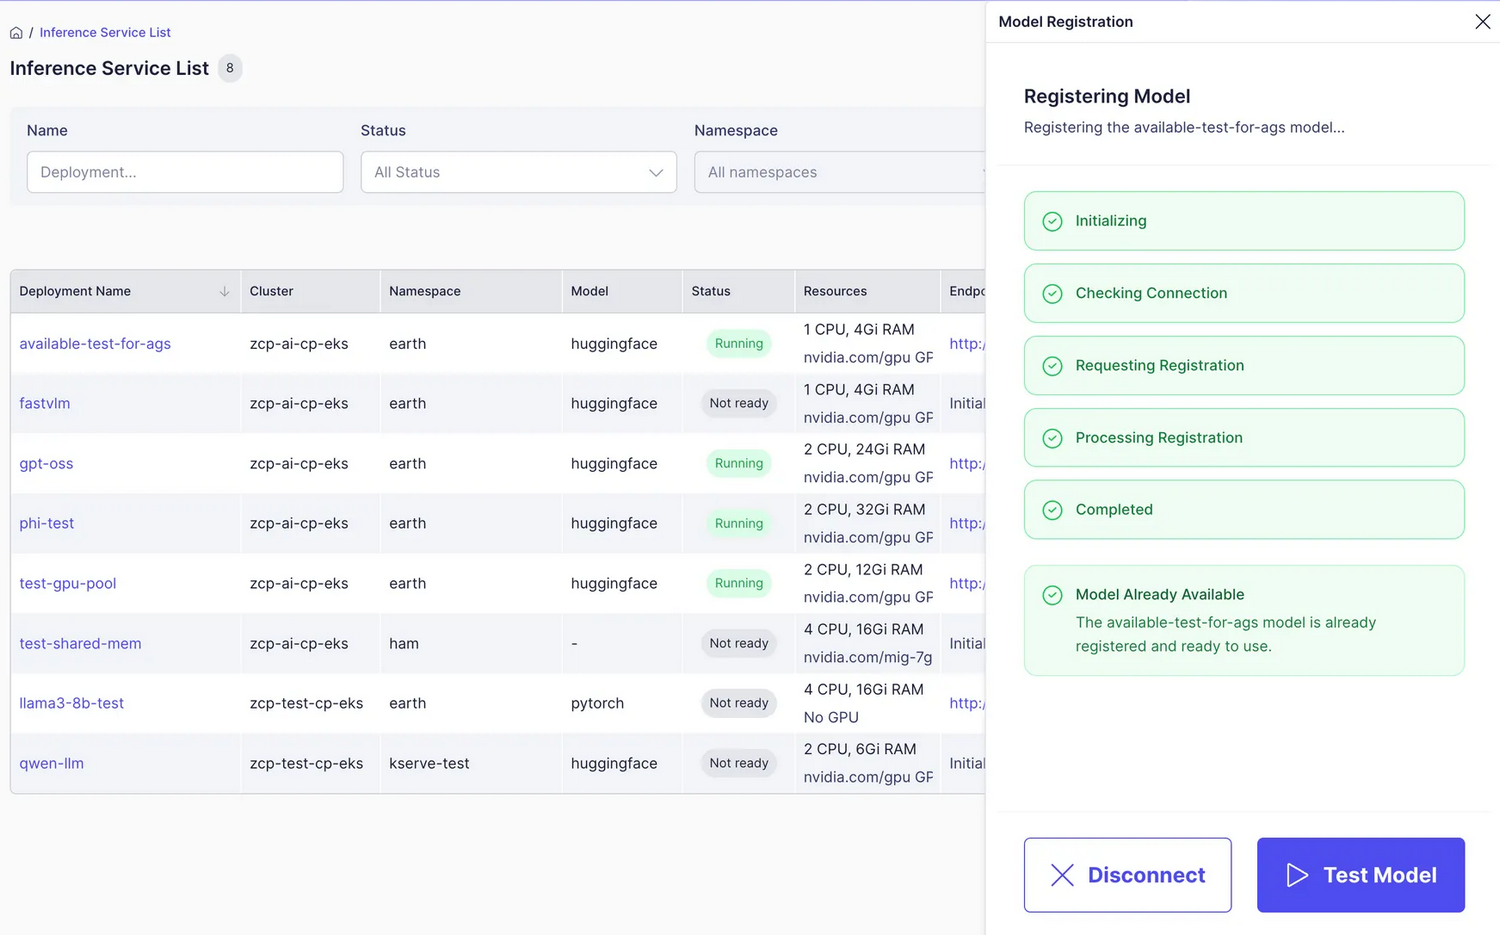
The model will be automatically registered through the Model Registration process.
-
Once registration is complete, click Test Model.
-
If you wish to cancel the registration, click Disconnect instead.
-
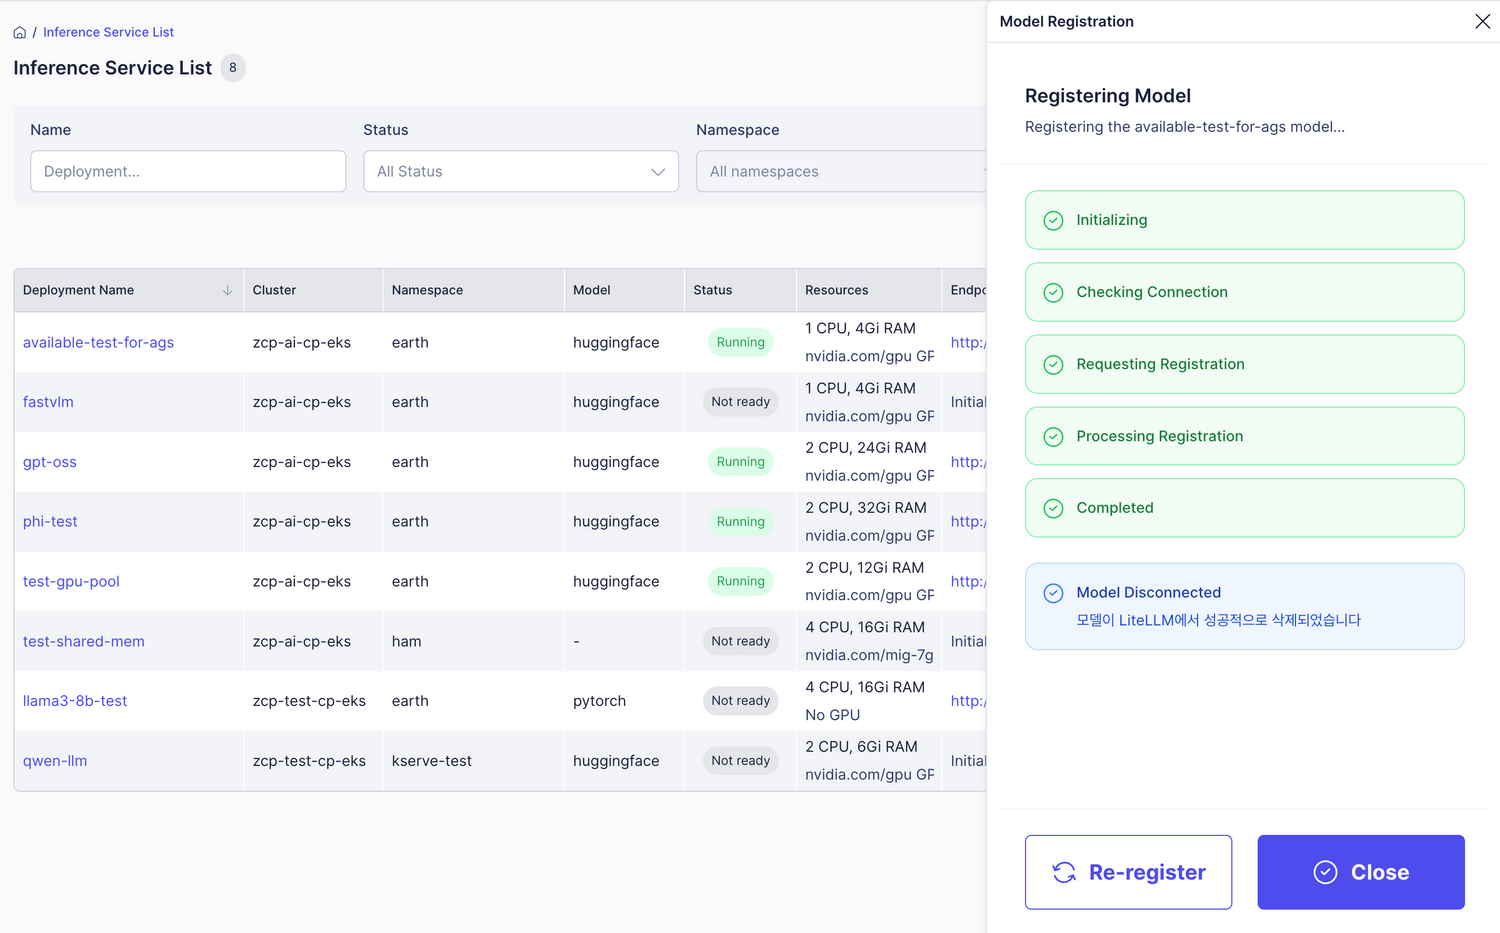
You can click “Re-register” to register the model again.
- If the model isn’t running properly, registration may fail.
- If the model is already registered, the Test Model button will appear immediately.
Step 3: Select the Model Type
Playground supports the following four model types:
| Typea | Description |
|---|---|
| Chat | Conversational models |
| Text Completion | Text auto-completion |
| Embedding | Sentence-to-vector conversion |
| Custom API | Custom API requests and testing |
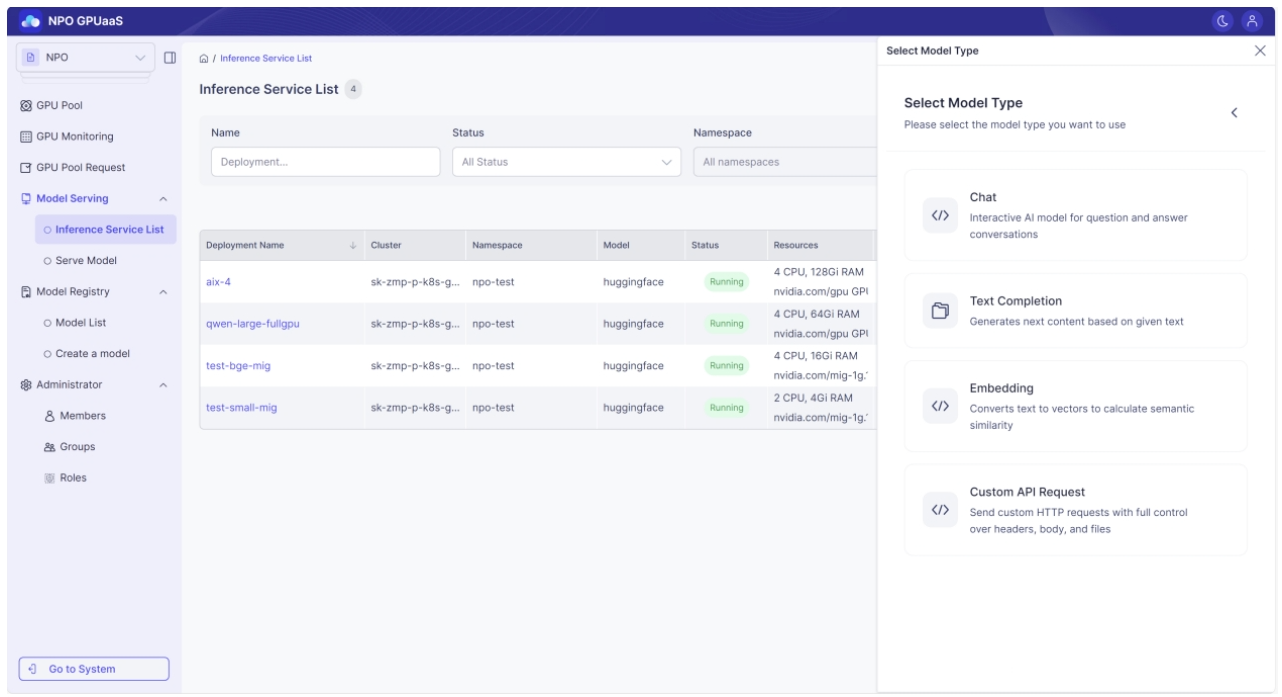
Click the type that matches your model and proceed with the test.
If you select a type that doesn’t match your model, it will not respond correctly.
For example: Using Chat type for a Stable Diffusion model → incorrect
Step 4: Adjust Model Options (Optional)
If needed, you can modify the model settings and parameters.
Not all models support every available setting.
Chat Model Testing
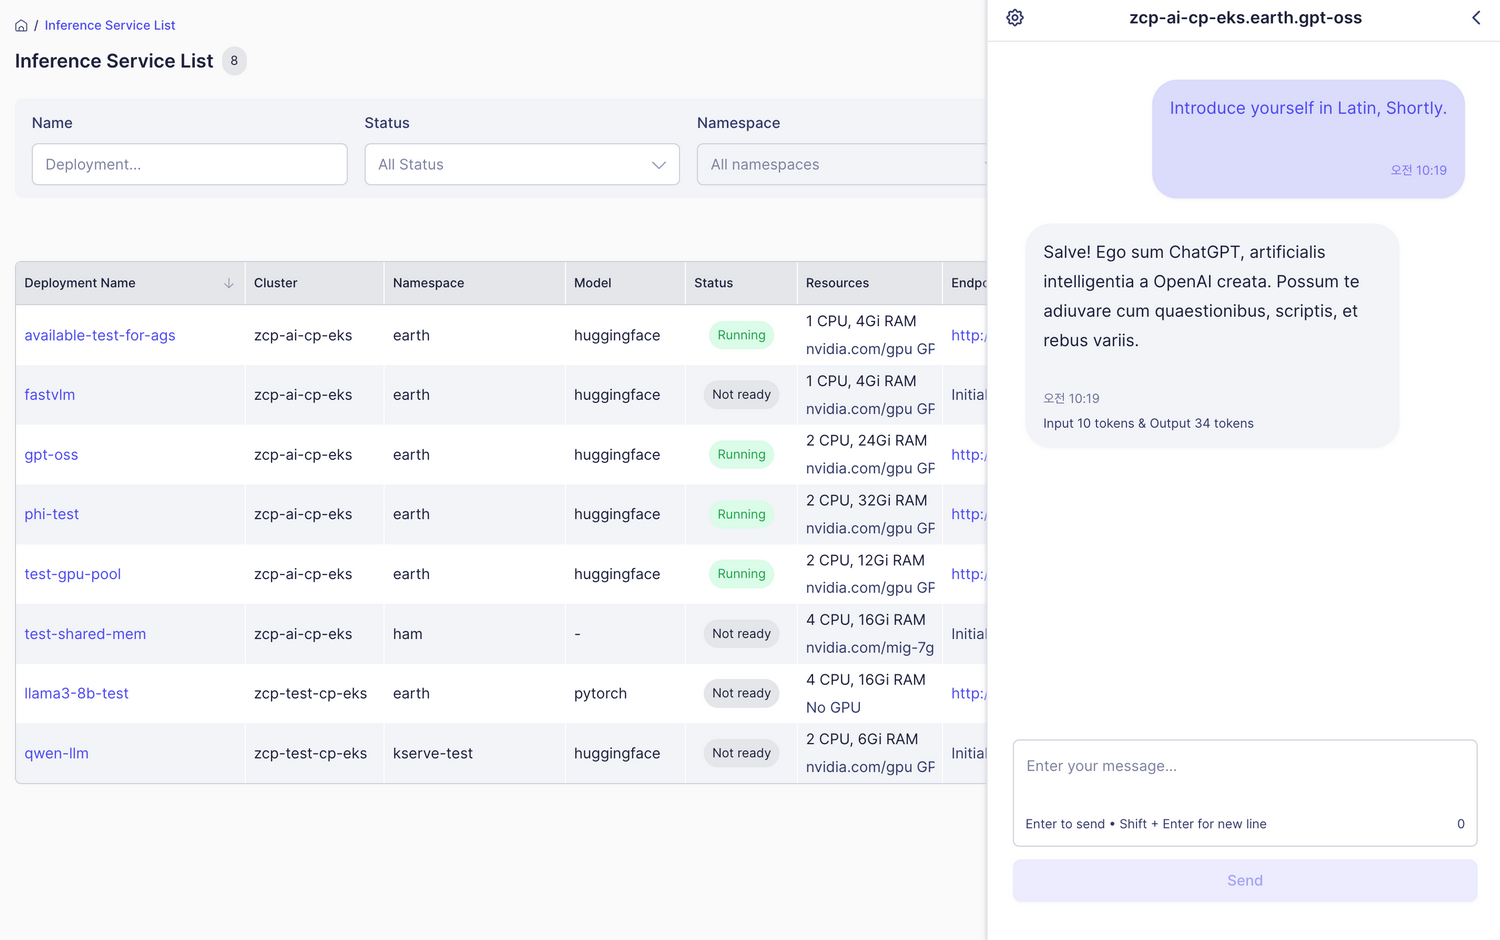
Chat model testing is used to validate models with conversational structures such as GPT and LLaMA. Chat models are specialized for multi-turn conversation scenarios, remembering previous exchanges as context and generating the most appropriate and consistent responses to the user's current questions. Users can also assign specific roles or behaviors to the model through the 'System Prompt'.
Context
Chat models use conversation history as context and rely on the Attention Mechanism and System Prompt to generate appropriate responses and maintain a consistent persona.
Purpose
Allows user to test the model via a web interface to evaluate accuracy, consistency, creativity, and to define the AI's role using the System Prompt.
How to Use
- Select the Chat model type and open the interface
- Enter your message and send
- Press Enter or click the send button
- View the model’s response
Adjusting Model Parameters
By clicking the settings button in the upper left corner, you can fine-tune various parameters to control the model’s responses:
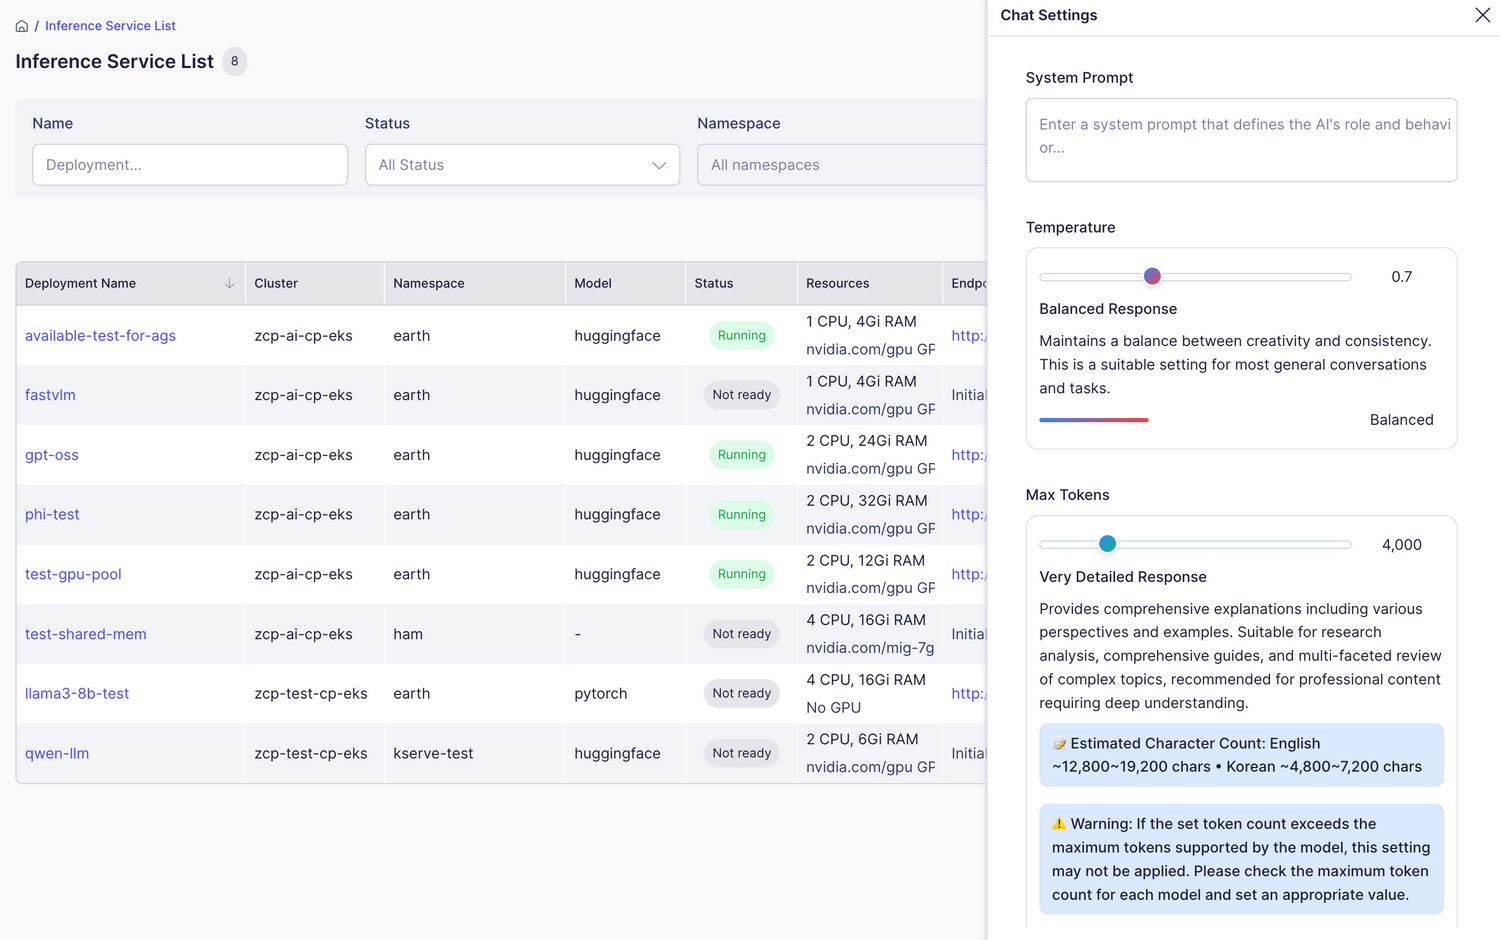
| Parameter | Range/Options | Description | Recommended Value |
|---|---|---|---|
| System Prompt | Text | Instructions defining AI’s role and behavior | - |
| Temperature | 0.0~2.0 | Controls creativity consistency (lower = more consistent) | 0.7 (general chat) |
| Max Tokens | 100~20,000 | Maximum number of tokens to generate (length limit) | 4,000 (medium length) |
| Top P | 0.0~1.0 | Controls diversity (used with Temperature) | 0.9~1.0 |
| Frequency Penalty | -2.0~2.0 | Discourages repetitive words/phrases | 0.1~0.3 |
| Presence Penalty | -2.0~2.0 | Encourages introduction of new topics | 0.0~0.2 |
| Stop Sequences | Array of text | Stops generation at specified text (can set multiple) | - |
| Seed | Number (optional) | Seed value for reproducible results | - |
| Metadata | Key-value pairs | Additional info for logging/analysis (optional) | - |
- Max Tokens: Be careful not to exceed the maximum token limit for your model.
- Stop Sequences: If any stop sequence is encountered, generation will halt.
- Seed: Using the same input and seed will produce repeatable results.
Text Completion Test
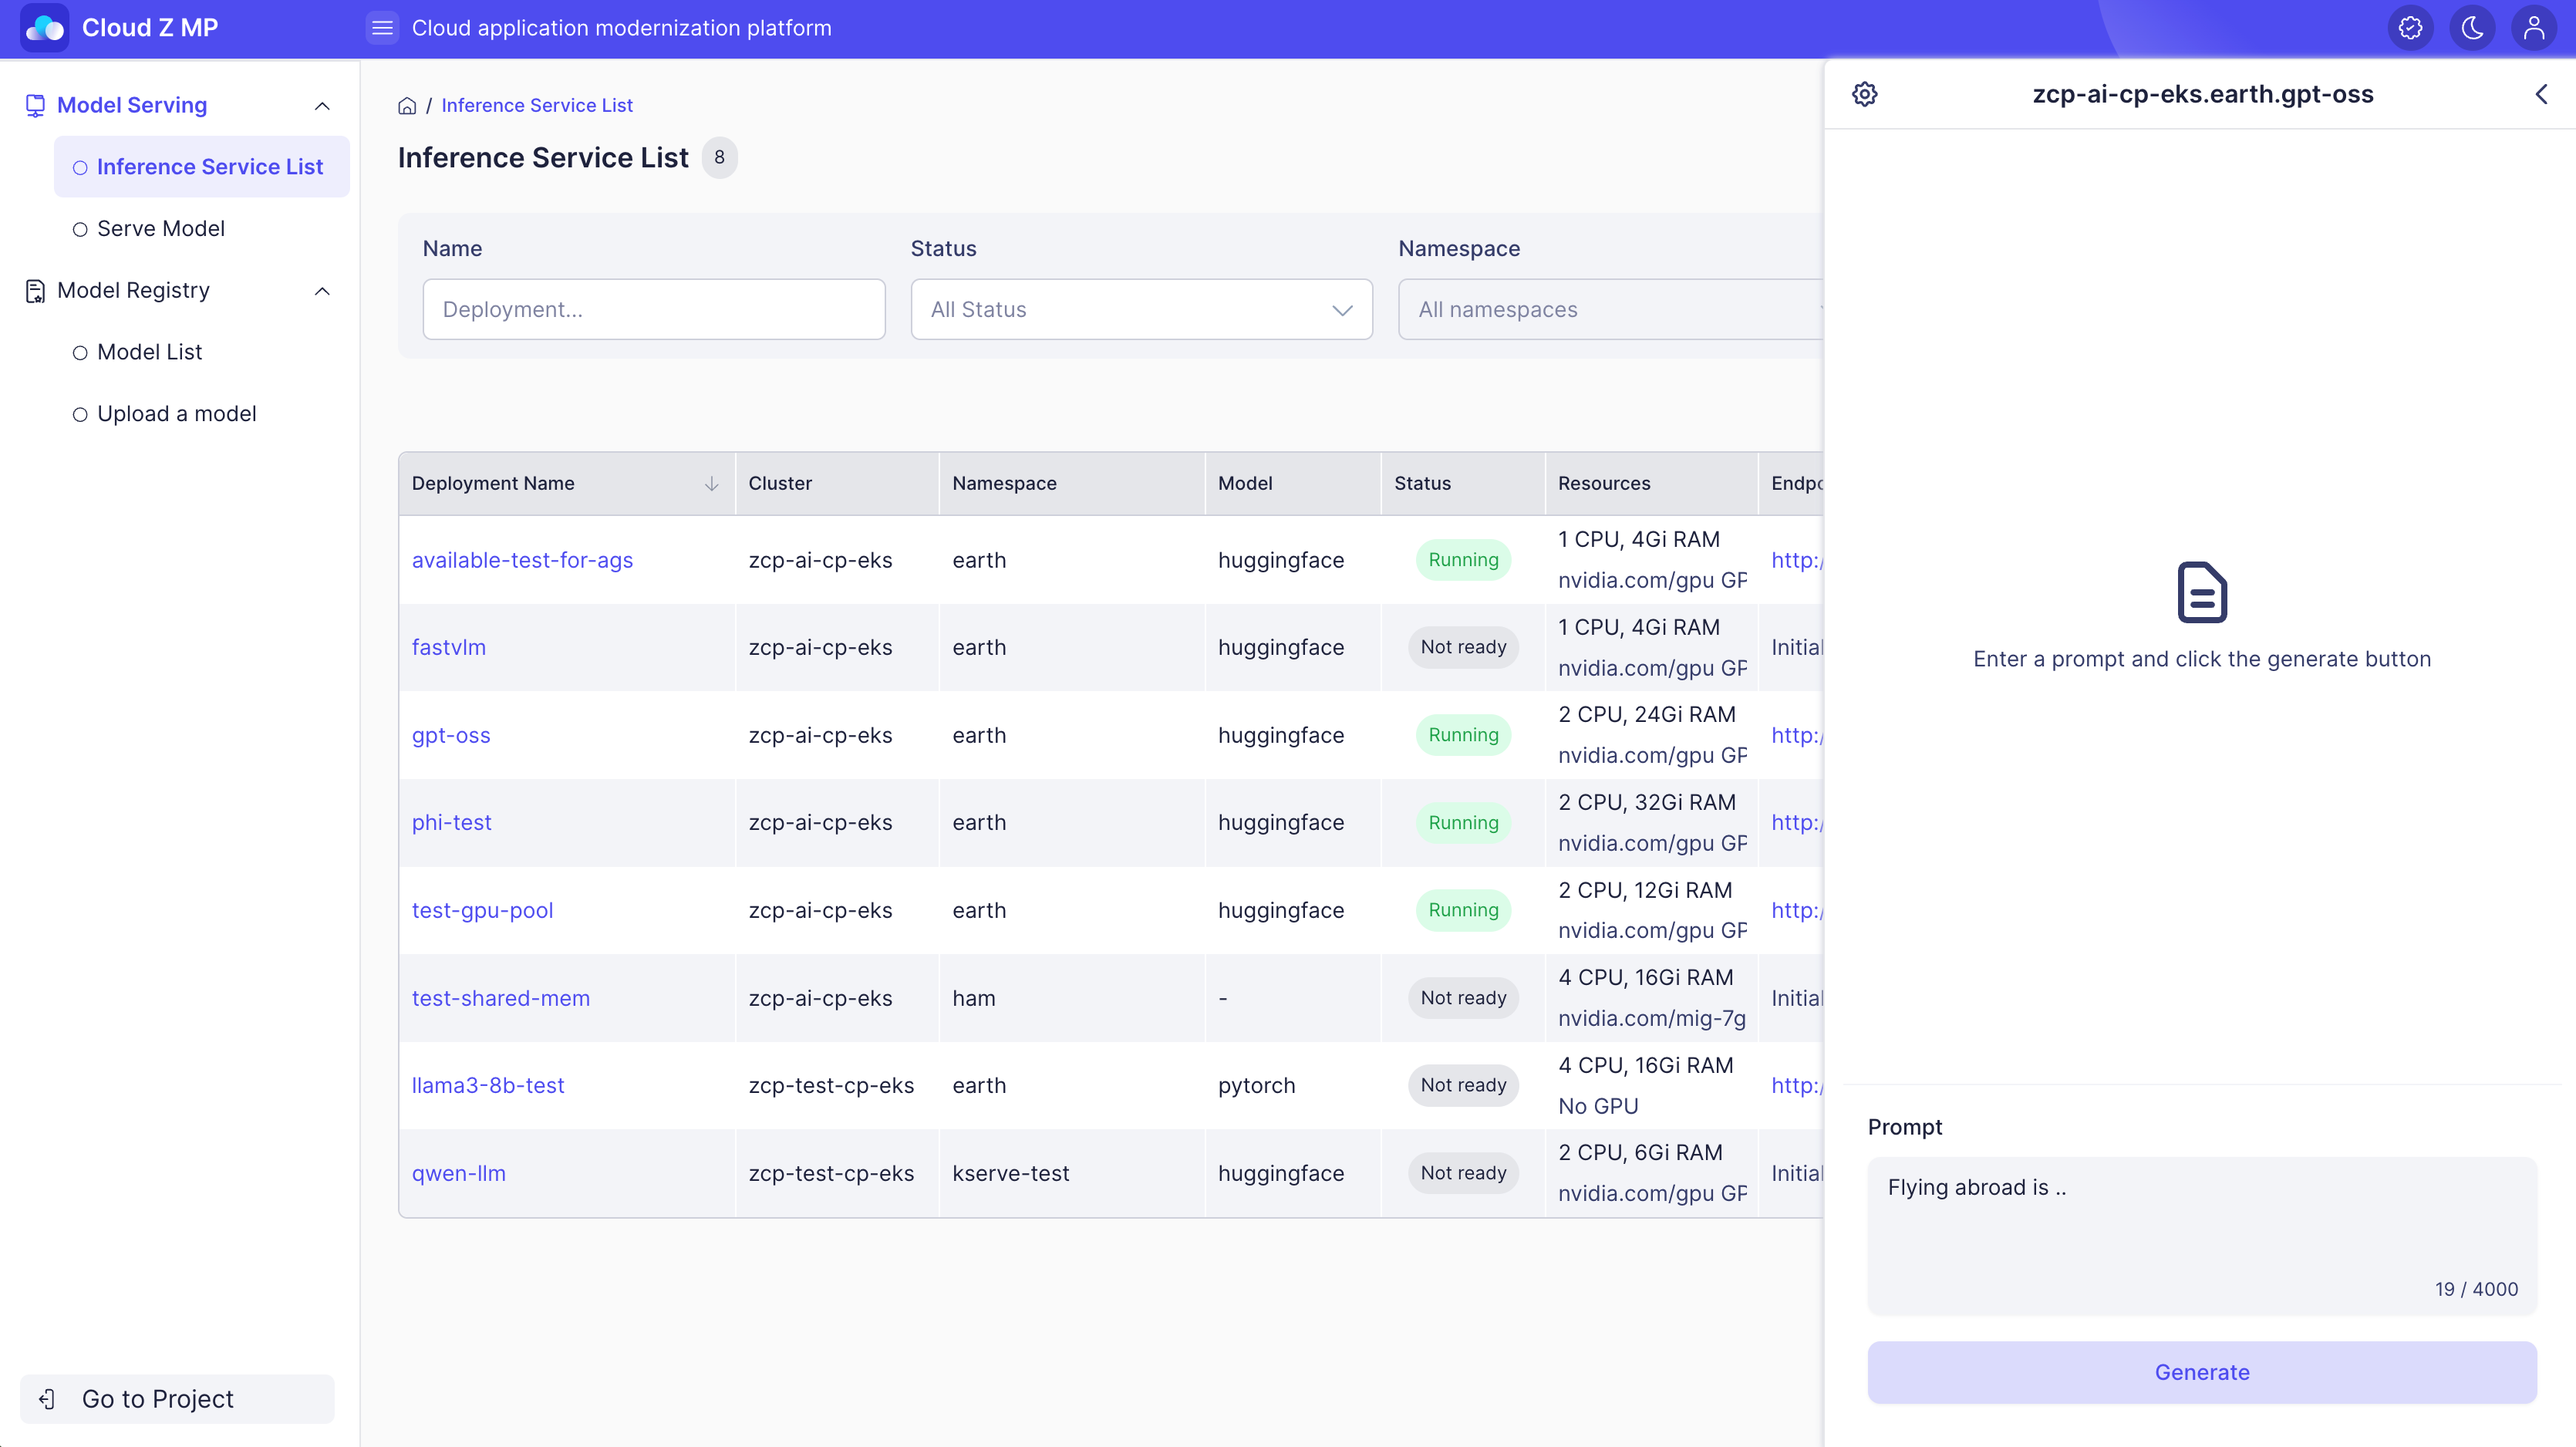
Text Completion is used to test models that automatically complete sentences after a prompt is given. Text Completion models analyze the patterns and context of the user-provided input text (prompt) and continuously generate the most probable next words and phrases. Through this process, the model can automatically complete sentences, paragraphs, or even long texts.
Context
Text Completion models are based on auto-regressive generation, sequentially generating the next token using the model’s predicted token probability distribution. During this process, parameters intervene in token sampling to control the diversity of the response—this is the theoretical core.
Purpose
Users input a prompt to automatically generate subsequent sentences and verify the quality of the generated text. In particular, the Suffix parameter can be used to add a suffix after the generated text, allowing tests that guide text completion in a specific direction.
How to Use
-
Select the Text Completion type.
-
Enter your prompt.
-
Click Generate and the model will automatically produce the continuation of your prompt.
-
You can copy the result or regenerate as needed.
Adjusting Model Parameters
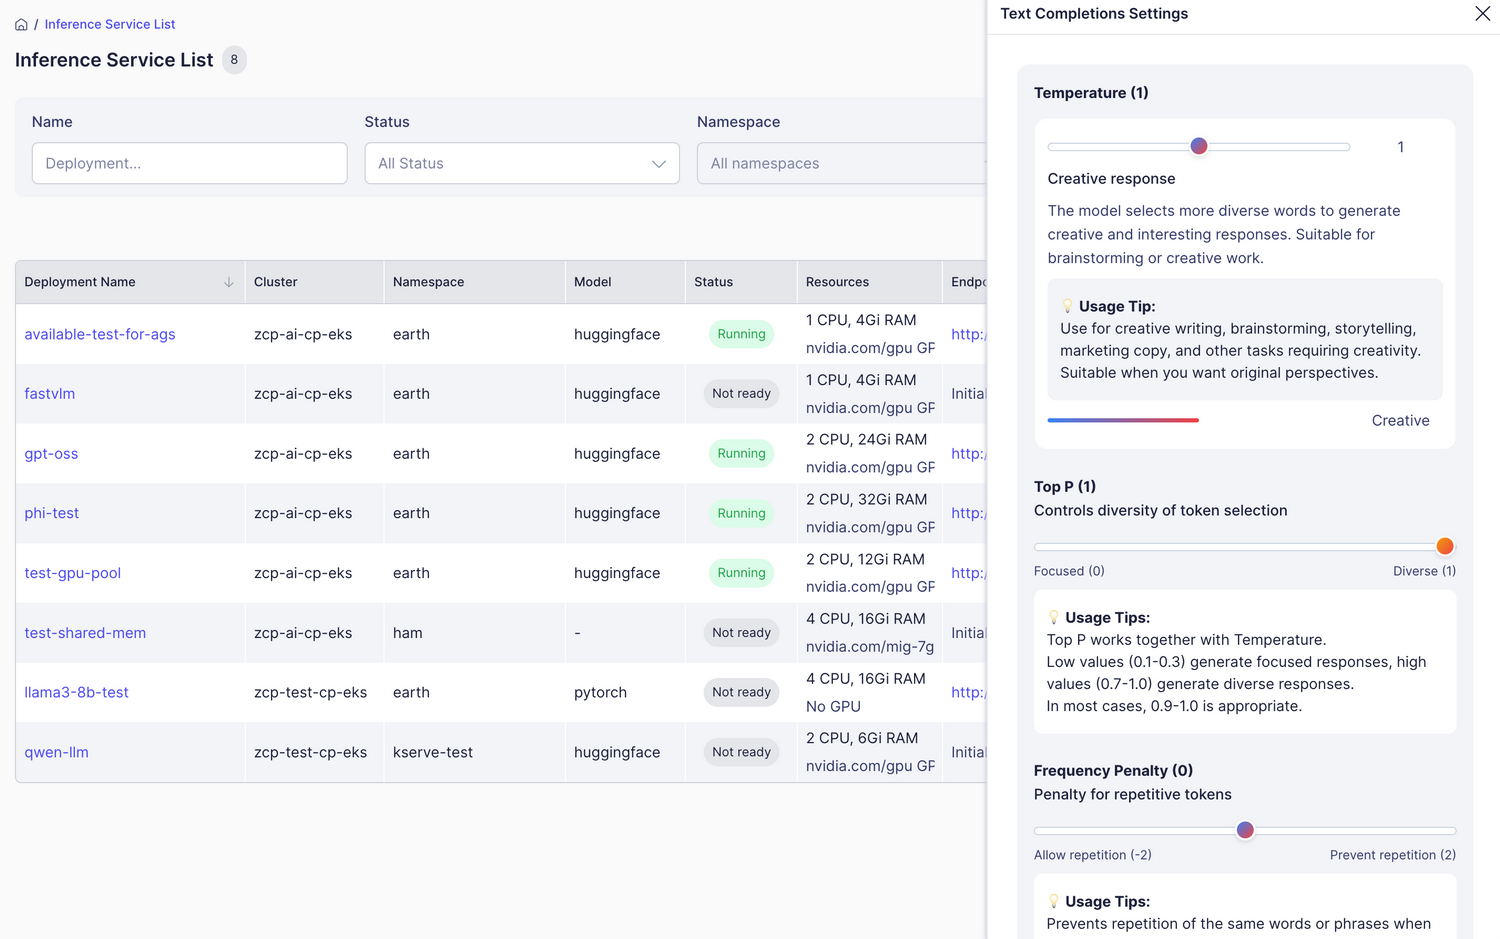
By clicking the settings button in the upper left, you can fine-tune the response parameters for the Text Completion model.
| Parameter | Range/Options | Description | Recommended Value |
|---|---|---|---|
| Temperature | 0.0~2.0 | Controls creativity and consistency | 1.0 (creative) |
| Max Tokens | 100~4,000 | Maximum number of tokens to generate | 1,000 (medium length) |
| Top P | 0.0~1.0 | Controls diversity (used with Temperature) | 1.0 |
| Frequency Penalty | -2.0~2.0 | Discourages repeated words/phrases | 0.0~0.3 |
| Presence Penalty | -2.0~2.0 | Encourages introduction of new topics | 0.0~0.2 |
| Suffix | Text (optional) | Adds a suffix to the generated text | - |
| Stop Sequences | Array of text | Stops generation at specified text | - |
| Stream | true/false | Enables real-time streaming for long text | true (recommended) |
Suffix Usage Examples
| Use Case | Suffix Example | Effect |
|---|---|---|
| Request a summary | "In summary:" | Guides the model to produce a summary |
| Conclusion | "In conclusion," | Finish the text with a logical conclusion |
| Specific Format | "### Main Points:" | Generates text in a structured format |
- Stop Sequences: Use
\\n\\n,###, orendto create natural stopping points. - Stream: Enable streaming to view long text as it’s generated in real time.
- Suffix: Use a suffix to guide the model’s completion direction.
Embedding Generation Test
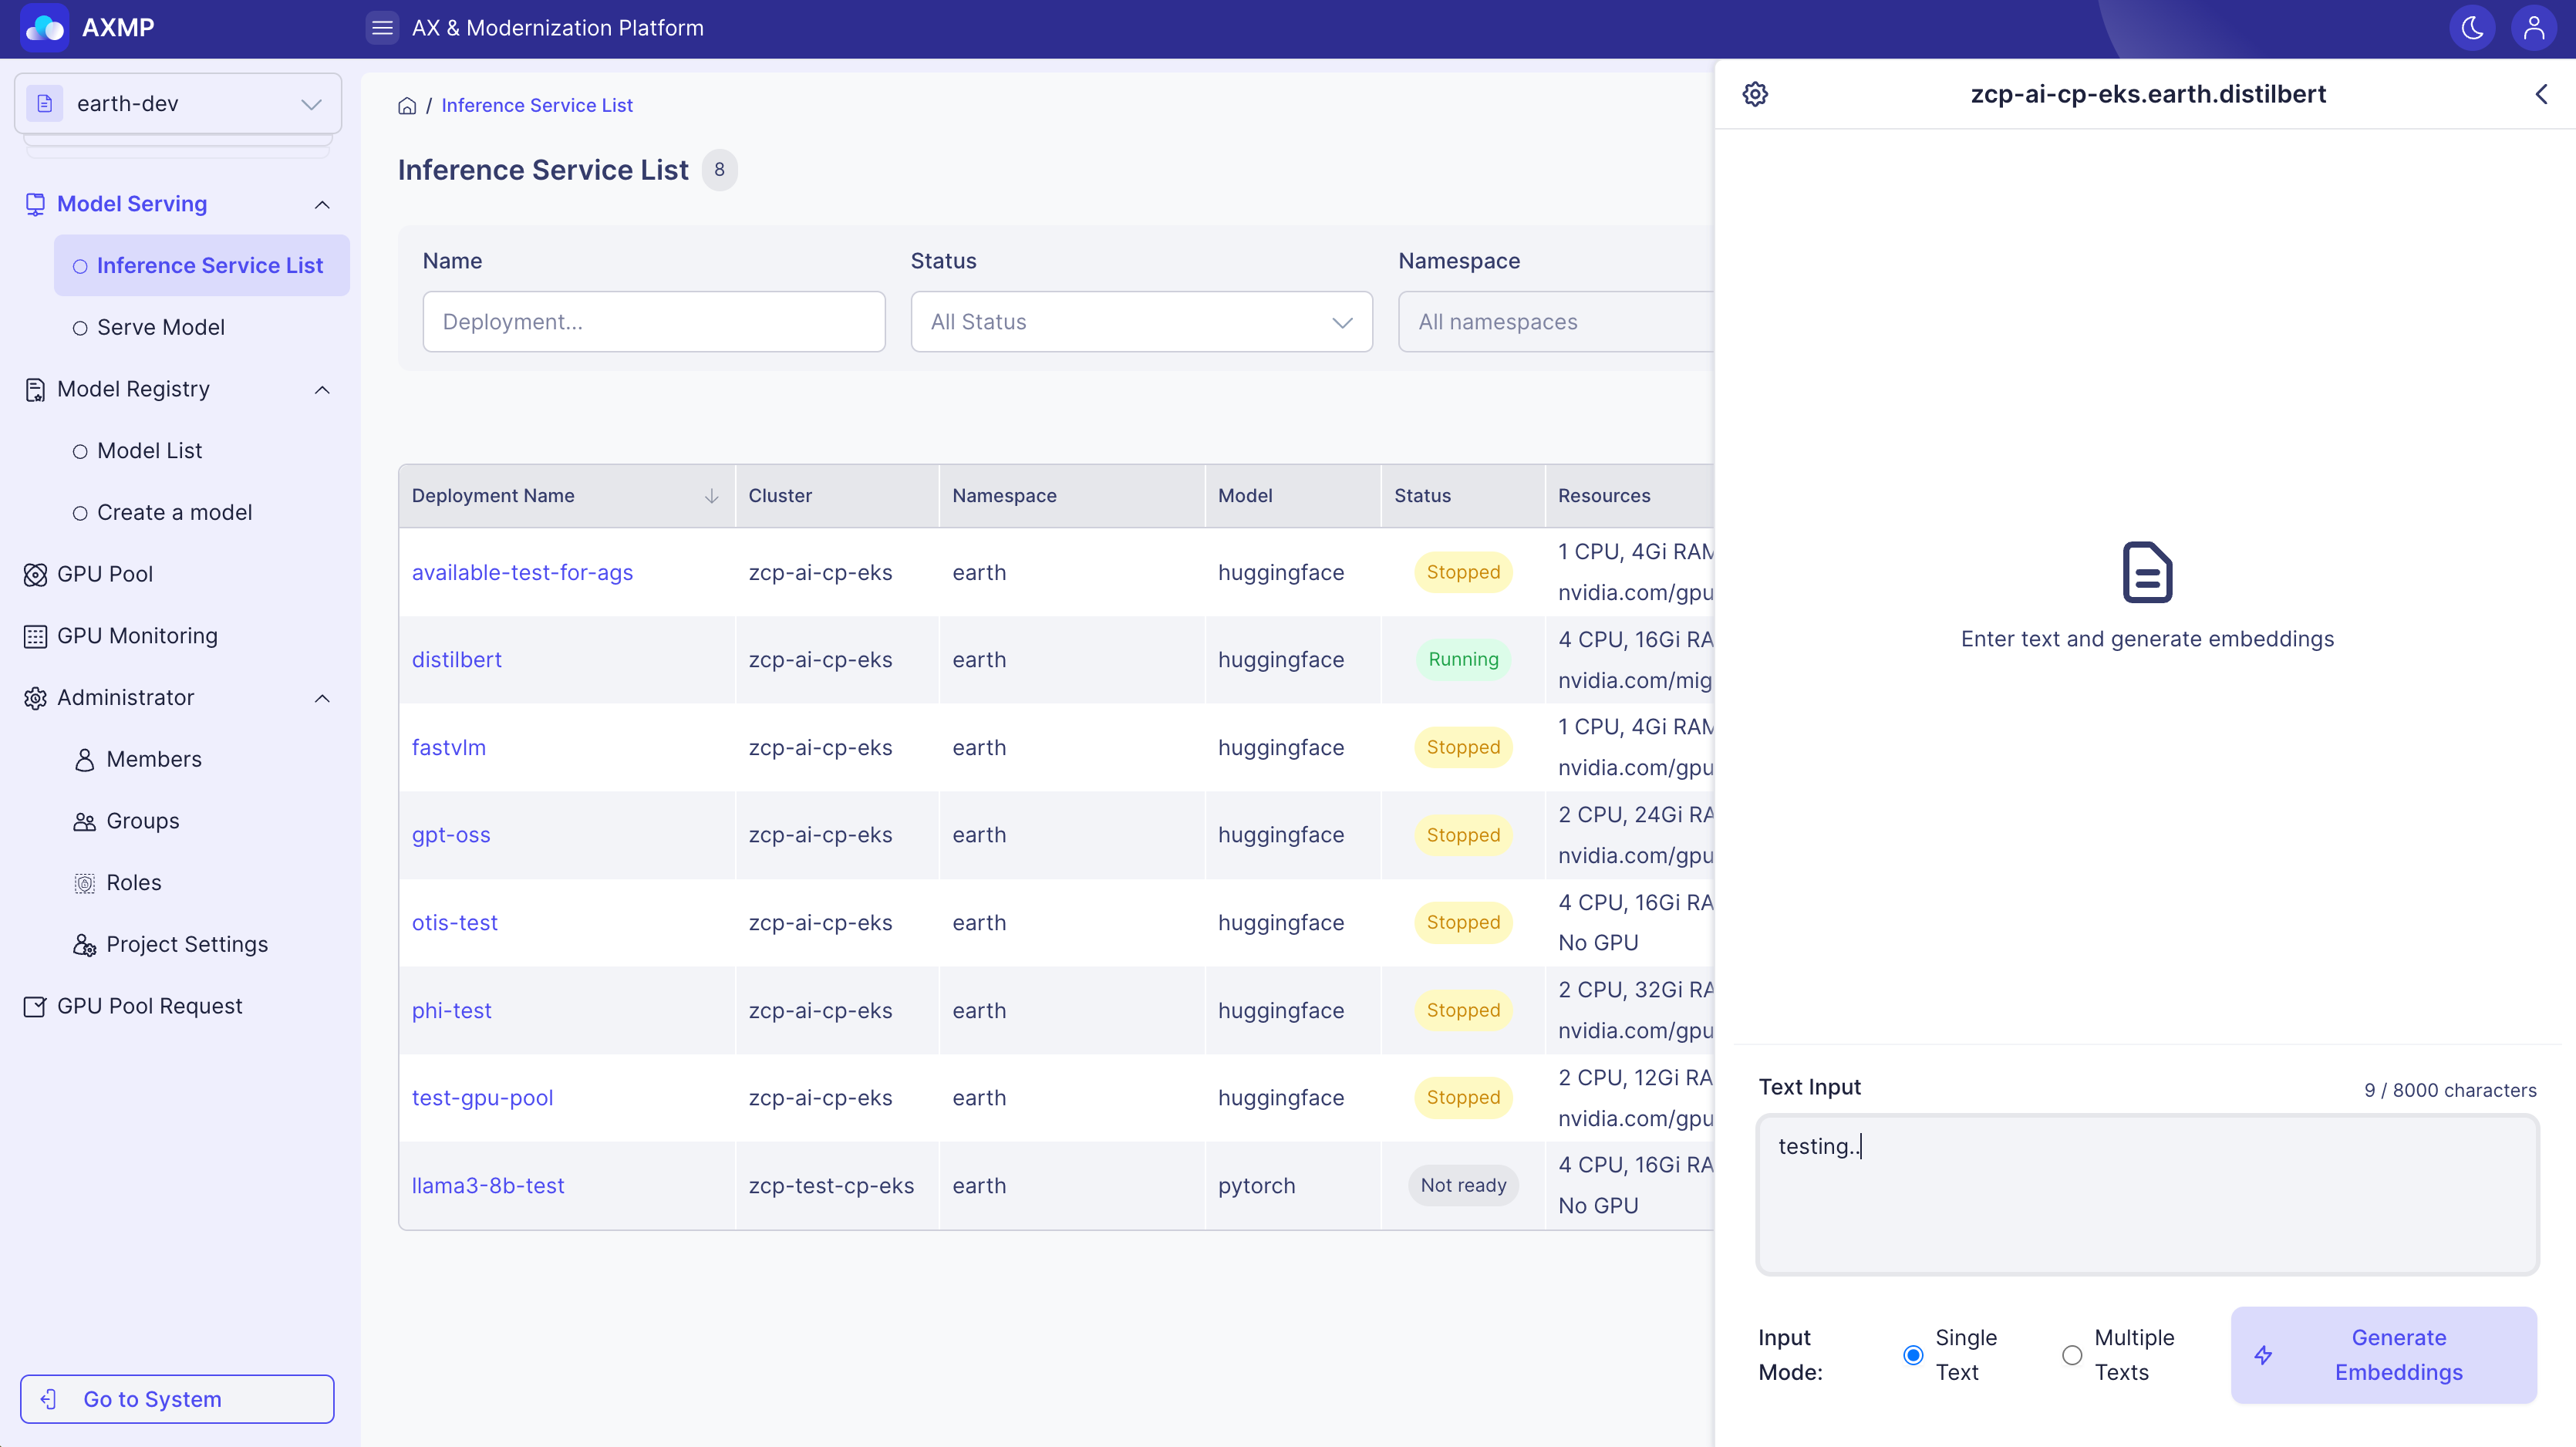
Embedding is used to test models that convert text into meaningful vector values. The model transforms input text into a numerical array in high-dimensional space, where these vector values represent the semantic features of the text. The more similar the vectors, the more similar the original texts are in meaning.
Context
Embedding is based on the theory of distributed representation, converting the meaning of words or sentences into numerical vectors in a high-dimensional space. In this space, similarity measures such as “Cosine Similarity” are used to calculate the similarity between vectors, indicating the semantic similarity between the original texts.
Purpose
By inputting single or multiple sentences, users can examine and verify the vector values generated by the model and the similarities between sentences. Additionally, parameters like Encoding Format and Dimensions can be adjusted to explore the optimal vector form for the intended environment.
How to Use
-
Select the Embedding type
-
Input one or multiple sentences (separate multiple sentences with line breaks)
-
Click Generate Embeddings
-
Check the vector values and similarity scores
Adjusting Model Parameters
You can customize the parameters for embedding vector generation.
| Parameter | Options/Range | Description | Recommended Value |
|---|---|---|---|
| Encoding Format | float / base64 | Vector encoding format | float (default) |
| Dimensions | 512, 1024, 1536, 3072 | Number of vector dimensions (model-dependent) | Model default |
| User Identifier | Text (optional) | Identifier for request tracking/monitoring | - |
Encoding Format Comparison
| Format | Characteristics | Use Cases |
|---|---|---|
| Float | Array of numbers, intuitive | Development/debugging, manual computation |
| Base64 | Compressed string, efficient | Storage/transmission, API responses |
Example Use Cases:
- Semantic Search: Find documents with similar meaning
- Similarity-Based Recommendations: Content recommendation systems
- Document Clustering: Group similar documents together
- Duplicate Detection: Identify documents with similar content
- Dimensions: Only some models support dimension customization
- Encoding Format: Impacts API response size (Base64 is more efficient for large data)
Custom API Testing
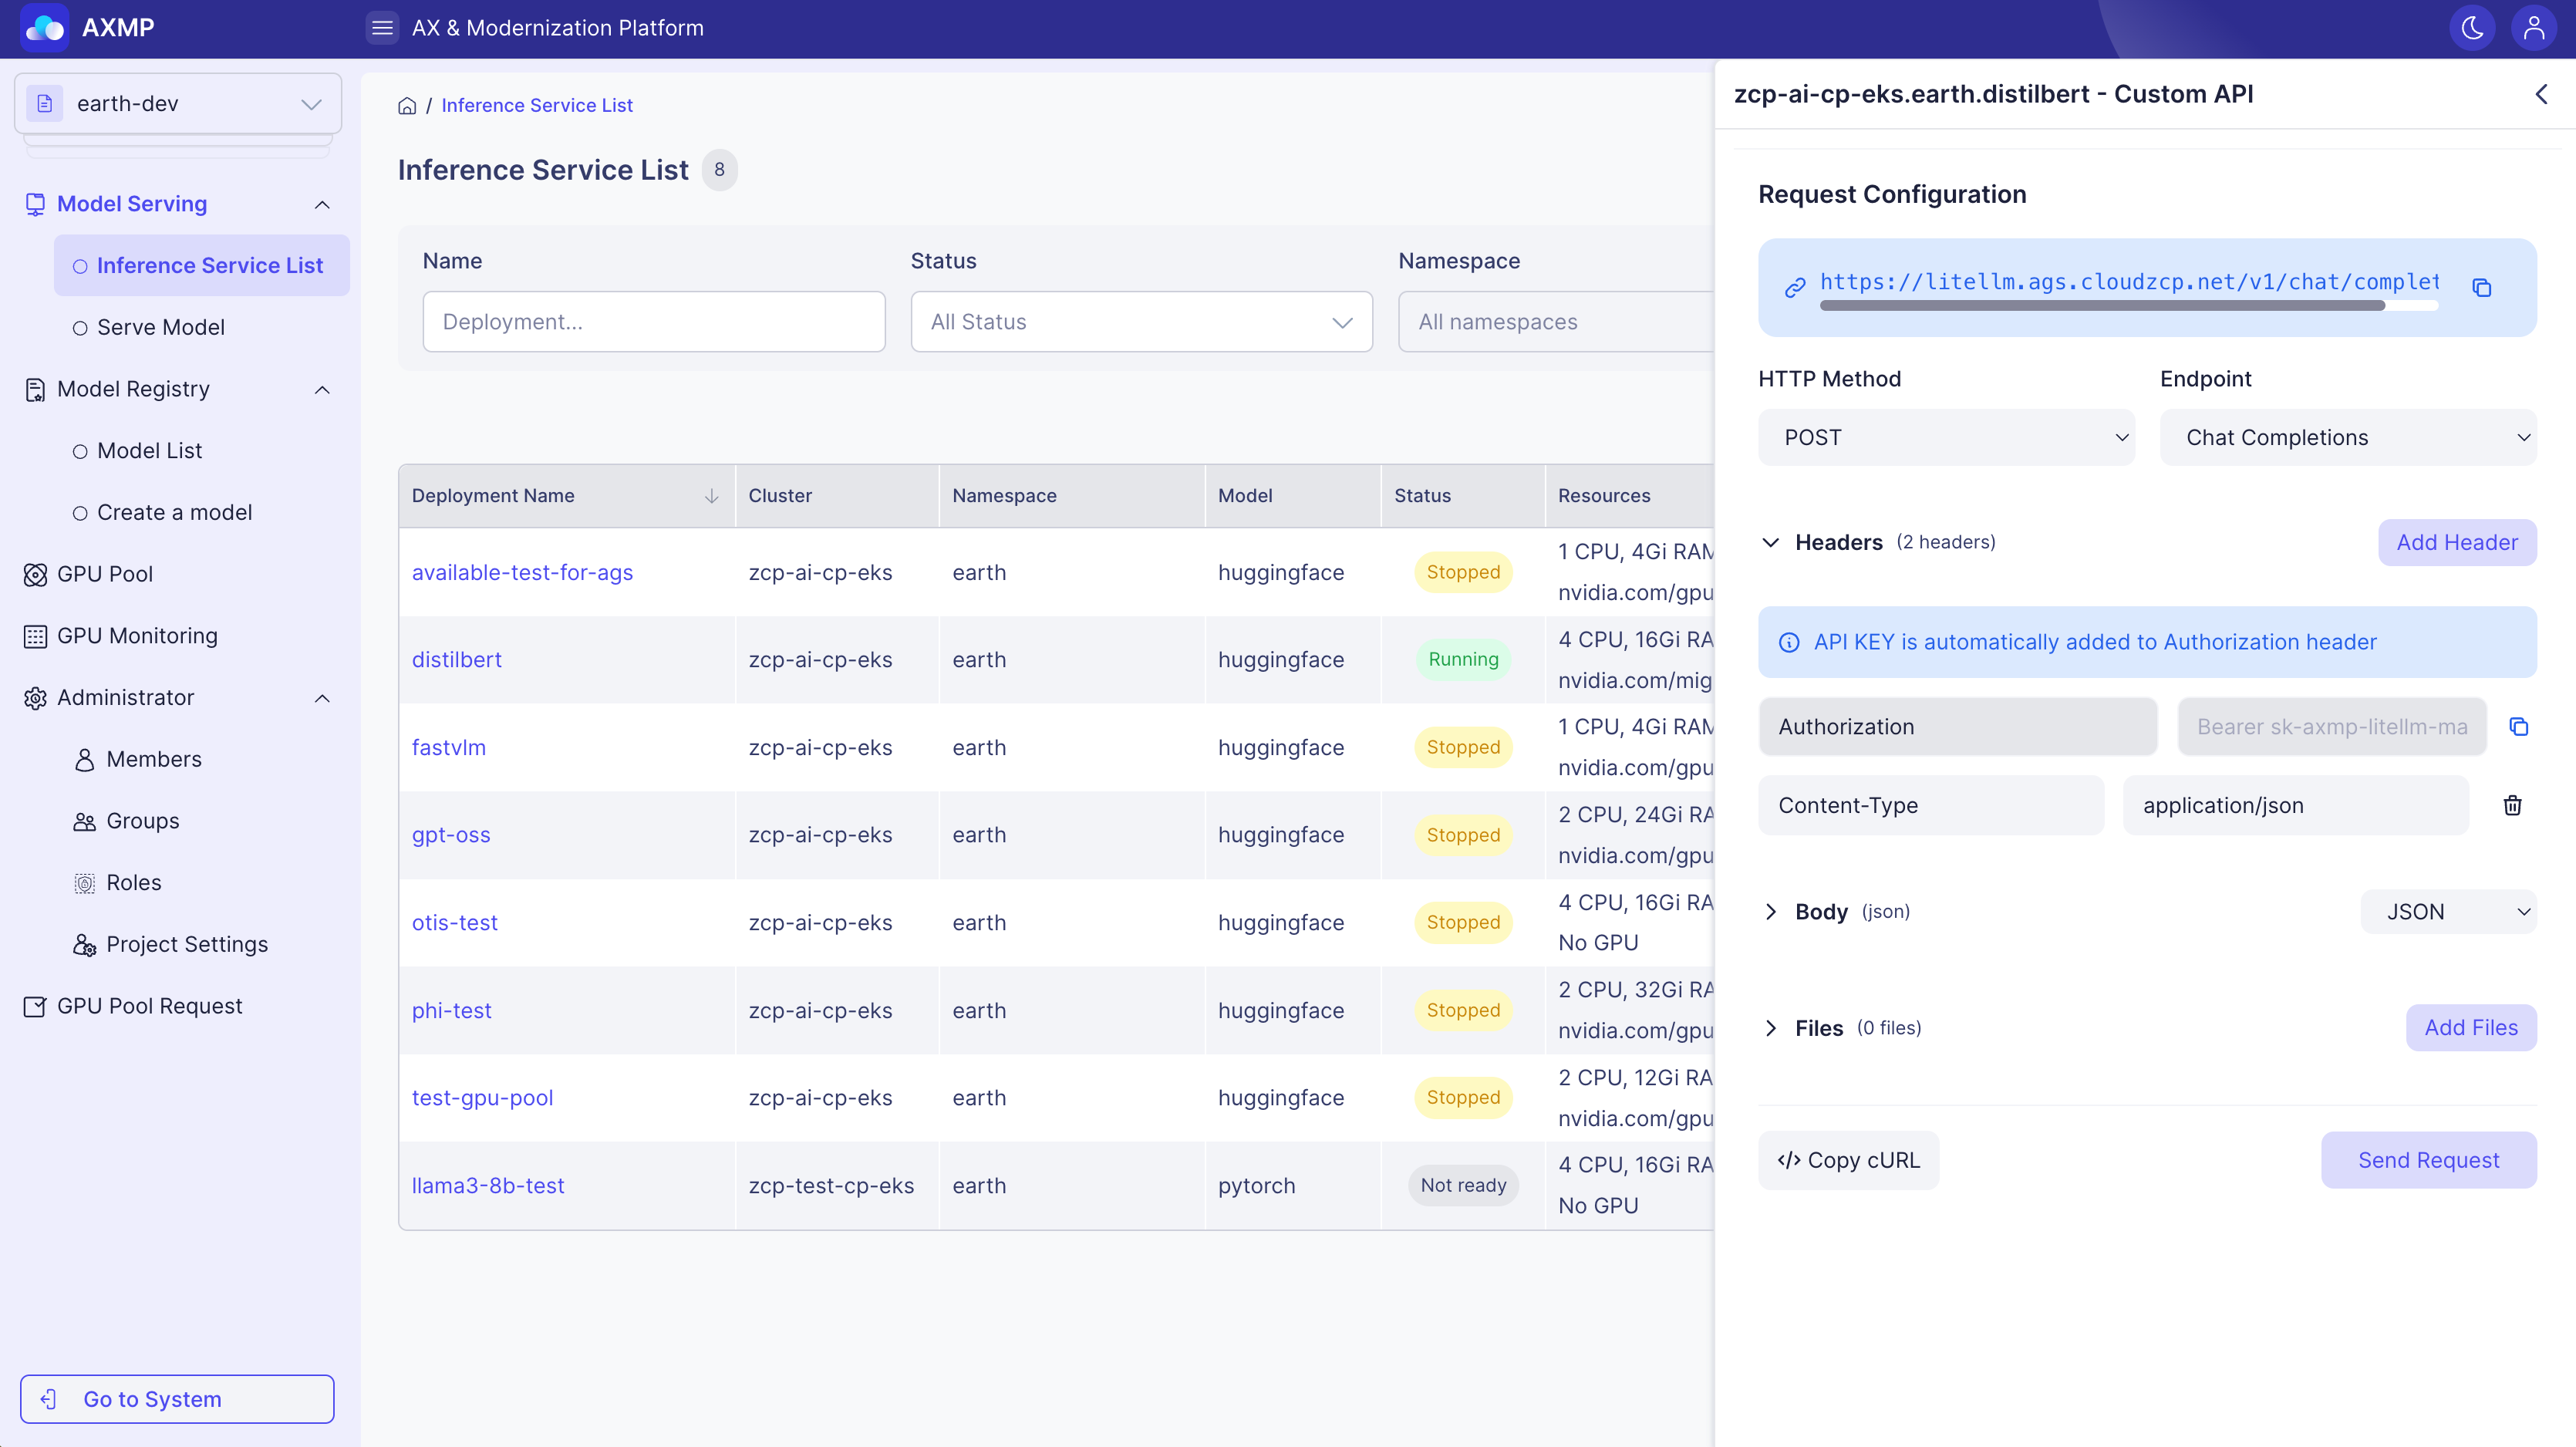
Custom API is an advanced feature that enables you to configure and send HTTP requests directly. It is especially useful for testing specialized APIs or custom endpoints that are not covered by the standard model types.
Context
Custom API testing is based on RESTful architecture and HTTP protocol. Users manually set HTTP methods (GET, POST, etc.), headers, and body to send requests to the model server’s endpoint, then analyze the status code and response data to verify correct API operation.
Purpose
It allows user to quickly verify and debug request/response structures during API development by checking endpoint behavior and response handling in a REST API environment. Complex requests can be easily built in a GUI.
How to Use
-
Select the Custom API type
-
Choose a predefined endpoint or enter a custom URL
-
Configure your request (set headers, body, and files as needed)
-
Click Send Request and review the results
Supported Endpoints
Custom API supports 8 predefined endpoints as well as custom endpoints.
| Endpoint | Description | HTTP Method | Body Type |
|---|---|---|---|
| Chat Completions | Conversational model API | POST | JSON |
| Text Completions | Text auto-completion API | POST | JSON |
| Embeddings | Sentence vector transformation | POST | JSON |
| Image Generations | Text-to-image generation API | POST | JSON |
| Audio Speech (TTS) | Text-to-speech conversion API | POST | JSON |
| Audio Transcriptions (STT) | Speech-to-text conversion API | POST | Form Data |
| Audio Translations | Speech translation API | POST | Form Data |
| Custom... | User-defined endpoint | Selectable | Selectable |
Request Configuration
Selecting HTTP Method| Method | Description | Typical Use Case |
|---|---|---|
| GET | Retrieve data | Check model information, view status |
| POST | Create/process data | Model inference, file upload |
| PUT | Update all data | Update settings |
| DELETE | Delete data | Remove resources |
| PATCH | Update partial data | Change specific settings |
| HEAD | View headers only | Status check |
| OPTIONS | Check supported methods | CORS preflight requests |
- Automatic headers: Authorization, Content-Type, and X-Model-Name are added by default.
- Custom headers: Add additional headers as needed.
- API key management: Easily copy the API key from the Authorization header.
| Body Type | Description | Use Case |
|---|---|---|
| None | No request body | GET, HEAD, OPTIONS requests |
| JSON | JSON formatted data | Most API requests |
| Form Data | Form data | File uploads, form submissions |
| Text | Plain text | Simple text transmission |
- Supported formats: All file types
- Size limits: Limits based on browser and server settings
- Multiple files: Upload several files at once
Response Handling
Response Modes| Mode | Description | Use Case |
|---|---|---|
| Formatted | Structured JSON tree view | Analyzing complex JSON responses |
| Raw | Original text form | Viewing simple responses |
- Auto-expand: All nodes are expanded by default
- Copy individual values: Easily copy data from specific nodes
- Color coding by type: Strings (green), numbers (blue), booleans (purple), etc.
- Nested structures: Objects and arrays are visually represented
| Item | Description | Display Format |
|---|---|---|
| HTTP Status | Response status code | 200, 404, 500, etc. |
| Duration | Processing time | 1.23s, 500ms, etc. |
| Size | Response size | 1.2KB, 5.4MB, etc. |
| Timestamp | Request time | 2024-01-15 14:30:25 |
Advanced Features
cURL Command Generation- Auto-generation: Requests can be converted to cURL commands
- Clipboard copy: Copy the generated cURL command with one click
- Real-time URL display: See the final request URL as you configure
- URL copy: Copy the completed URL to your clipboard
- Auto-injection: The API key is automatically added to the Authorization header
- Key copy: Copy just the API key separately
- Development: Quickly verify request and response formats while developing APIs
- Debugging: Analyze unexpected responses in detail
- Documentation: Document API usage with generated cURL commands
- Testing: Validate API behavior across different parameter combinations
- API Key Security: Be careful not to expose your API keys
- Request Limits: Watch for API server rate limits
- File Size: Check network status for large file uploads
- Endpoint Accuracy: Incorrect endpoints may result in 404 error
Model Usage – Internal Connection Endpoint
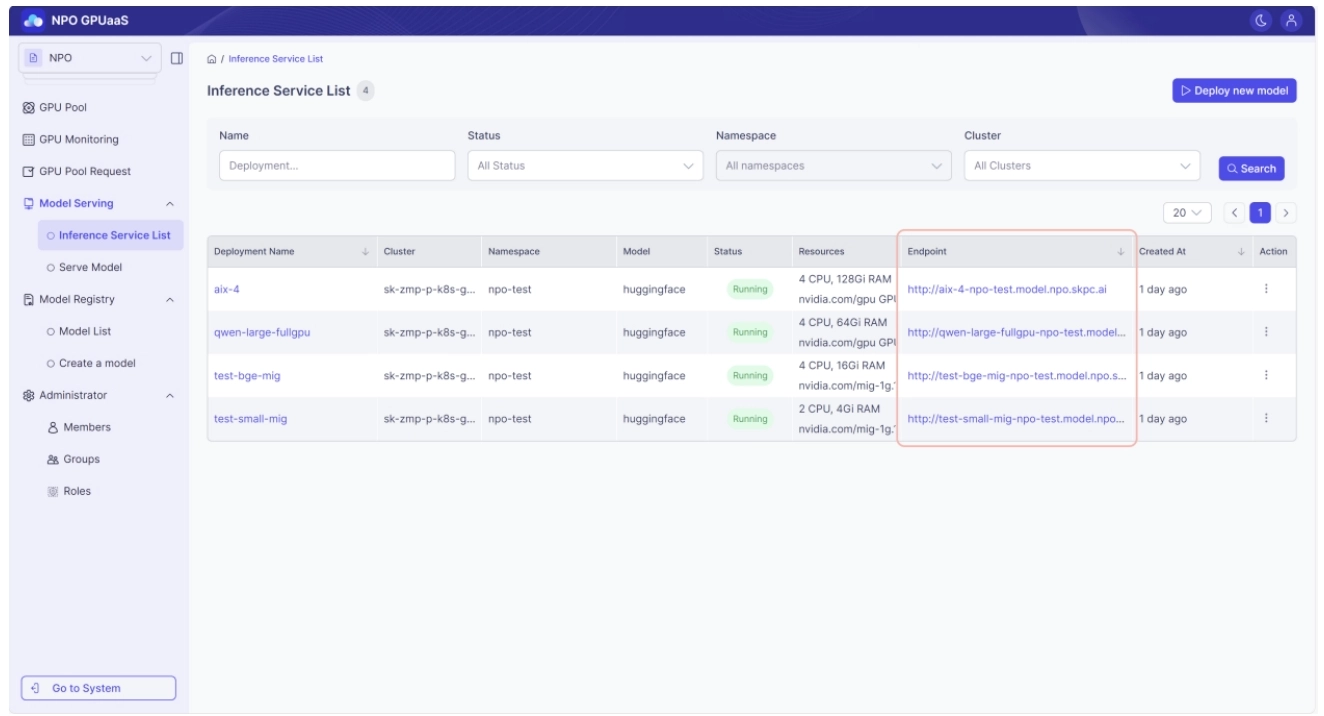
The internal Inference Service endpoint is a URL that can be used only within the GPU Cluster. Depending on the deployed model, it may have different API address patterns and request formats, and it cannot be used from outside the cluster.
Context
To enable fast and secure model invocation from other workloads running within the same cluster where the model is deployed (e.g., training servers, batch servers).
Purpose
Minimize intra-cluster network latency and ensure security by performing model inference without external exposure.
Main Function
- An internal Inference Service endpoint usable only inside the GPU cluster.
- Supports multiple endpoint patterns depending on the deployed model type and runtime.
- No separate API key authentication is required.
How to check
The Endpoint field in the model list shown when you navigate to Model Serving > Inference Service List from the home page or the left navigation menu.
Precautions
- For internal endpoints, the endpoint URL and request format can vary depending on the deployment runtime, model type, and configuration.
- Usable only within the GPU cluster.
Model Usage – External Connection Endpoint
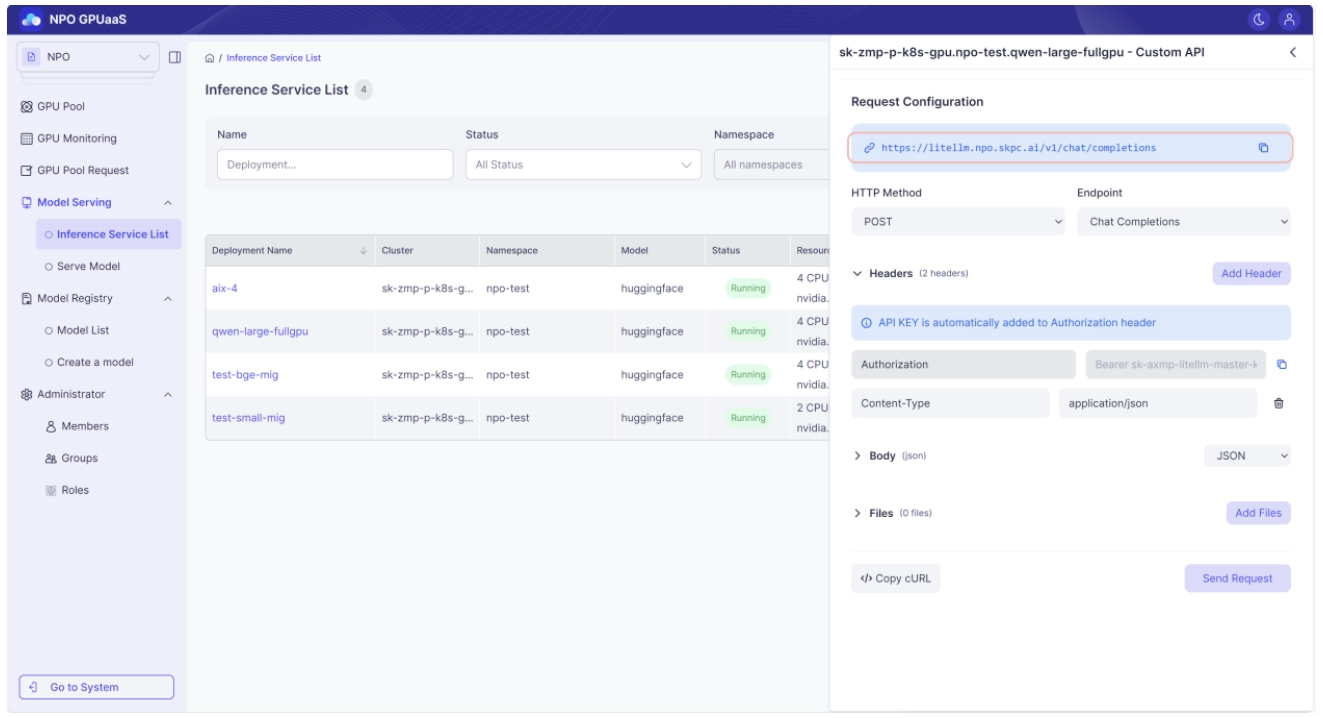
The external connection endpoint shown in the Playground is a URL reachable from outside the cluster where the model is deployed. This endpoint is guaranteed to work only for OpenAI API–compatible models.
Context
Used when you need to access the model inference API from external web services, mobile apps, or development environments outside the cluster.
Purpose
To call the model API from outside the cluster for integration with external services, and to perform OpenAI-compatible API communication in the same way as the Playground.
Main Function
- An external access URL discoverable via the Playground and reachable from outside the cluster.
- Guaranteed to work only for OpenAI API–compatible models.
- An API key is mandatory for access.
How to check
- Endpoint: Open Playground from Model Serving > Inference Service List > Action, choose Custom API Request, then check the endpoint shown in Request Configuration.
- API Key: On the Custom API Request screen, in Headers, click the copy button next to Authorization.
Precautions
- When using the external connection endpoint, you must specify the model name in the request body to distinguish deployed models (per the OpenAI API spec).
- Because it follows the OpenAI API spec, the external connection address does not support endpoints that are not available in OpenAI.