Create and Update Single Agent Profile
The NPO Studio allows you to create Agent Profiles so that you can design, configure, and manage intelligent digital assistants tailored to specific tasks or use cases. Creating an Agent Profile is the first step in building an AI agent that can operate independently or within a workspace, supporting activities such as customer support, data analysis, information retrieval, and more.
Initiate a New Agent Profile
Following the steps below to start creating a new agent profile:

-
Navigate to the AI Agent > Agent Profiles page from the main navigation menu.
-
In the top right corner, you’ll find the Create Agent button. Click the button to initiate the creation process.
-
Once you click the Create Agent button, the Agent Profile Settings form will appear. Enter the required information for you new agent:
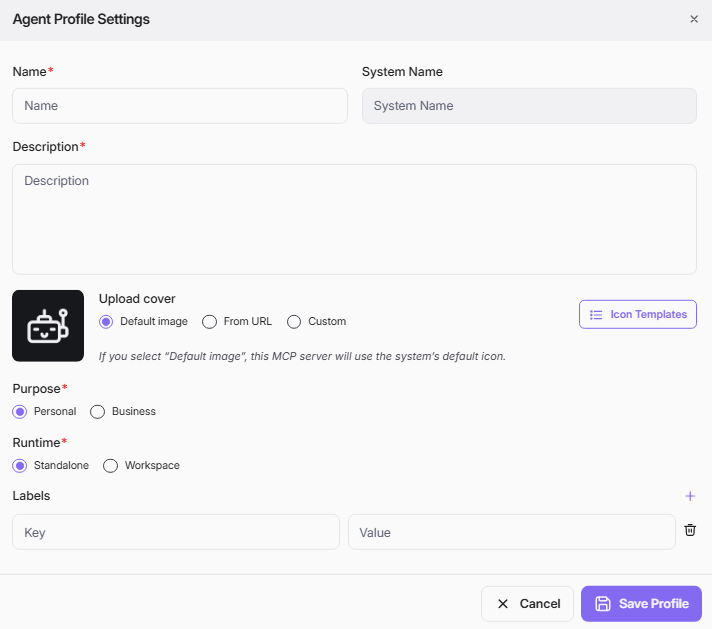
- Name: Enter a clear, descriptive name for your agent profile. This name will appear in the agent list and is used to identify your agent.
- System Name: The system name is auto-generated from the profile name and must be unique. This field cannot be edited directly. If the system name already exists, update the profile name so the system name will automatically change.
- Description: Write a detailed description explaining your agent’s functionality, target users, and key features. This helps others understand the agent’s purpose and scope.
- Upload Cover: Select a visual cover to represent your agent.
- You can upload a custom image file or provide an image URL.
- You may also browse Icon Templates for preset designs.
- If you do not select an image, a default cover will be automatically applied.
- Purpose: Indicate the intended use for the agent
- Personal: For individual or small team use.
- Business: For organizational or enterprise-level applications.
- Runtime: Choose where your agent will operate
- Standalone: Functions independently.
- Workspace: Integrated with collaborative environments.
- Labels: Add relevant labels to categorize and clarify the purpose of your agent. Use the ‘Add’ button (the + icon) to add more labels and the trash icon to remove any unnecessary ones.
Once you have entered all required information, click Save Profile to proceed to the Agent Profile Editor, where you can further customize your agent’s configuration.
Update an Agent Profile
You can update the agent profiles you have created, or all profiles if you have administrative privileges. Update a single agent can follow all similar steps as deep agent creation except for step to add Sub-agent. Refer to step 1 to 12 (ignore step 8) on Create/Update Deep Agent Profile | Notion for detailed guideline.