GPU Pool Requests
GPU Pool Requests画面では、システム管理者がプロジェクト全体のGPUプールリクエストを表示、フィルタリング、および管理できます。この画面は、リソースの割り当て、承認ワークフロー、およびGPUリソースの効率的な処理に不可欠です。
GPUリクエストリストにアクセス
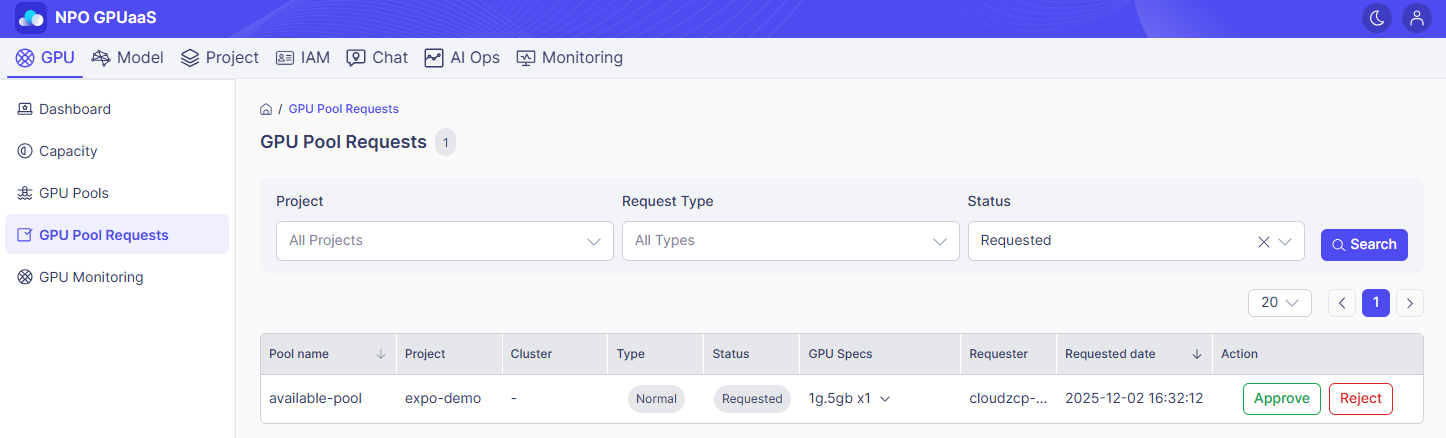
システム管理者コントロールパネルから、メインナビゲーションでGPUをクリックします。次に、左側のナビゲーションでGPU Pool Requestsを選択します:
リクエストを検索
Search機能を使用して、特定のGPUプールリクエストを迅速に見つけることができます。検索は以下のフィルターに基づいて行うことができます:
- Project: 特定のプロジェクトを選択するためのドロップダウンまたはすべてのプロジェクトからリクエストを表示します。
- Request Type: リクエストの種類でフィルタリング(例:通常、カスタム)。
- Status: リクエストのステータスでフィルタリング(例:リクエスト済み、承認済み、却下)。
希望のフィルターを設定した後、Searchボタンをクリックして、下のテーブルを更新します。
リクエストリストを表示
このページでは、フィルターに一致するすべてのGPUプールリクエストをリストしたテーブルを見ることができます(該当する場合)。情報は以下を含みます:
- Pool name: リクエストが作成されたGPUプールの名前。
- Project: リクエストが属するプロジェクト名。
- Cluster: リクエストが関連付けられているクラスターの名前(例:zcp-ai-cp-eks)。
- Type: プールの種類(例:通常、カスタム)
- 通常: 通常のGPUリクエスト
- カスタム: カスタムGPUプールを作成するリクエスト
- Status: 現在のステータス(例:リクエスト済み)
- リクエスト済み: 承認待ちのリクエスト
- 承認済み: 承認されたリクエスト
- 却下: 却下されたリクエスト
- GPU Specs: リクエストされたGPUインスタンスの数(例:1g.5gb x1)
- Requester: リクエストを作成したユーザーまたは管理者アカウントの名前
- Requested date: リクエストが作成された日時
- Action: リクエストをApproveまたはRejectするためのボタン
- 承認: GPUリソースの承認と割り当てを進める
- 拒否: リクエストを拒否し、ステータスを更新する
承認リクエスト
ヒント
承認する前に、以下を確認してください:
- リクエストの目的と詳細(リクエストの目的を確認するにはGPU仕様を展開してください)。
- 現在のGPUリソースの可用性(システムの安定性のために推奨)。
- 関連するクラスターとノードのステータスを確認し、健康な状態であることを確認してください。

- 希望するリクエストのAction列にある緑のApproveボタンをクリックします。
- システムは承認を処理し、リクエストされたGPUプールをプロジェクトに割り当てます。
拒否リクエスト
ヒント
リクエストが拒否された場合、拒否の理由が文書化されるか、内部運用手順に従ってユーザーに通知されることを確認してください。

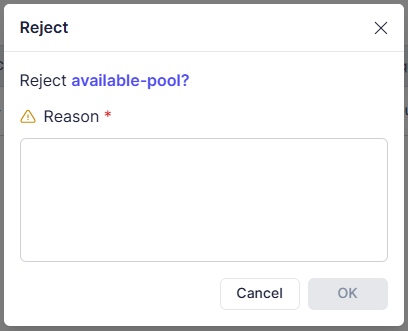
- Action列にある赤のRejectボタンをクリックします。
- プロンプトが表示されたら、拒否の明確で具体的な理由を入力します。
- 拒否を確認するにはOKをクリックするか、リクエストを再度確認するにはCancelをクリックします。
同じプロジェクト内で繰り返しリクエストを処理する際は、重複承認を防ぐために承認履歴を確認してください。