Access Create API Screen
From the API List page, click Create API button at the top-right corner of the screen.

Step 1: Fill in the Create API form
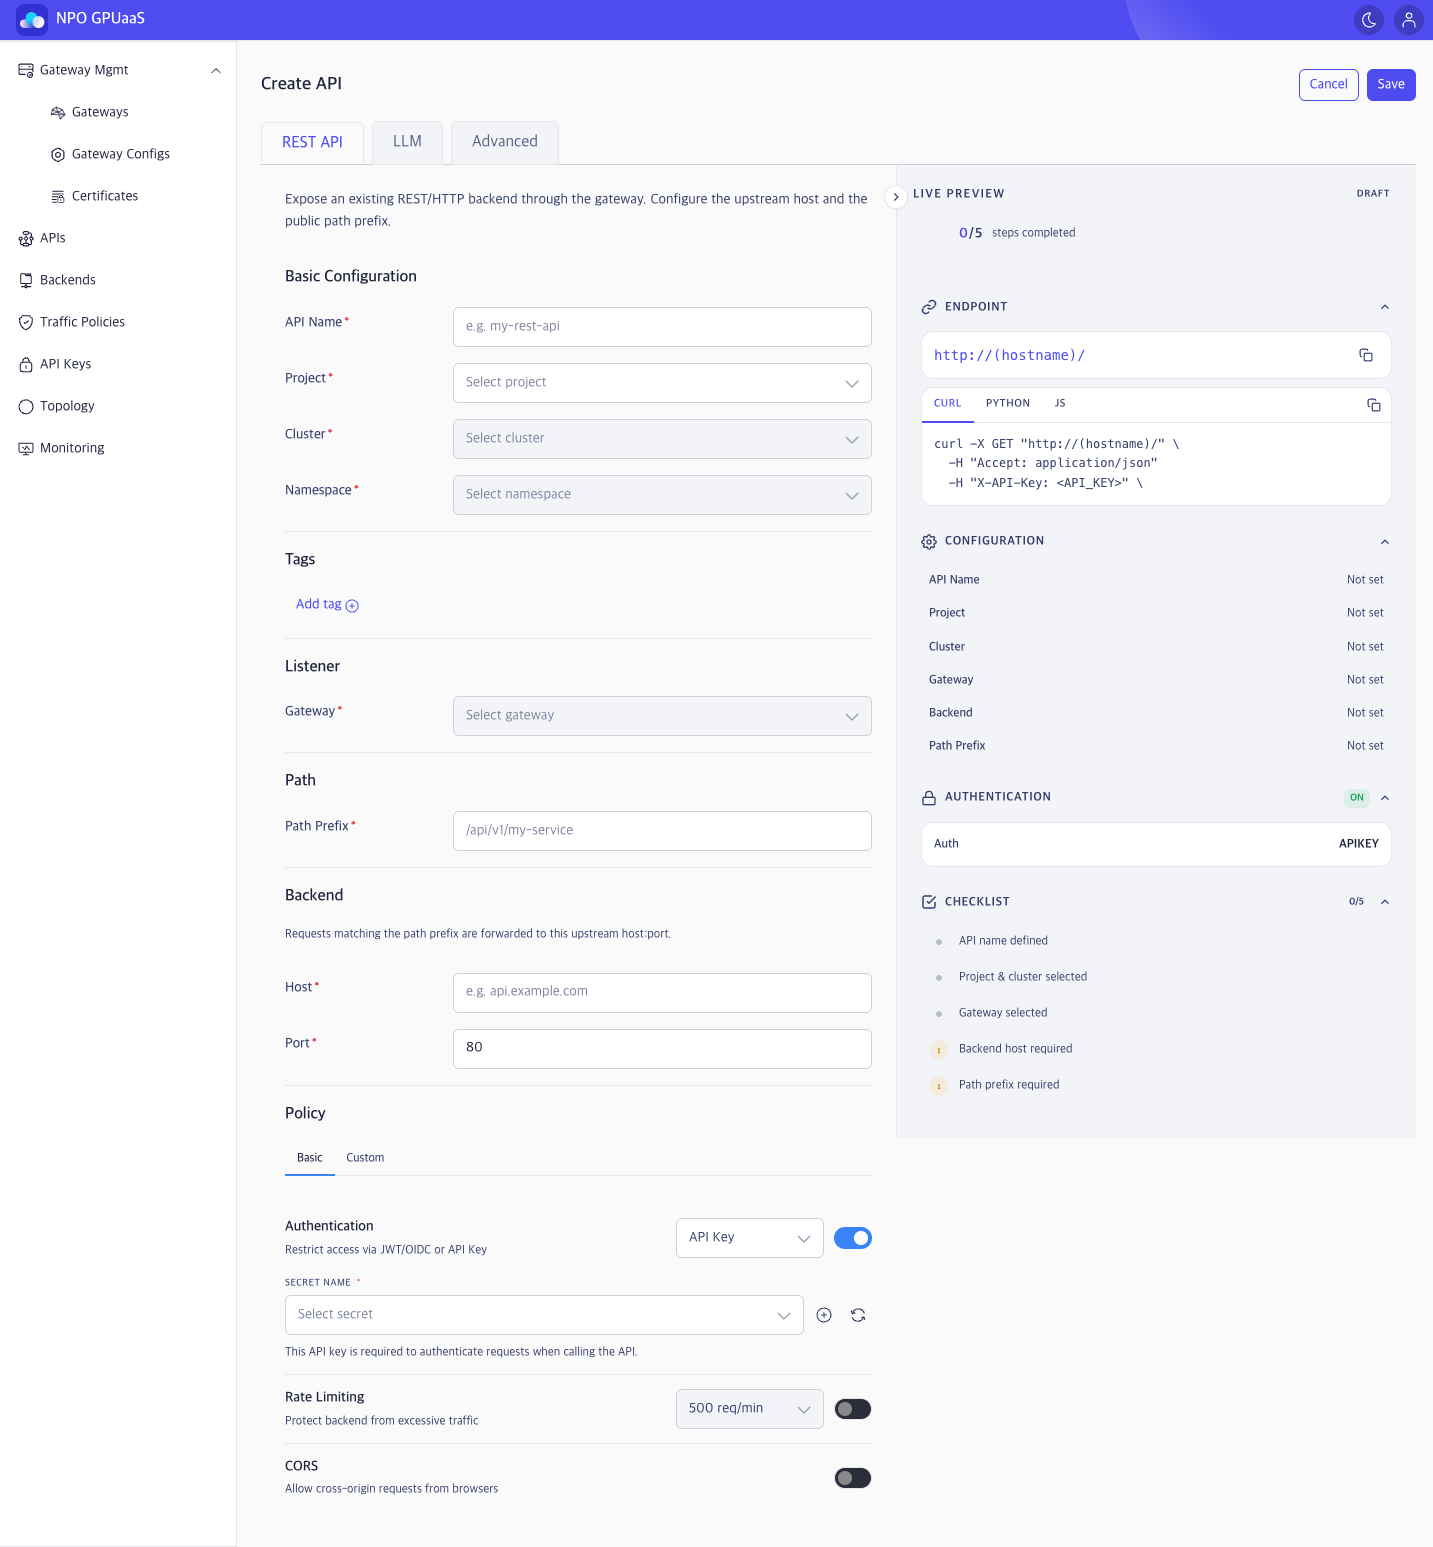
REST API tab
Basic Configuration
- API Name (Required): API identifier.
- Project (Required): Select a project.
- Cluster (Required): Select a cluster under the chosen Project.
- Namespace (Required): Select a namespace under the chosen Cluster.
Tags
User can add multiple tags for filtering on the API list.
-
Click Add tag and enter Key and Value:

-
Multiple tags are supported.
Listeners
- Gateway (Required): Select the Gateway where this API will be exposed.
Path
- Path Prefix (Required): Enter the path prefix to expose (e.g., /api/v1/my-service).
Backend
- Host: Enter the hostname or IP address of the upstream backend (e.g., api.example.com, 10.0.0.12).
- Port: Enter the service port exposed by the upstream backend (e.g.,80, 443, 8080).
Authentication
Basic Tab- Authentication:
- Select the authentication method used to validate requests. (API key or JWT/OIDC)
- Enable/disable access control for this API using a toggle.
- Secret Name (required): Select the secret that stores the API key used to authenticate incoming requests.
- Create secret (+ icon): Create a new secret and then select it for this policy.
- Refresh (↻ icon): Reload the secret list from the system.
-
Rate Limiting:
- Enable/disable request rate limiting for this API using a toggle.
- Limit: Set the maximum allowed request rate per configured time window.
- CORS:
- Enable/disable Cross-Origin Resource Sharing (CORS) using a toggle to allow browser-based cross-origin requests.
- Search: Search available policy features by keyword.
-
Feature cards:
- Feature name: The policy feature to apply to the API.
- Status: Indicates whether the feature is currently enabled for this API (Inactive/Active).
- Description: Summary of what the feature does.
- Add: Add the feature to this API (then configure it as needed).
LIVE PREVIEW Panel
On the right side, the LIVE PREVIEW panel updates immediately based on your current inputs:
- Endpoint: The endpoint URL built from the current hostname and path prefix.
- Code snippets (cURL/Python/JS): Request examples.
- Configuration: Shows key values (API Name / Project / Cluster / Gateway / Backend / Path Prefix). Any missing value is displayed as Not set.
- Authentication: Displays the current authentication method.
- Checklist: Displays progress to help ensure required steps are completed.
LLM Tab
Basic Configuration
- API Name (Required): API identifier.
- Description: Short description about API.
- Project (Required): Select a project.
- Cluster (Required): Select a cluster under the chosen Project.
- Namespace (Required): Select a namespace under the chosen Cluster.
Tags
User can add multiple tags for filtering on the API list.
-
Click Add tag and enter Key and Value:

-
Multiple tags are supported.
Listeners
- Gateway (Required): Select the Gateway where this API will be exposed.
Model Source
Choose where the model is served from:
- Self-Hosted Model (CLUSTER): Use a model that is running in your Kubernetes cluster.
- Public Model (CLOUD): Connect to an external LLM provider (e.g., OpenAI/Anthropic).
Model
- Model Entry:
- Select from Cluster: Select a model registered in the cluster.
- Enter Manually: Manually type the model name.
- Model: The target model to serve.
Authentication
- API Key: Enable/disable API key protection for this API using a toggle.
- Secret Name (required when API Key is ON): Select the secret that stores the API key used to authenticate requests.
Step 2: Save or Cancel
- After completing the form, click Save to create API.
- In case you want to discard the changes, click Cancel and navigates back to the API List page.