Workload
Overview
The Workload page provides a centralized view of all deployed GPU workloads across clusters and projects. Administrators can monitor workload status, inspect pod-level details, and deploy new workloads.
Navigation: GPU → Workload Management → Workload
Sub-text: "View deployed workloads and history, and deploy new workloads."
1. Page Header
| Element | Description |
|---|---|
| Title | "Workload" |
| + Deploy Workload button | Opens the Deploy Workload dialog (top right, primary blue). |
2. Filters
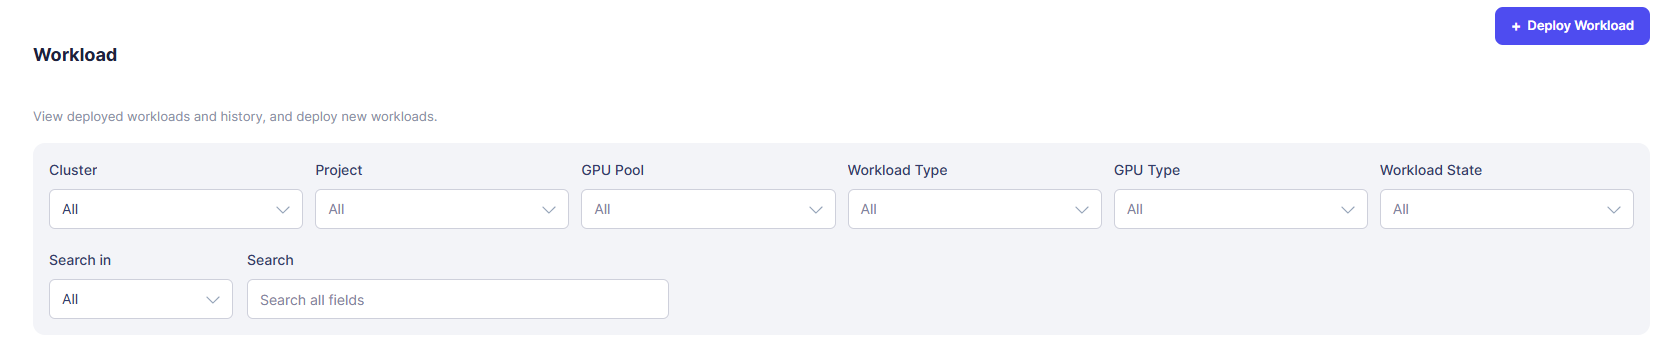
Filter Row 1
| Filter | Description |
|---|---|
| Cluster | Filter by cluster. Defaults to All. |
| Project | Filter by project. Defaults to All. |
| GPU Pool | Filter by GPU pool name. Defaults to All. |
| Workload Type | Filter by workload classification (Inference / RayJob). Defaults to All. |
| GPU Type | Filter by GPU sharing mode (Full GPU / MIG / Time-Slicing / NPU). |
| Workload State | Filter by runtime state — Running / Waiting. Defaults to All. |
Filter Row 2
| Filter | Description |
|---|---|
| Search in | Select which column to search — defaults to All fields. |
| Search | Free-text search input. Filters the table client-side as you type. |
3. Workload Table
Table Columns
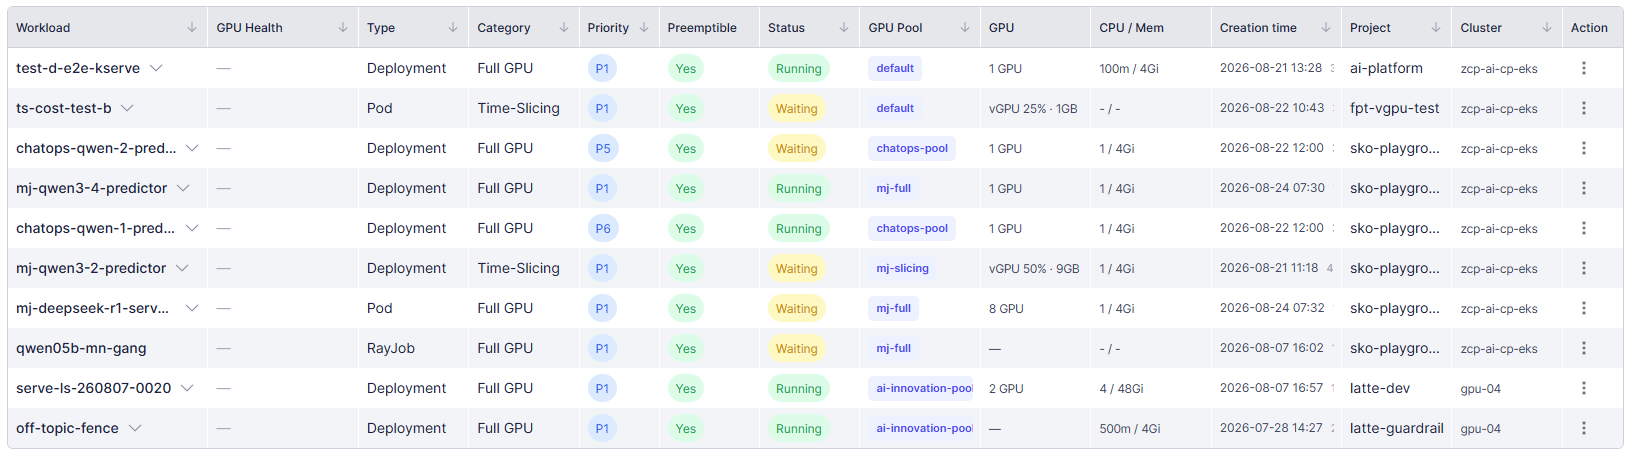
| Column | Description |
|---|---|
| Workload | Workload name. Click the chevron (∨/∧) to expand and see the pod sub-row. |
| GPU Health | GPU health status badge. Shows Action needed (red) when an issue is detected; "—" when no data is available. |
| Type | Kubernetes owner resource type — Deployment / Pod / RayJob. |
| Category | GPU sharing mode — Full GPU / Time-Slicing / MIG. |
| Priority | Scheduler priority badge (P1–P9). Blue tag. |
| Preemptible | Whether the workload can be preempted — Yes (green) / No (neutral). |
| Status | Runtime state — Running (green) / Waiting (yellow). |
| GPU Pool | Assigned GPU pool name shown as a colored chip. |
| GPU | GPU resource allocated (e.g. 1 GPU, 8 GPU, vGPU 25% · 1GB, vGPU 50% · 9GB). |
| CPU / Mem | CPU and memory requested (e.g. 100m / 4Gi, 1 / 4Gi). Displays "-/-" when unavailable. |
| Creation time | Timestamp when the workload was created. |
| Project | Project the workload belongs to. |
| Cluster | Cluster the workload is running in. |
| Action | ⋮ context menu with 2 options: • YAML — view the workload's raw YAML; • Detail — navigate to the workload detail page. • Delete |
Expanded Row
Clicking the chevron on a workload row expands a pod sub-table showing all active pods for that workload:

| Sub-column | Description |
|---|---|
| Pod | Pod name. |
| Status | Pod runtime state (e.g. Running). |
| Node | Host node the pod is running on (e.g. ip-10-0-134-143.ec2.internal). |
| GPU / Resource | GPU resource allocated to this pod (e.g. 1 GPU). |
4. Deploy Workload Dialog
Clicking + Deploy Workload opens a two-step dialog.
Step 1: Deployment Type
Two options to choose from:
| Option | Description |
|---|---|
| Deploy via Model Manager | Redirects to the Model Manager's Create Model page to deploy a model as a workload. |
| Custom Deployment | Shows manifest examples by workload kind and GPU type — includes project, GPU pool, and resource annotation templates. |
Step 2: Custom Example
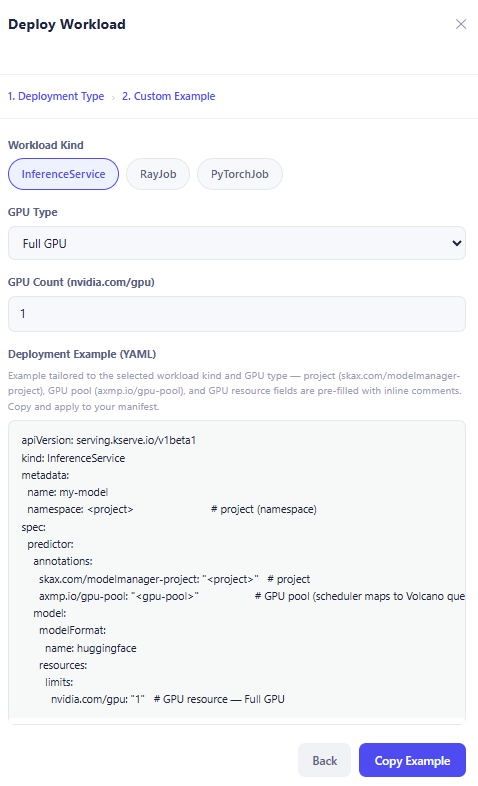
Shown after selecting Custom Deployment. Generates a ready-to-copy YAML manifest example tailored to the selected configuration.
Workload Kind — three tabs to select the Kubernetes resource type:
| Option | Description |
|---|---|
| InferenceService | KServe InferenceService manifest (e.g. for model serving). |
| RayJob | RayJob manifest for distributed Ray workloads. |
| PyTorchJob | PyTorchJob manifest for PyTorch training workloads. |
GPU Type — dropdown to select the GPU sharing mode (e.g. Full GPU).
GPU Count (nvidia.com/gpu) — numeric input for the number of GPUs to request.
Deployment Example (YAML) — a syntax-highlighted YAML block that updates based on the selections above. The project (skax.com/modelmanager-project), GPU pool (axmp.io/gpu-pool), and GPU resource fields are pre-filled with inline comments. Copy this manifest and apply it to your cluster.
Actions:| Button | Description |
|---|---|
| Back | Return to Step 1 (Deployment Type selection). |
| Copy Example | Copies the generated YAML to clipboard. |