Create and Edit an MCP Profile
Within AI Agent Studio, you can easily create a new MCP Server Profile to connect and manage your backend APIs.

- Navigate to the MCP Servers tab from your Agent Studio dashboard.
- In the dropdown menu, select MCP Profiles to view or manage server profiles.
- Locate and click the Create MCP Server button at the top right of the page. This will open the profile creation workspace.
- On the profile creation workspace, you can design your MCP Server Profile.
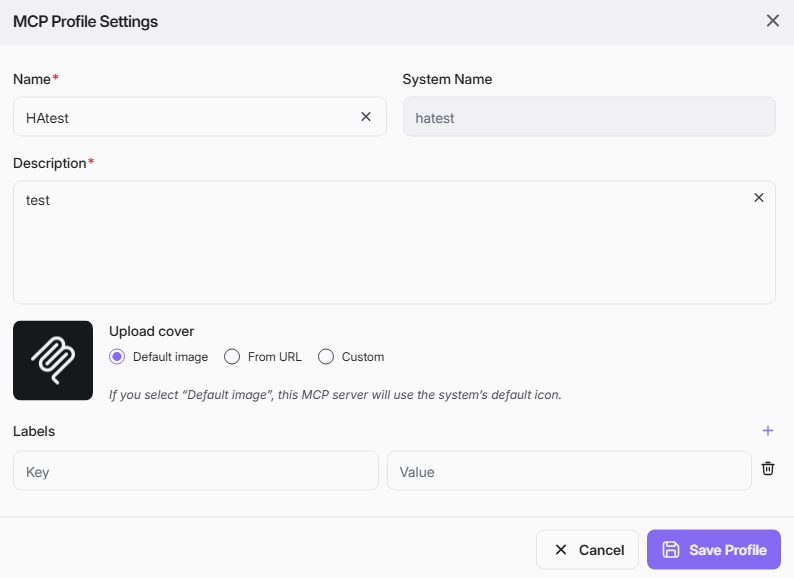
- Name: Enter a clear, descriptive name for your MCP Server.
- System Name: This is auto-generated field based on MCP Profile Name.
- Description: Add a brief explanation of your MCP Server, its data services, and intended functionality.
- Upload Cover: Choose an image to represent your server profile. You can select:
- Default image: This MCP Server will use the system’s default icon. If no image is uploaded, the default icon will be used.
- From URL: Upload an image from online resource.
- Custom: Choose an image from your device to upload, max file size 3MB.
- Label: Add labels (key-value pairs) to categorize and organize your MCP Server Profile.
- Click Save to save all inputted information for your MCP Profile. Once saved successfully, system will open design canvas as picture below for you to continue design your MCP Profile from the default MCP Server node.
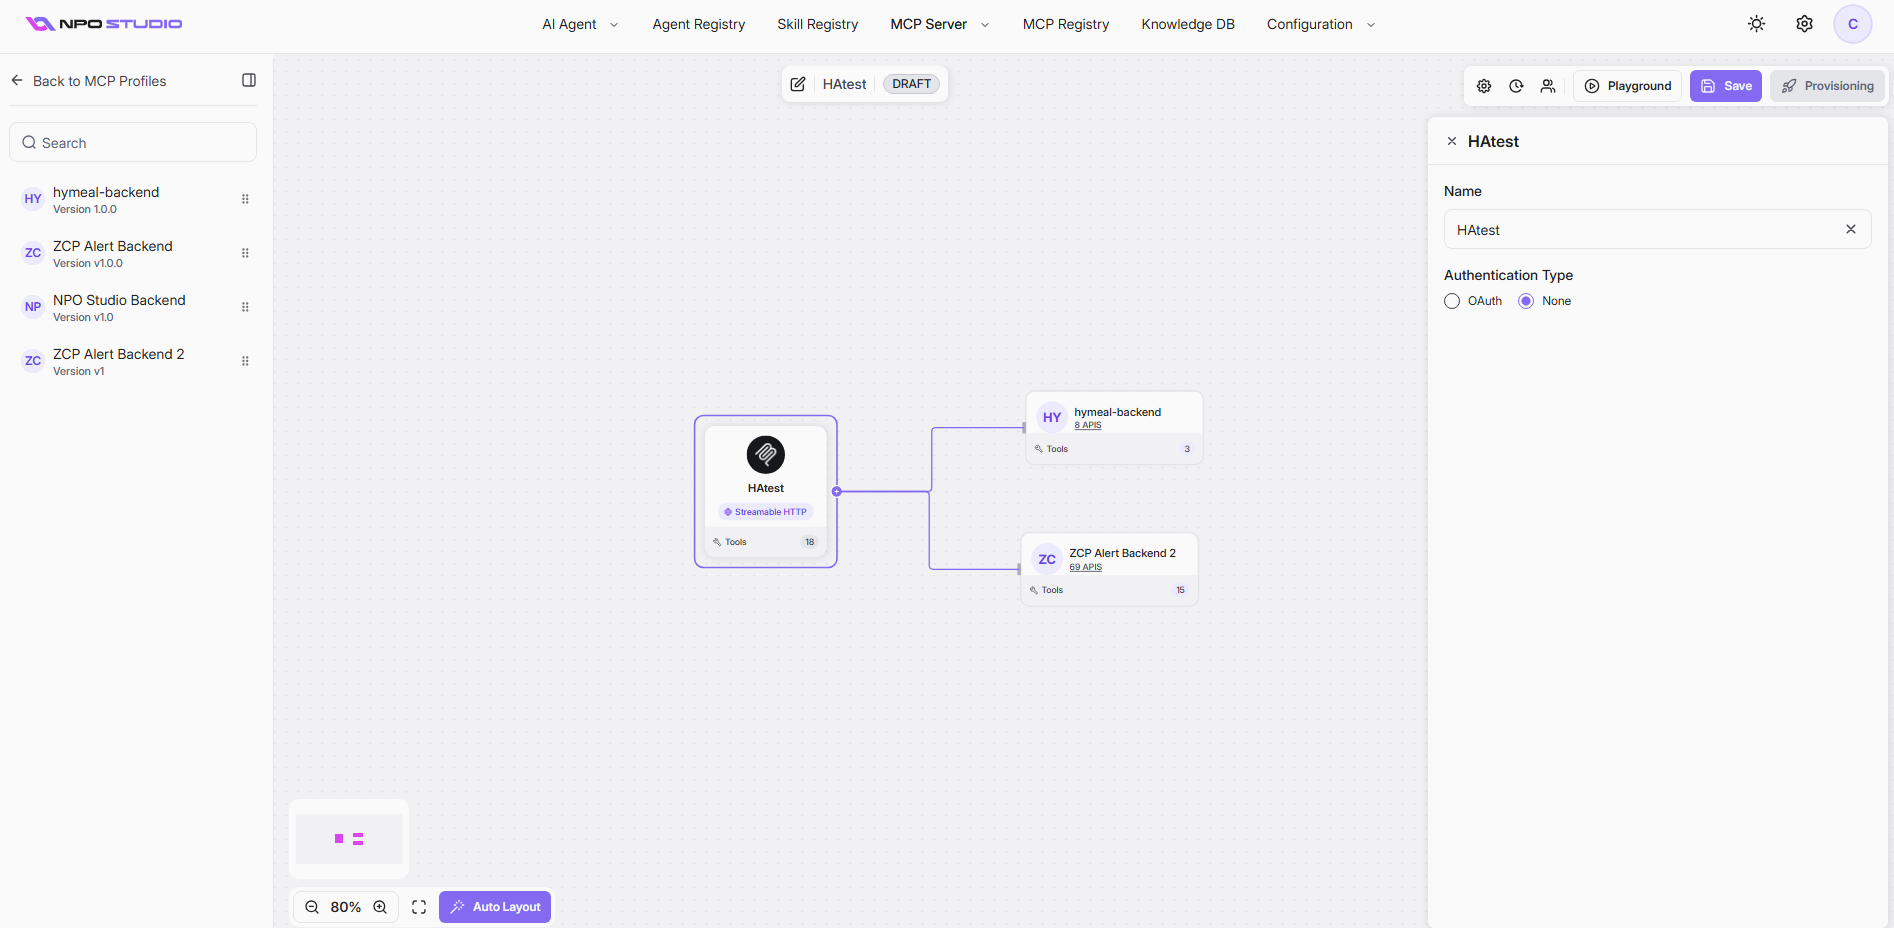
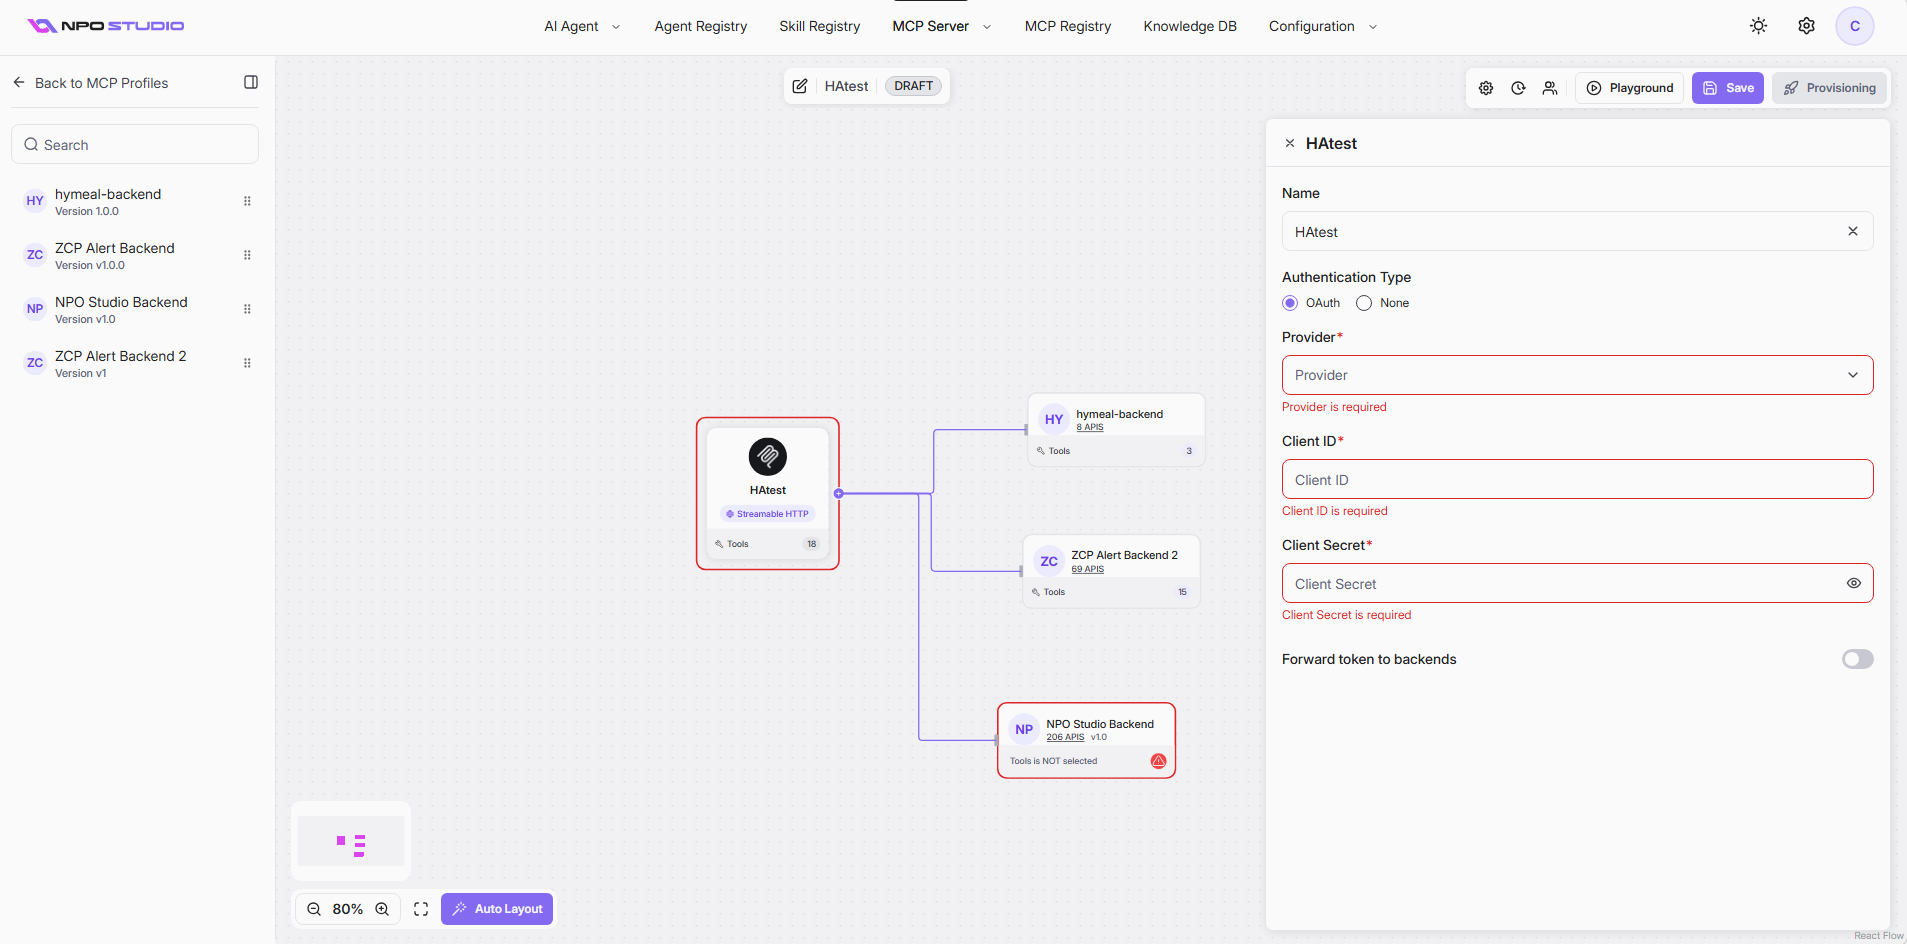
- When you select the default MCP Server node, configuration panel opens on the right side of the screen
- Name: Display name of your MCP Server Profile. The default name of MCP Server node will be created as “MCP Serverâ€. You can rename it.
- Authentication Type (Required): Select OAuth for OAuth-based authentication or select None for public APIs without authentication.
When OAuth is selected, you must provide the following required credentials:
- Provider (Required): Specify your OAuth provider (Google or Keycloak).
- Client IDÂ (Required): Your OAuth application's client identifier, obtained from your OAuth provider's application settings.
- Client Secret (Required): Your OAuth application's secret key.
- Forward token to backends: Enable if your backend services require the OAuth token to be forwarded. When it is enabled, bearer token shall be passed without the need to set in playground settings later.
- On the left hand side, you'll see the Backend List, which contains all available backend APIs
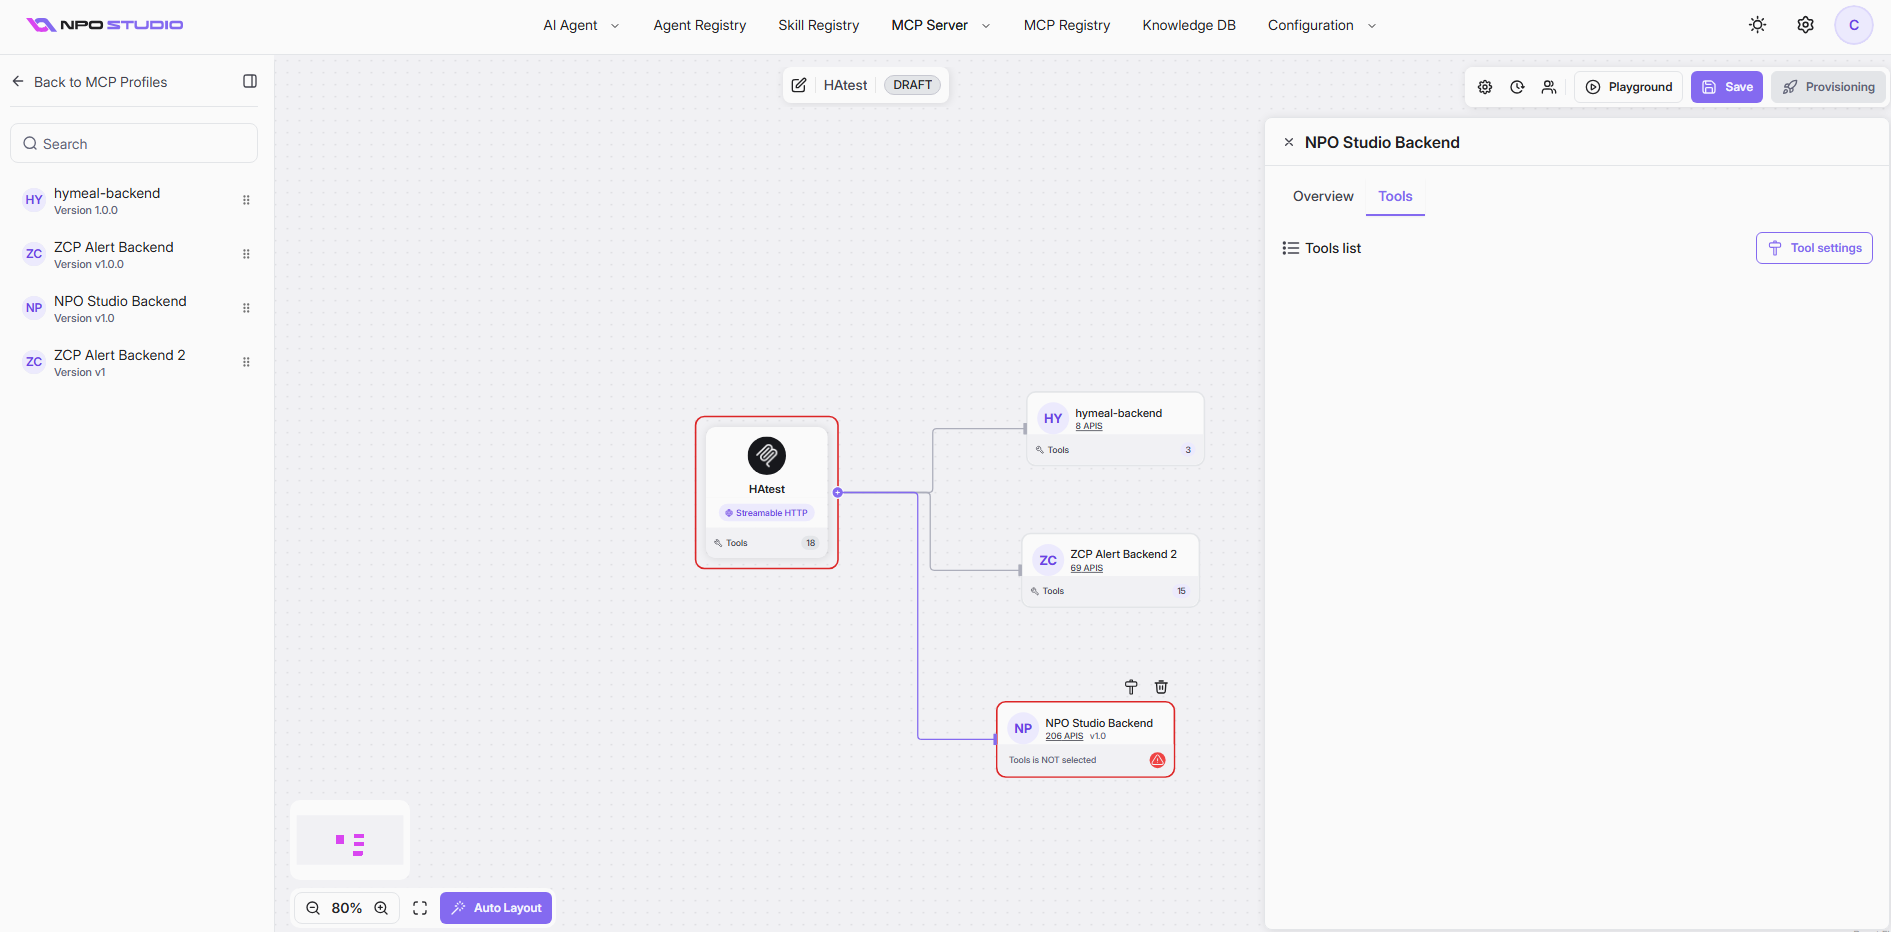
- Drag and drop the relevant backend items from the Backend List onto the design canvas to link them to your new MCP Server Profile. After drag, click on each BE node to view backend information shall be displayed on the right hand side.
Use Auto Layout to quickly rearrange the components.
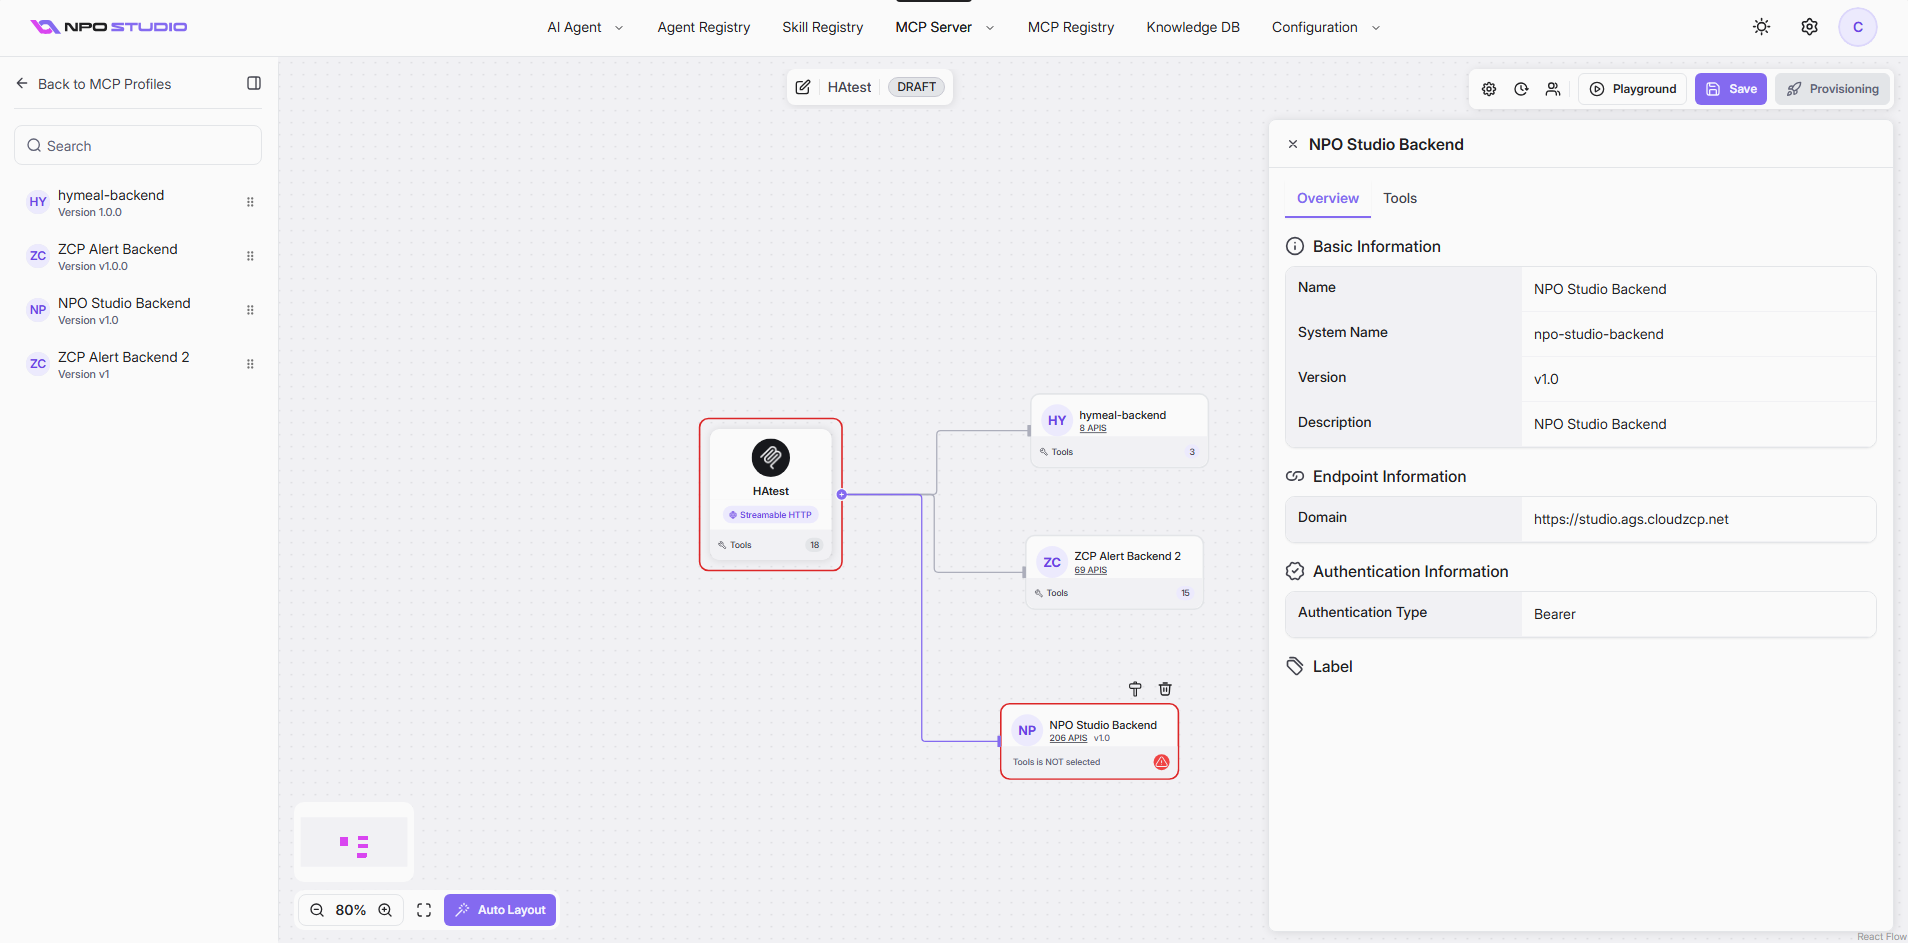
- Click the Overview tab to view the backend server's core details:
-
Basic Information Section
- Name: Display name of the backend server (e.g., "NPO Studio Backend")
- System Name: Internal identifier for the system (e.g., "npo-studio-backend")
- Version: Software version of the backend (e.g., "v1.0")
- Description: Details about the backend server's purpose and functionality
- Endpoint Information Section: Domain is the backend server's API endpoint URL (e.g., https://studio.ags.cloudzcp.net")
- Authentication Information Section: Authentication Type shows the configured authentication method (e.g., "Bearer", "OAuth".
- Label Section: Custom labels for categorization and organization
-
Basic Information Section
- Select tools from API endpoints: you can click Tools tab for each API endpoint then click Tool Settings, or click icon Tool Settings of each endpoint on the canvas. The "Select MCP tools form API Endpoints" dialog will open.
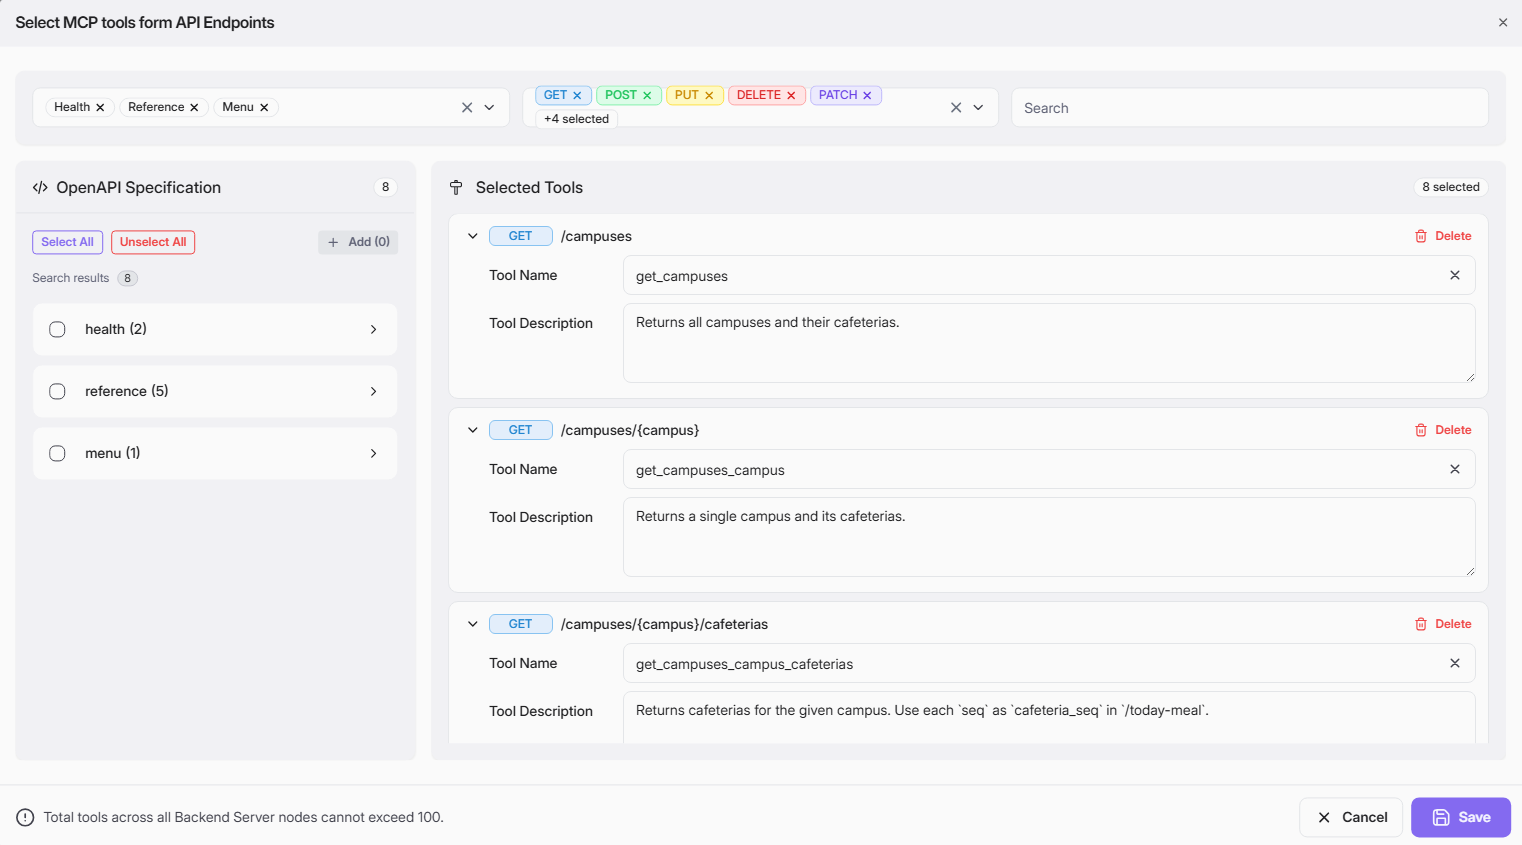
The dialog is divided into two main sections:
Left Panel: OpenAPI Specification Browser
Selection Controls- Select All button: Quickly select all endpoints in the current view
- Unselect All button: Clear all selections
- Add button: Add new endpoints to your selection
- Click on any category to expand and view individual endpoints
- Each endpoint is a selectable checkbox item
After select all the desired endpoints, click “Add†button to add them to the right panel “Selected Toolsâ€.
Total tools across all Backend Server nodes cannot exceed 100.
Right Panel: Selected Tools
Tool List Display- Shows all currently selected tools with:
- HTTP Method badge (GET, POST, PUT, DELETE, PATCH)
- API endpoint path (e.g., "/campuses")
- Tool Name field (auto-generated or customizable)
- Tool Description field (explains the tool's function)
- Delete button (remove individual tools from selection
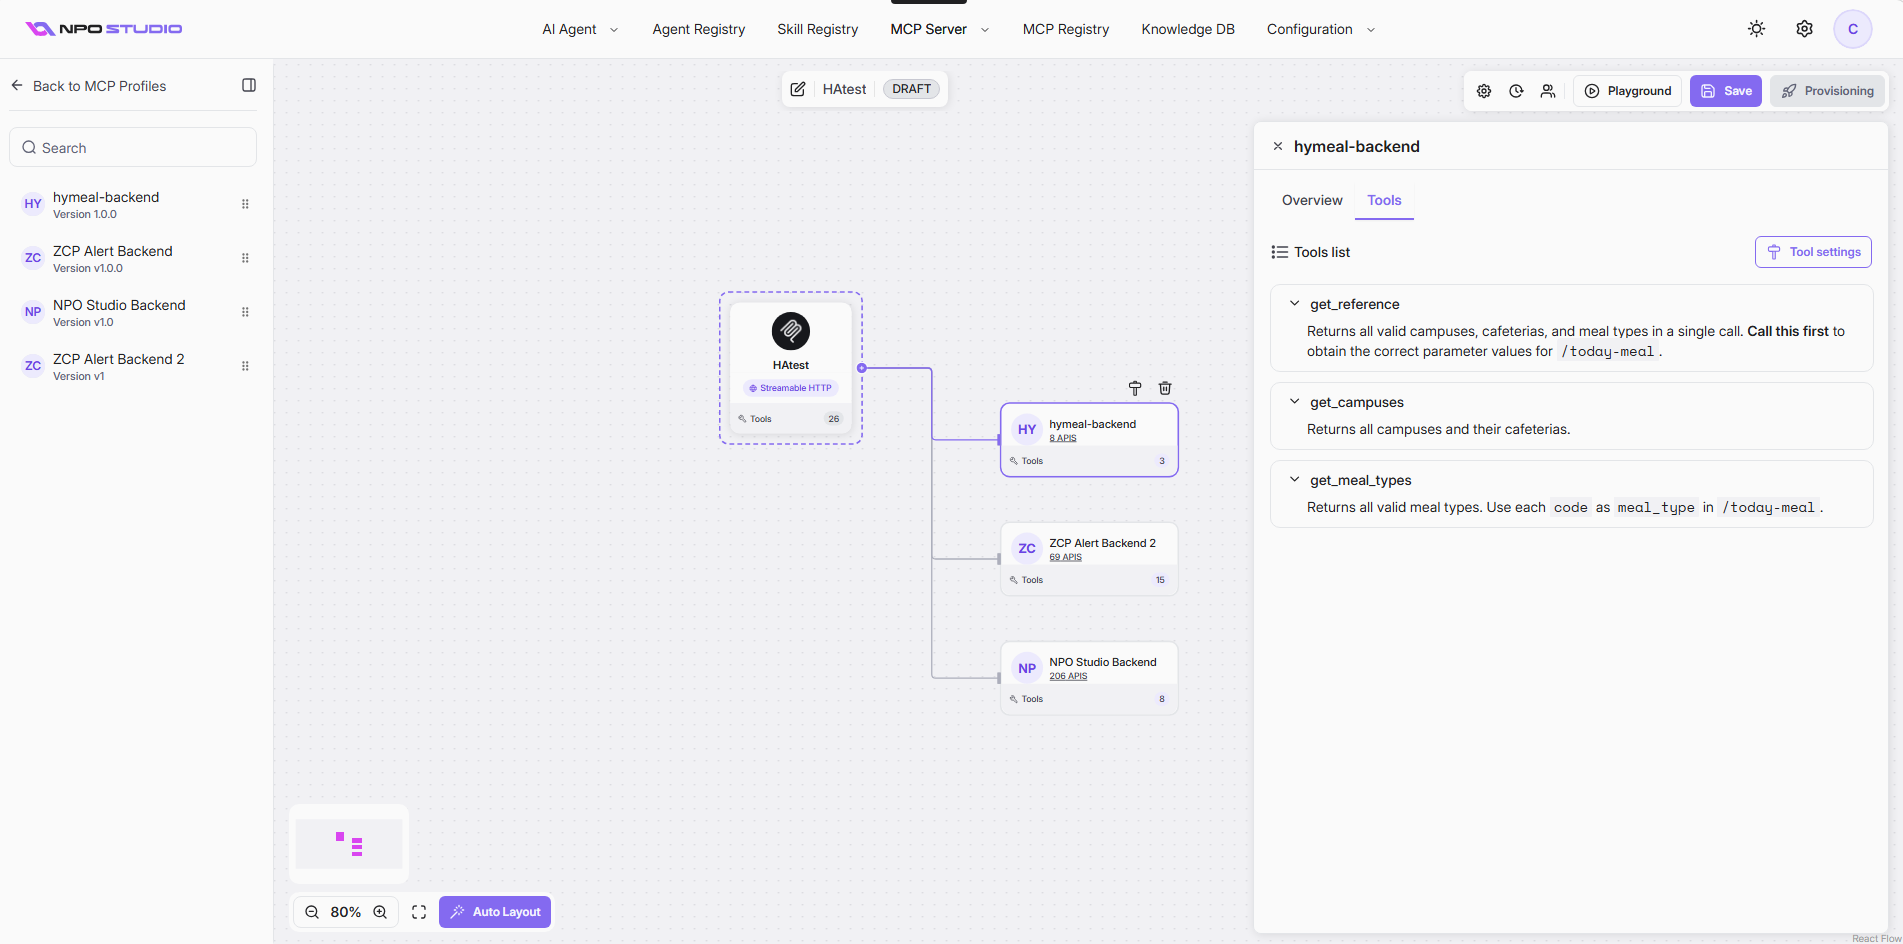
After review all tools selected, click Save to finalize tool list for the backend server. The summary of selected tools displayed on the right panel as below.
- Repeat step 7 to select all API endpoints and their tools. Then click Save to finish setting up your MCP Profiles. The MCP Save Confirmation dialog will appear for your final review. Enter a version comment, then click Save to confirm. The MCP Profile status changes to Completed, and the Provisioning button is enabled.
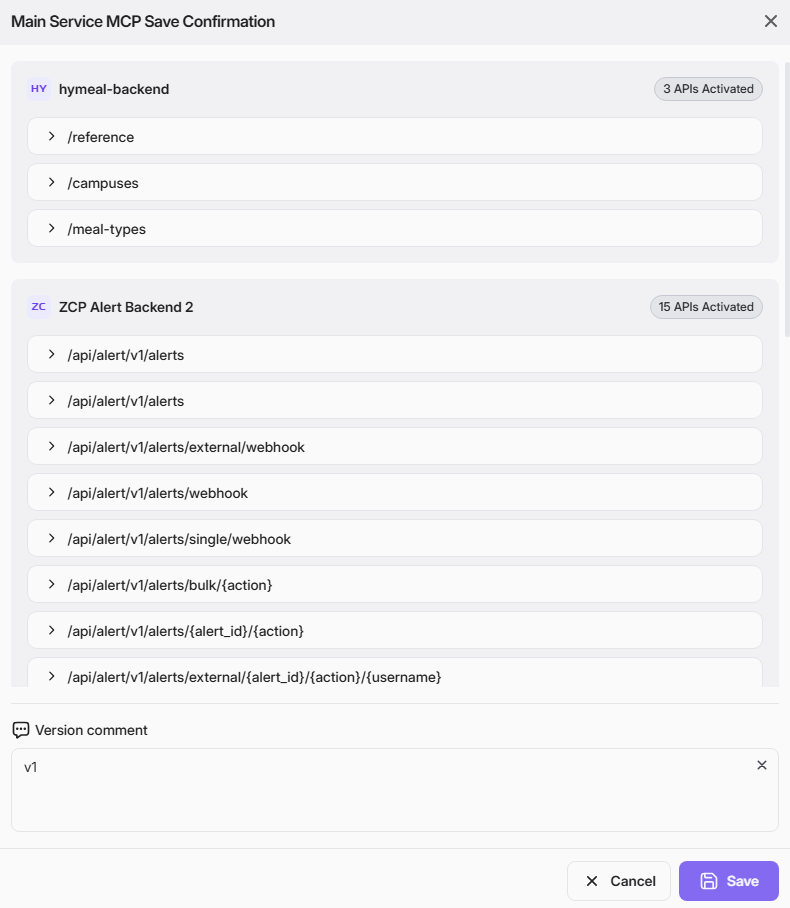

The MCP Profile is now ready to be provisioned as an MCP Instance. Before provisioning, use the playground to test whether it operates correctly. Refer to (9+) MCP Server Profile Playground | Notion for details.
Playground is not available for MCP servers with OAuth authentication. Please provision an MCP server without authentication to use the playground.
If any need to update MCP Profile, navigate to MCP Server>MCP Profiles, click on vertical ellipsis at the MCP Profile card and click Edit. The design canvas will appear with all information to edit. Follow the action as described in creation process to edit the MCP Server.