Getting Started
NPO Workspace Overview
NPO Workspace is a complementary tool for NPO Studio. It is your central dashboard where you can manage AI agents, initiate conversations, and configure your workspace environment.
How to Access NPO Workspace
To access your workspace, use the link below:
[Insert Prod Workspace URL]If you are already logged in to NPO Studio, your session will be automatically retained when you open NPO Workspace in the same browser—no need to log in again.
Homepage Overview
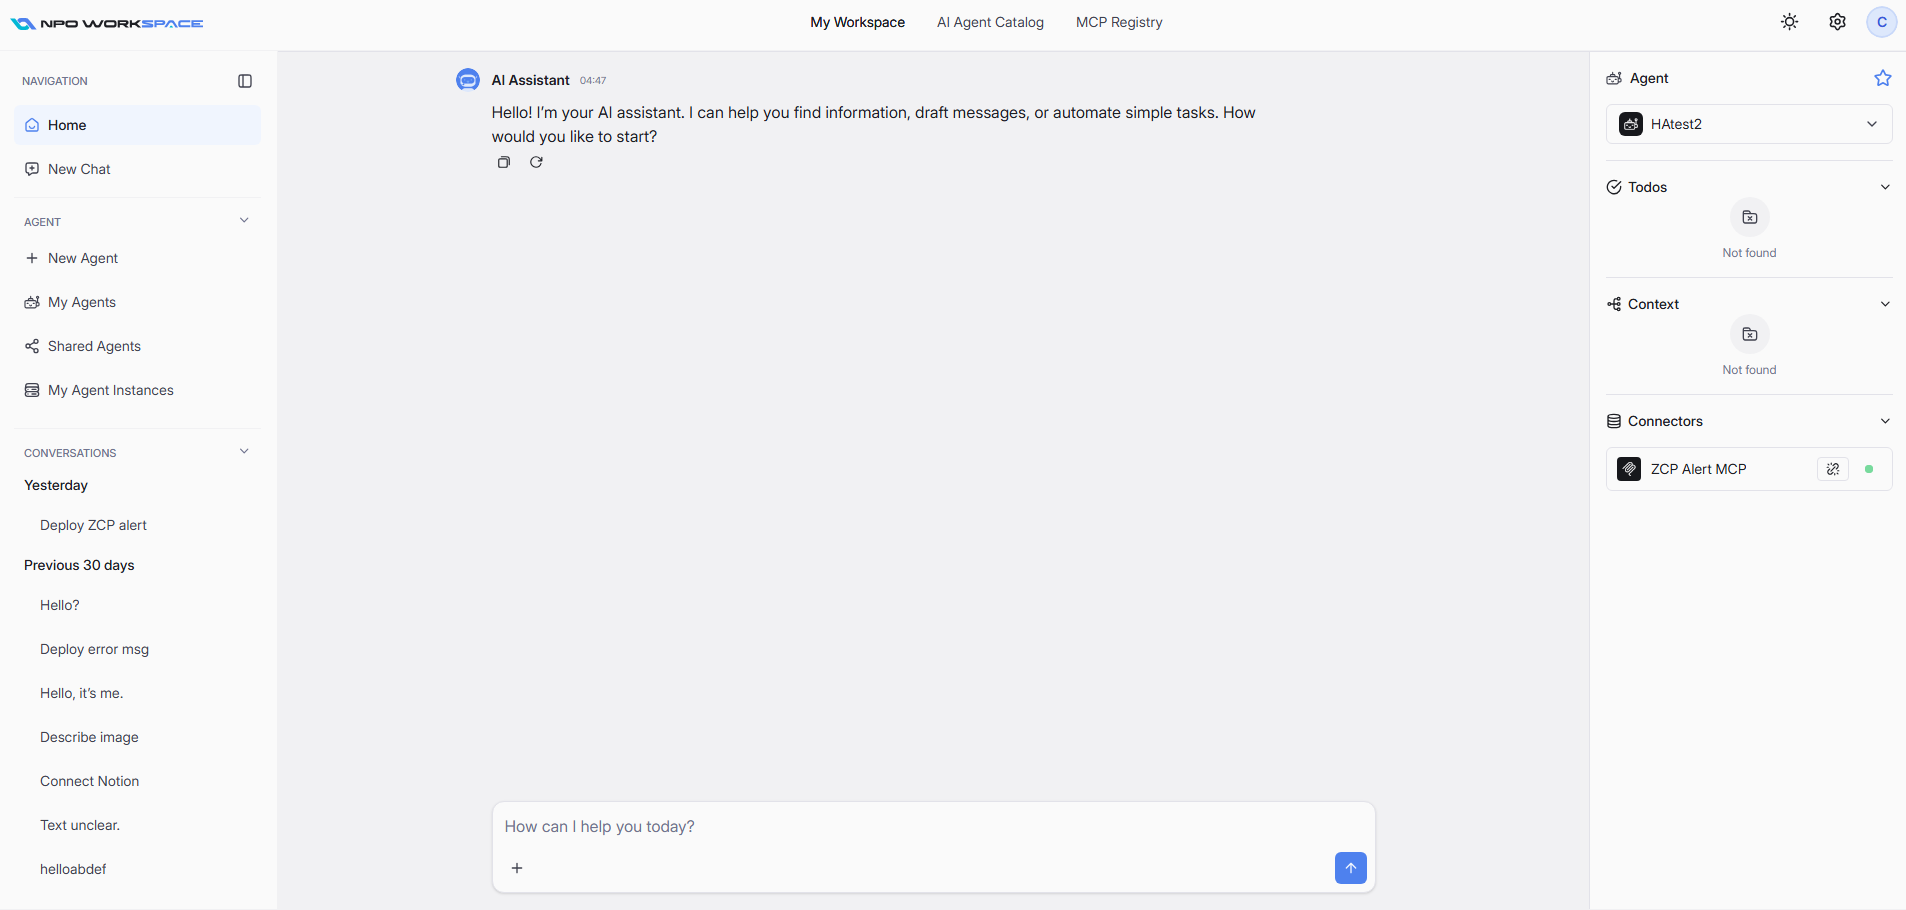
The Homepage is your starting point for all agent activities and workspace management. Here’s a breakdown of its key components:
Main Menu
Located at the top of the page, the main menu lets you navigate across major modules:
- My Workspace: Returns you to your personal workspace dashboard.
- AI Agent Catalog: Browse and explore available AI agents.
- MCP Registry: Manage and review MCP server connections.
Left Sidebar Navigation
The left sidebar provides quick quick links for navigating and managing agents and conversations:
- Navigation:
- Home: Go back to the homepage dashboard.
- New Chat: Start a new conversation with an agent.
- Agent:
- New Agent: Create a new AI agent.
- My Agents: View and manage agents you have created.
- Shared Agents: Access agents that have been shared with you.
- My Agent Instances: Monitor and control running agent instances.
- Conversations: Displays a list of conversations with agents from the past 7 days. You can click on any entry to revisit or continue the dialogue.
Main Workspace Area
This is where you can start a new task or conversation with an AI Agent.
Type your queries or requests here to interact with the selected agent. Use the send (arrow) button to communicate with the selected agent.
Right Sidebar Panel
This section allows you to configure your agent and workspace settings.
Only agents you have created or that have been shared with you will appear in the Agent selector list.
Please follow the guide below to configure an AI Agent before starting a conversation:
- Choose an Agent: Select the agent you want to interact with. Read the agent’s description to ensure it matches your needs.
- Select AI Model: Pick the model version for your agent’s responses.
- Enable/Disable Web Search: Toggle if your task requires real-time data.
- Review & Manage MCP Servers: Remove any unnecessary ones or add additional servers as needed for more complex workflows.
What You Can Do on the Homepage
Here’s a quick summary of actions you can take:
- Start a Conversation: Chat with the selected agent using the message bar.
- Switch Agents or Models: Adjust agent and model selection to fit your needs.
- Review Recent Activity: Access previous conversations for follow-up or reference.
- Create & Manage Agents: Use the sidebar to create new agents or manage existing ones.
- Configure MCP Servers of selected agent: Add, monitor, or remove MCP servers.
- Use My Agents and Shared Agents for instant access to important agents.
- Connect relevant MCP servers for advanced collaborative workflows.
- Toggle web search for agents requiring real-time data.