Middleware Configurations
This guide explains the Middleware settings available when creating or editing an AI Agent in NPO Studio. The Middleware tab provides 3 key features: Human in the loop, PII (Personally Identifiable Information) protection and Summarization (based on LangChain).
Accessing Middleware Settings
- Open your AI Agent from the Agent design canvas.
- Click on the AI Agent node (e.g., "Agent 1 – Main Agent").
- In the right-side configuration panel, select the Middleware tab.
Human in the loop
The Human in the Loop middleware gives you control over which tools the agent can execute autonomously and which require explicit human approval. When enabled, tool calls matching your configured rules will pause execution and wait for a human to approve, edit, or reject them before proceeding.
Enabling Human in the Loop
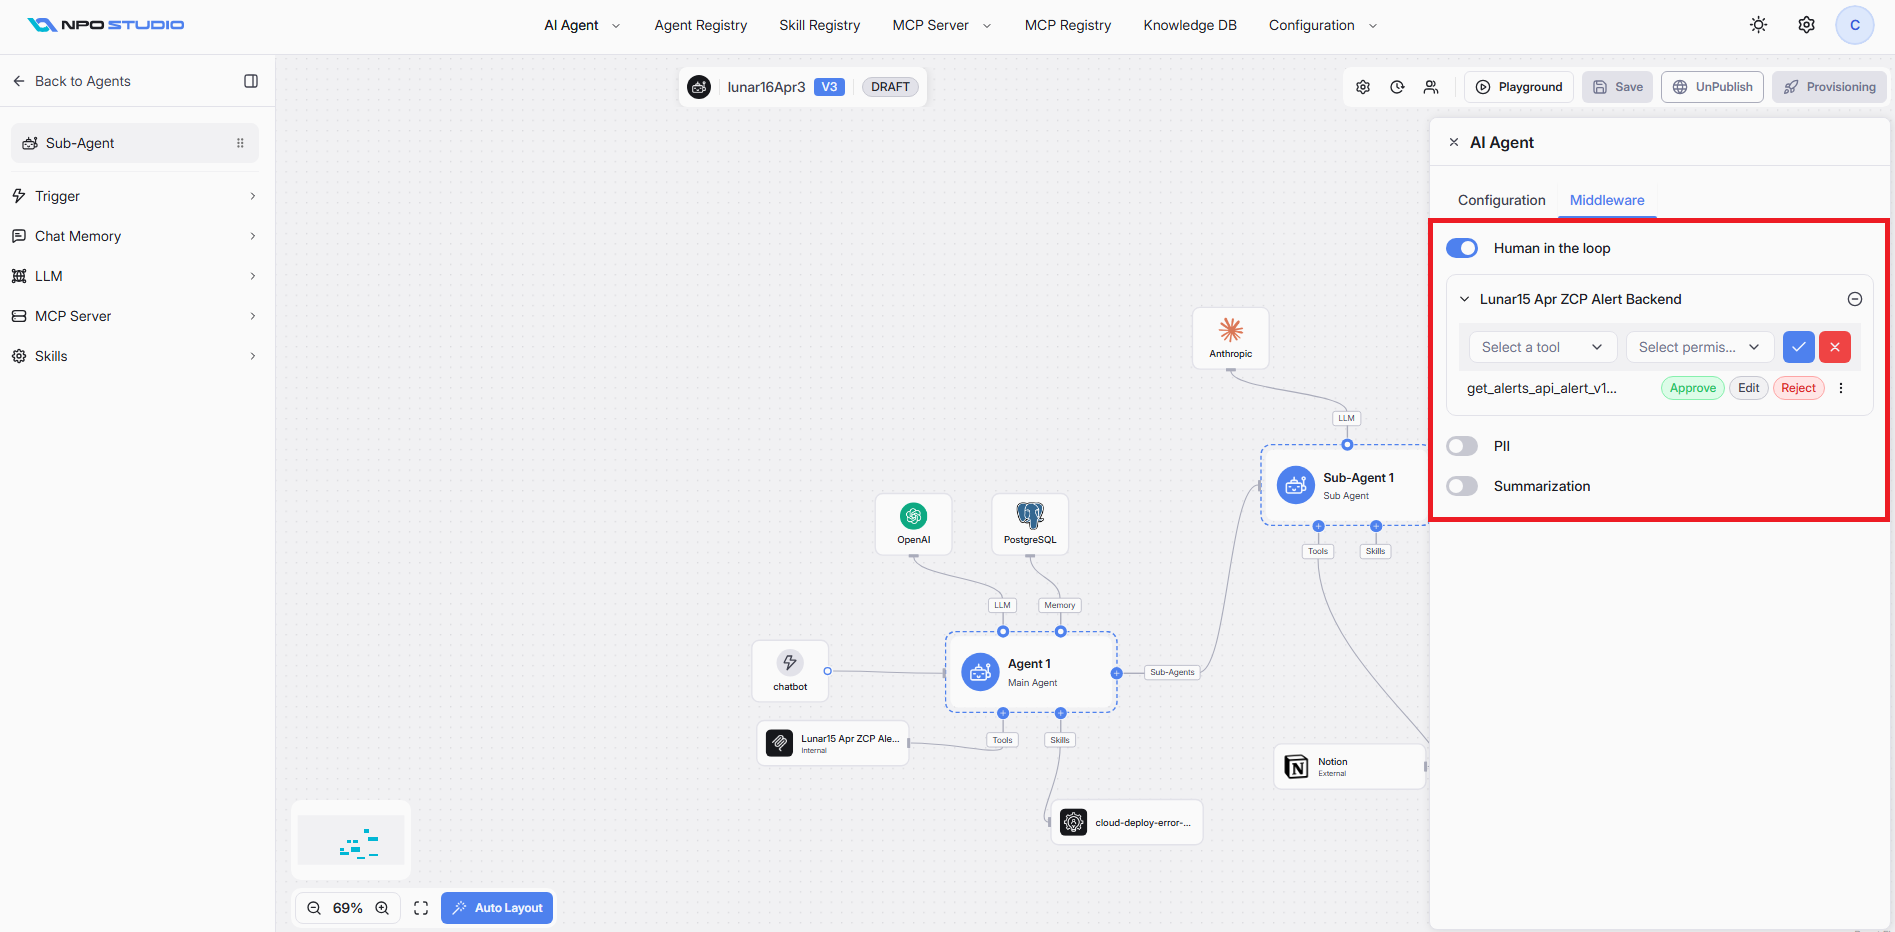
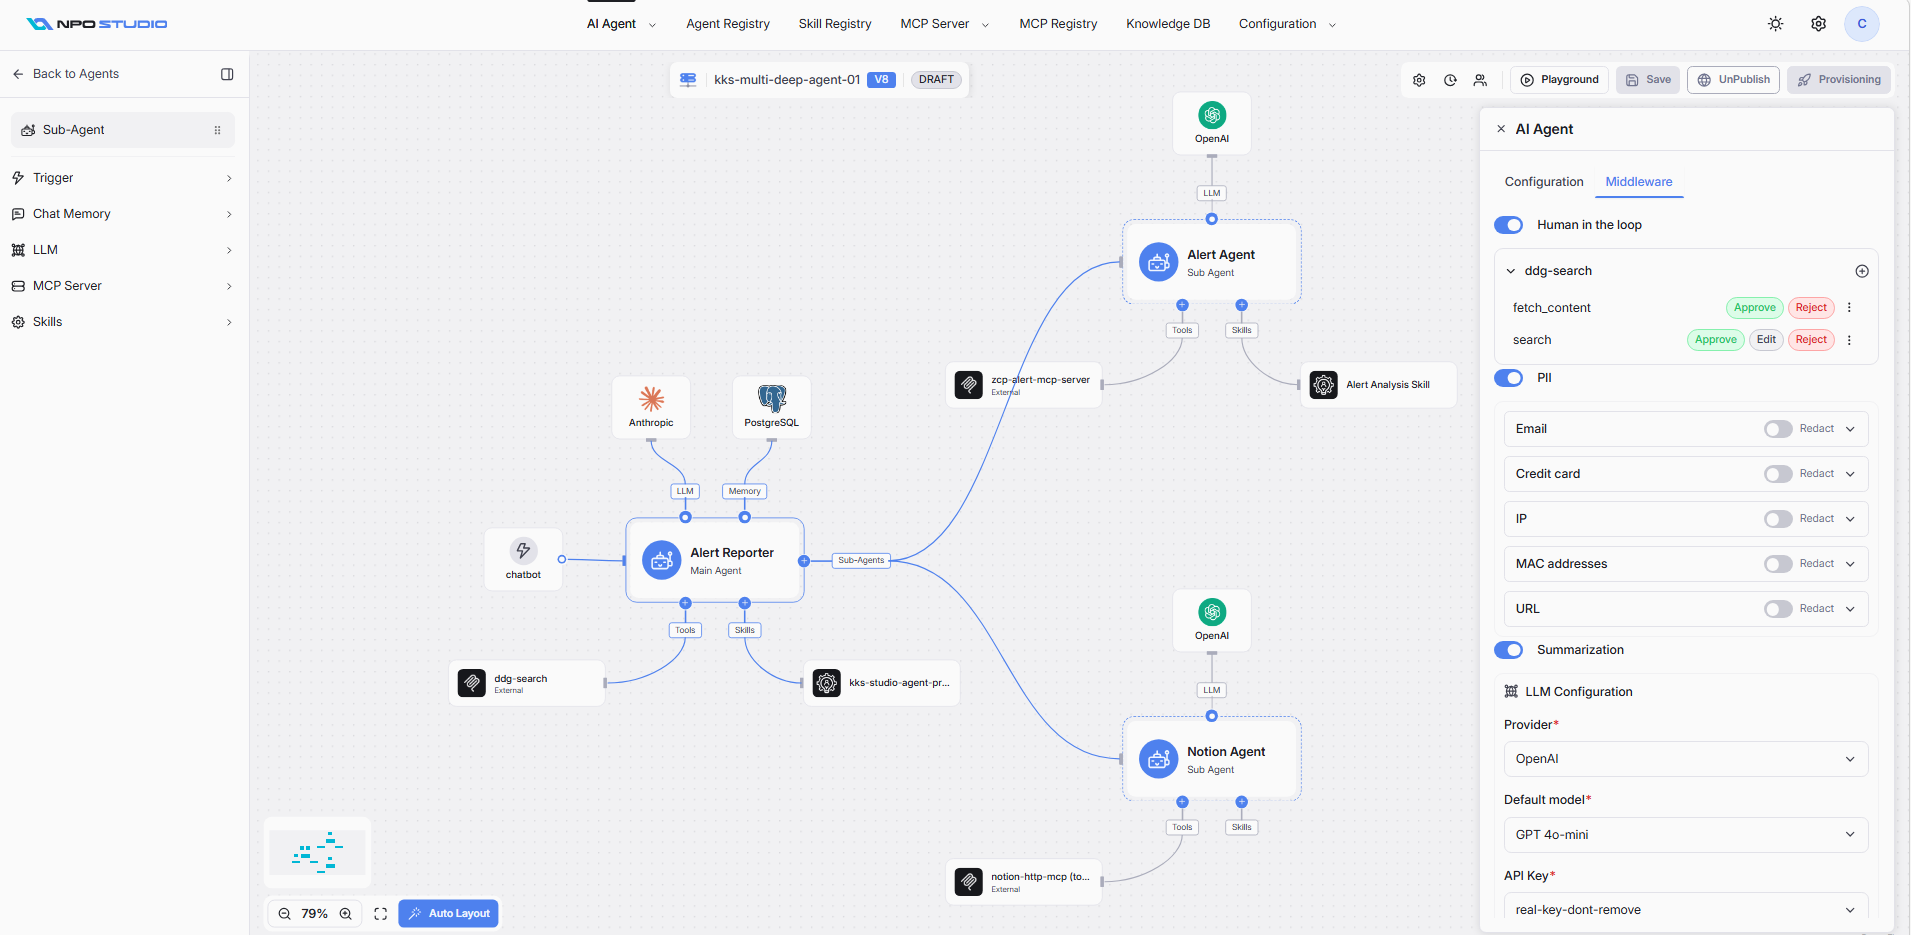
Toggle the Human in the loop switch to ON at the top of the Middleware panel. This feature is available on both Main Agent and Sub-Agent nodes.
Configuring Tool Permissions per MCP Server
After enabling Human in the Loop, each connected MCP Server is displayed as a collapsible section. You configure approval rules per tool within each MCP Server.
Adding a Tool Permission Rule
- Expand the MCP Server section (e.g., "Lunar15 Apr ZCP Alert Backend", "ddg-search").
- Click the Select a tool dropdown to choose a specific tool from that MCP Server.
- Click the Select one or more permission dropdown to assign the allowed permission for that tool.
- Click the checkmark (✓) button to confirm, or the X button to cancel.
- The tool now appears in the list with its assigned permission actions.
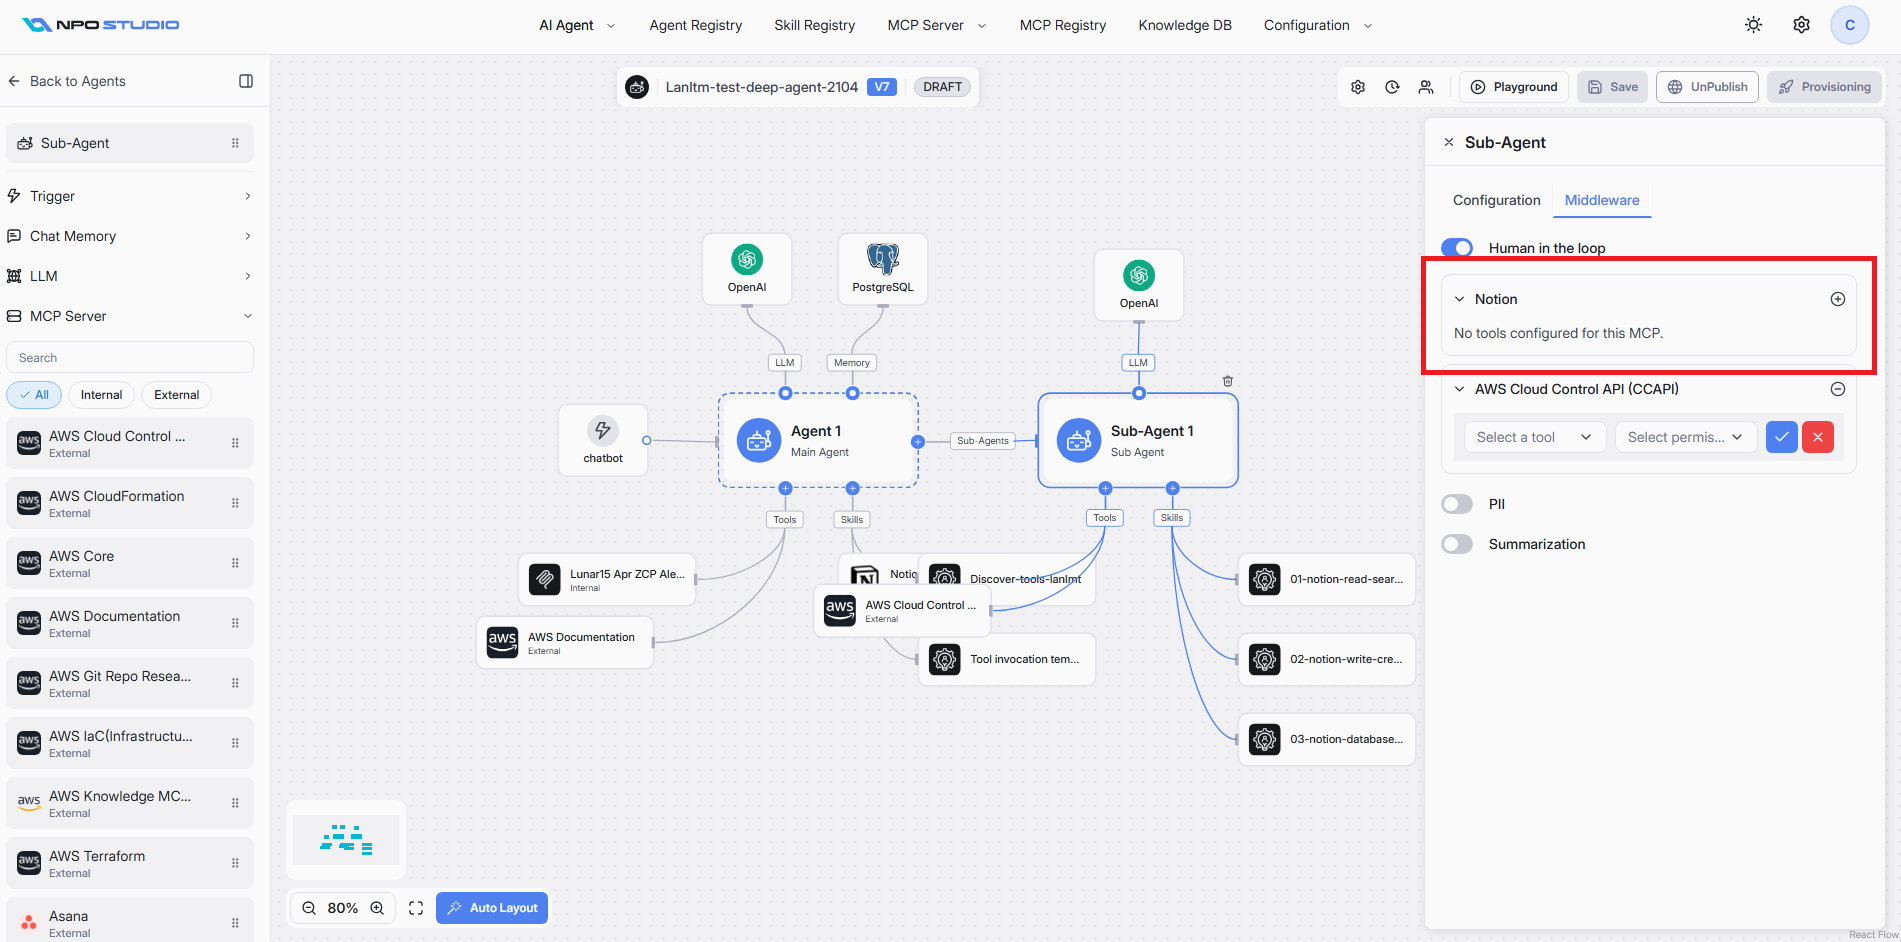
Note: If an MCP Server has no tools configured for Human in the Loop, it displays "No tools configured for this MCP."
Tool Permission Actions
Each configured tool displays one or more action buttons that define how the agent handles tool execution requests. A tool can be configured with multiple permissions at the same time: Approve, Edit, Reject.
| Action | Description |
|---|---|
| Approve | Allows the tool execution to proceed. The human reviewer confirms that the tool call and its arguments are acceptable. |
| Edit | Allows the human reviewer to modify the tool call arguments before execution. Available when editable permissions are configured. |
| Reject | Blocks the tool execution entirely. The agent is informed that the tool call was denied and must proceed without it. |
Managing Tool Rules
- Click the three-dot menu (⋮) next to a tool to access additional options (e.g., remove the rule).
- Click the add (⊕) icon in the MCP Server header to add a new tool permission rule.
- Multiple tools from the same MCP Server can each have different permission configurations.
How Human in the Loop Works at Runtime
When an agent with Human in the Loop enabled is used in the NPO Workspace chat:
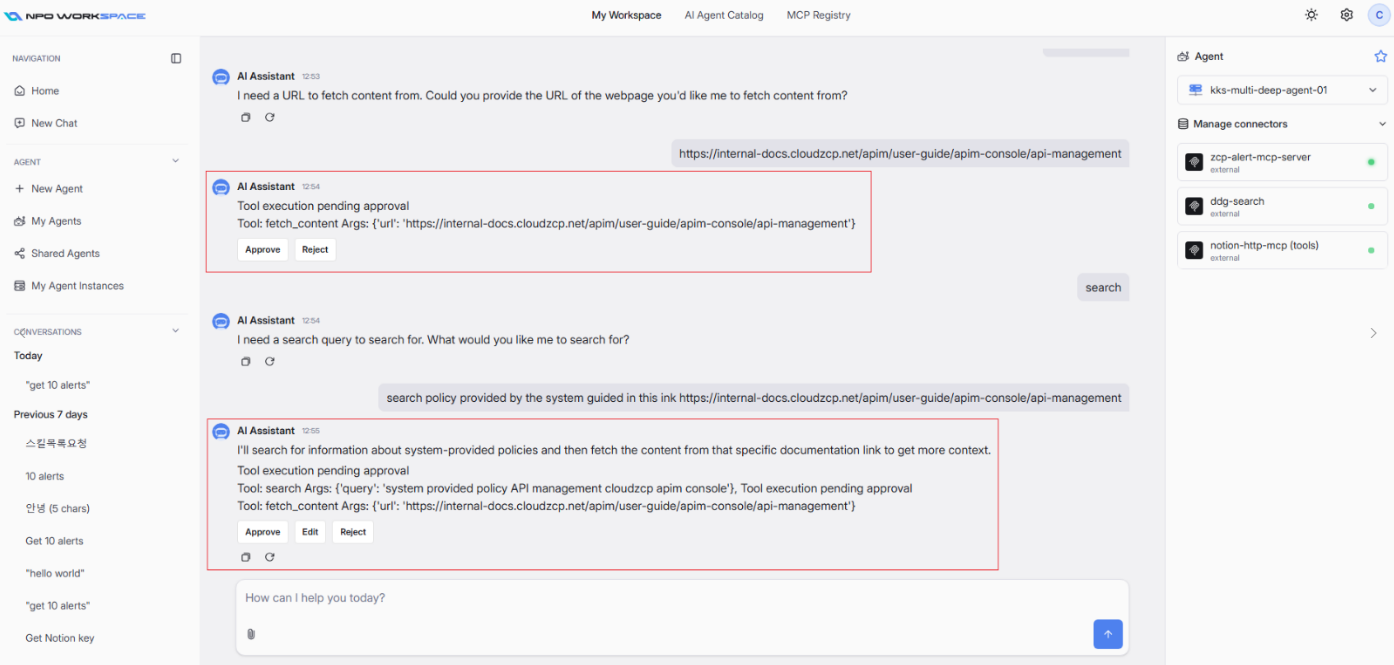
- The agent processes the user's message and determines it needs to call a tool.
- Instead of executing the tool automatically, the agent displays a "Tool execution pending approval" message in the chat.
- The message shows:
- The tool name being called (e.g., fetch_content, search, get_alerts_api_alert_v1...).
- The arguments the agent intends to pass
- The human reviewer clicks one of the available action buttons:
- Approve: The tool executes with the displayed arguments.
- Edit: The reviewer modifies the arguments, then the tool executes with the updated values.
- Reject: The tool call is blocked; the agent continues without the tool result.
- After the action, the agent resumes processing with the tool result (if approved) or without it (if rejected).
Note: Multiple tool calls may appear in a single pending approval message. Each tool call within the message must be reviewed. The agent will not proceed until all pending tools are addressed. All the MCP servers selected for Main Agent and Sub-Agent shall be display under Human in the loop section. Ensure that MCP having tools configured to select.
Configuration Examples
| MCP Server | Tool | Available Actions | Use Case |
|---|---|---|---|
| ZCP Alert Backend | get_alerts_api_alert_v1... | Approve, Edit, Reject | Review alert queries before execution |
| ddg-search | fetch_content | Approve, Reject | Control which URLs the agent can fetch |
| ddg-search | search | Approve, Edit, Reject | Review and modify search queries |
Best Practices for Human in the Loop
- Enable Human in the Loop for tools that perform write operations (create, update, delete) or access sensitive data.
- Use Edit permission for tools where argument tuning improves accuracy (e.g., search queries, API filters).
- For read-only tools with low risk, consider leaving them without Human in the Loop to maintain conversational speed.
- Configure tool rules per MCP Server to apply granular control — not all tools need the same level of oversight.
- Test the approval flow in the Playground before publishing to ensure the user experience is smooth.
- Human in the Loop applies to both Main Agent and Sub-Agent nodes independently — configure each agent node based on its specific tool usage.
PII Personally Identifiable Information
The PII middleware automatically detects and protects sensitive data flowing through your AI Agent. When enabled, it scans messages for specific data types and applies a protection action.
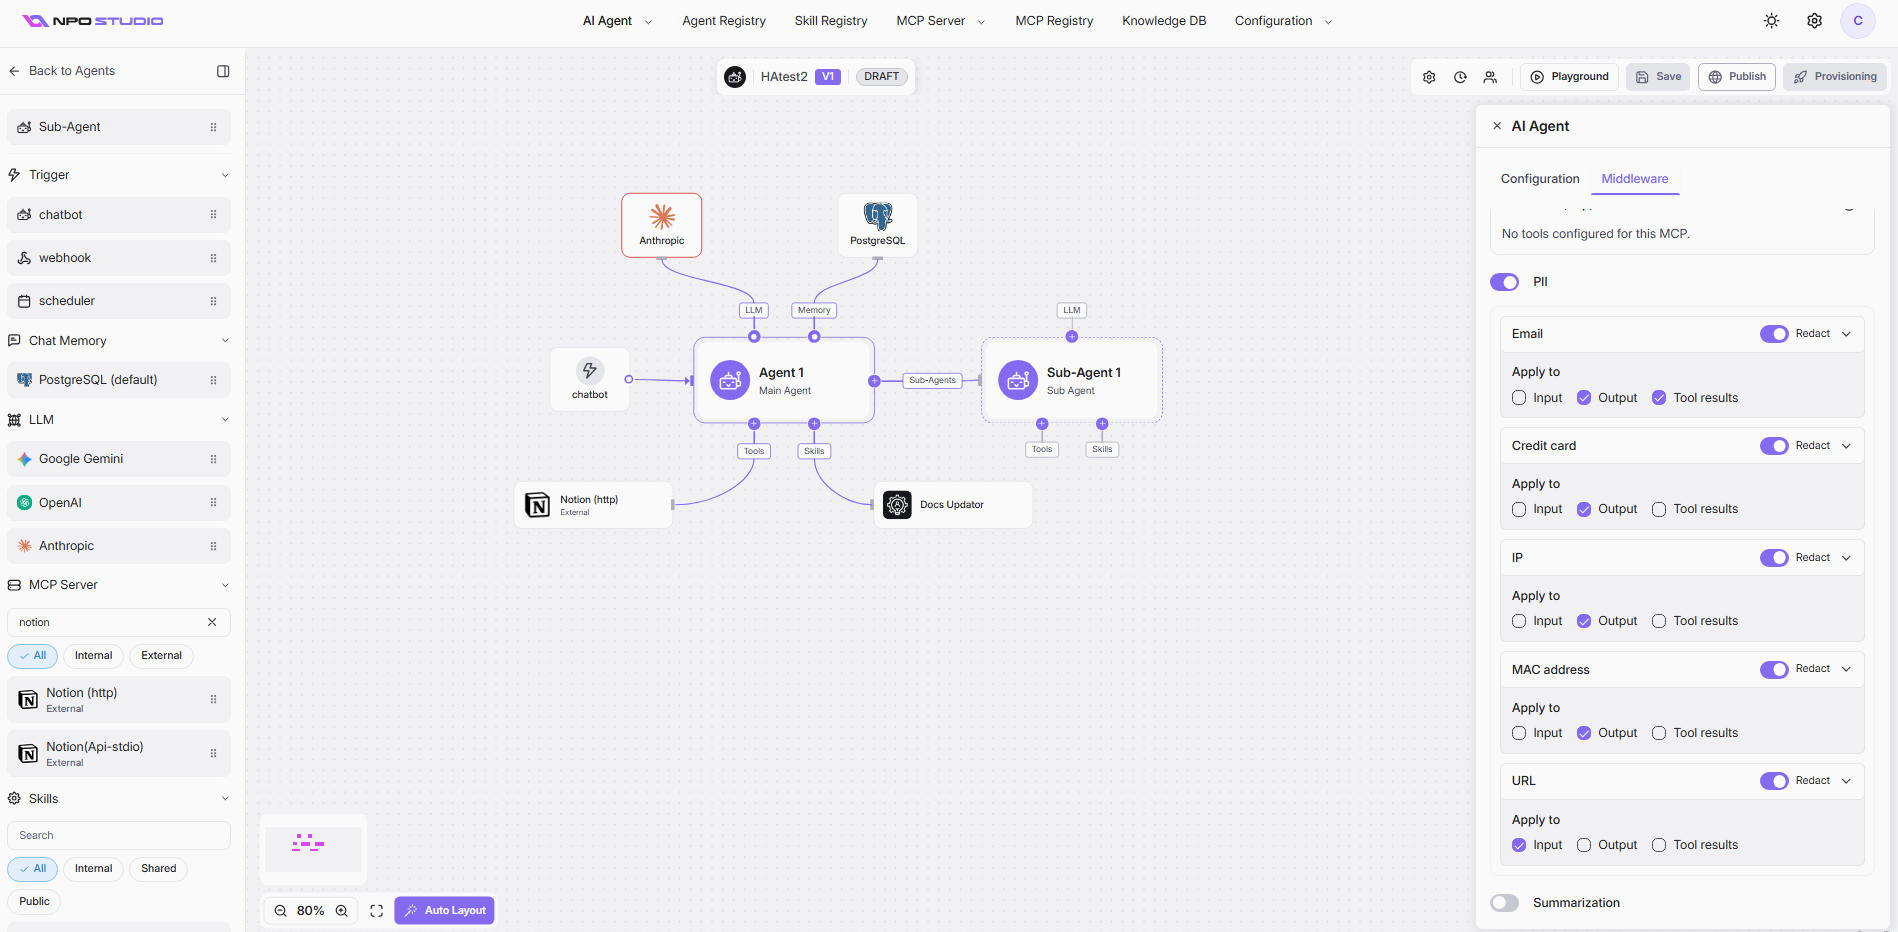
Enabling PII
Toggle the PII switch to ON to activate PII protection for the agent.
Supported PII Types
Each PII type can be individually toggled ON or OFF:
| PII Type | Description |
|---|---|
| Email addresses (e.g., user@example.com) | |
| Credit card | Credit/debit card numbers |
| IP | IP addresses (IPv4/IPv6) |
| MAC address | Network MAC addresses |
| URL | Web URLs and links |
Each PII type has an action dropdown that determines how detected data is handled:
- Redact: Replaces the detected PII with a placeholder (e.g., [REDACTED]), removing the sensitive value from the message entirely.
For each PII type, you can choose where the protection is applied. Use the checkboxes to select one or more:
- Input: Scans and protects PII in user messages sent to the agent.
- Output: Scans and protects PII in the agent's responses back to the user.
- Tool results: Scans and protects PII in data returned from tool/API calls.
| PII Type | Action | Input | Output | Tool results | Use Case |
|---|---|---|---|---|---|
| Redact | ☠| ☑ | ☑ | Prevent agent from leaking emails in responses | |
| Credit card | Redact | ☠| ☑ | ☠| Block card numbers in output only |
| IP | Redact | ☠| ☑ | ☠| Hide IP addresses from responses |
| MAC address | Redact | ☠| ☑ | ☠| Hide MAC addresses from responses |
| URL | Redact | ☑ | ☠| ☠| Strip URLs from user input before processing |
- Enable Output protection for sensitive types (Email, Credit card) to prevent accidental data leakage.
- Enable Tool results when backend APIs return user data that should not be exposed.
- Enable Input when you want to anonymize user-provided data before it reaches the LLM.
- Review PII settings when connecting new MCP tools that may return sensitive information.
Summarization
The Summarization middleware (based on LangChain) automatically condenses conversation history to manage context window limits. When the conversation grows beyond a configured threshold, it triggers summarization to keep the context within bounds while preserving important information.
Enabling Summarization
Toggle the Summarization switch to ON to activate conversation summarization.
LLM Configuration
Summarization requires its own LLM to generate summaries. Configure the following required fields:
Provider (Required)
- The LLM provider used for generating summaries.
- Example:Â OpenAI
- Select from the dropdown of configured providers.
Default model (Required)
- The specific model used for summarization.
- Example:Â GPT 4o
- Choose a model that balances quality and cost for summarization tasks.
API Key (Required)
- The API key used to authenticate with the LLM provider.
- Example:Â BachDX
- Select from pre-configured API keys in your system.
Trigger
The Trigger section defines the conditions that initiate summarization. When any enabled condition is met, the summarization process runs. You can enable multiple triggers simultaneously—summarization activates when any condition is satisfied.
Messages- Triggers summarization when the conversation reaches a specified number of messages.
- Example: 50 — summarization runs after 50 messages in the conversation.
- Click × to clear the value.
- Triggers summarization when the conversation reaches a specified token count.
- Enter the maximum token count before summarization activates.
- Useful for staying within LLM context window limits.
- Triggers summarization when the conversation uses a specified percentage of the context window.
- Adjustable via slider (0–100%).
- Useful for dynamic context management relative to model capacity.
Keep
The Keep section determines how much conversation history is retained after summarization runs. Select one of three strategies:
Messages (Keep by message count)- Retains a fixed number of the most recent messages after summarization.
- Messages limit: The number of recent messages to preserve.
- Example: 30 — after summarization, the 30 most recent messages are kept verbatim, and older messages are replaced by the summary.
- Retains recent messages up to a specified token budget.
- Tokens limit: The maximum number of tokens to preserve from recent history.
- Useful when you need precise control over context window usage.
- Retains a percentage of the total conversation as recent messages.
- Fraction limit: Adjustable via slider (e.g., 12%).
- The remaining portion is summarized.
- Useful for proportional context management regardless of conversation length.
How Summarization Works (LangChain-based)
- The agent monitors the conversation against the configured Trigger conditions.
- When a trigger threshold is reached, the summarization LLM generates a concise summary of older messages.
- The system retains recent messages according to the Keep strategy.
- The summary replaces the older conversation history, reducing context size.
- Future interactions use the summary + recent messages as context.
| Scenario | Trigger | Keep Strategy | Recommendation |
|---|---|---|---|
| Short conversations, cost-sensitive | Messages: 30 | Messages: 10 | Simple and predictable |
| Long conversations, quality-focused | Tokens: near model limit | Fraction: 20% | Maximizes context usage |
| Variable-length conversations | Fraction: 80% | Messages: 20 | Adapts to conversation length |
| Strict token budget | Tokens: 4000 | Tokens: 1000 | Precise token control |
- Use a fast, cost-effective model (e.g., GPT 4o) for summarization since it runs frequently.
- Set Trigger thresholds below your model's actual context limit to allow headroom for the summary itself.
- Enable multiple trigger types for safety—if one condition is misconfigured, another catches it.
- Test with real conversations to verify that important context is preserved after summarization.
- For multi-turn task agents, prefer Messages keep strategy to ensure recent instructions are intact.
- For knowledge-heavy conversations, prefer Tokens or Fraction to retain more detail.