Provision MCP Profile
An MCP Profile is a blueprint/template that defines an MCP server's configuration (its backend services, tools, metadata, etc.). Provisioning MCP Profile means deploying an MCP Server instance based on a pre-configured MCP Profile definition.
On the MCP Profiles page where all MCP Profiles are managed, you can use the search bar or browse the list/grid to find the MCP Server profile you want to provision.
Locate the MCP profile card in Grid View or the profile row in List View. Click on the edit button (pencil icon) of the profile to open the profile workspace editor.
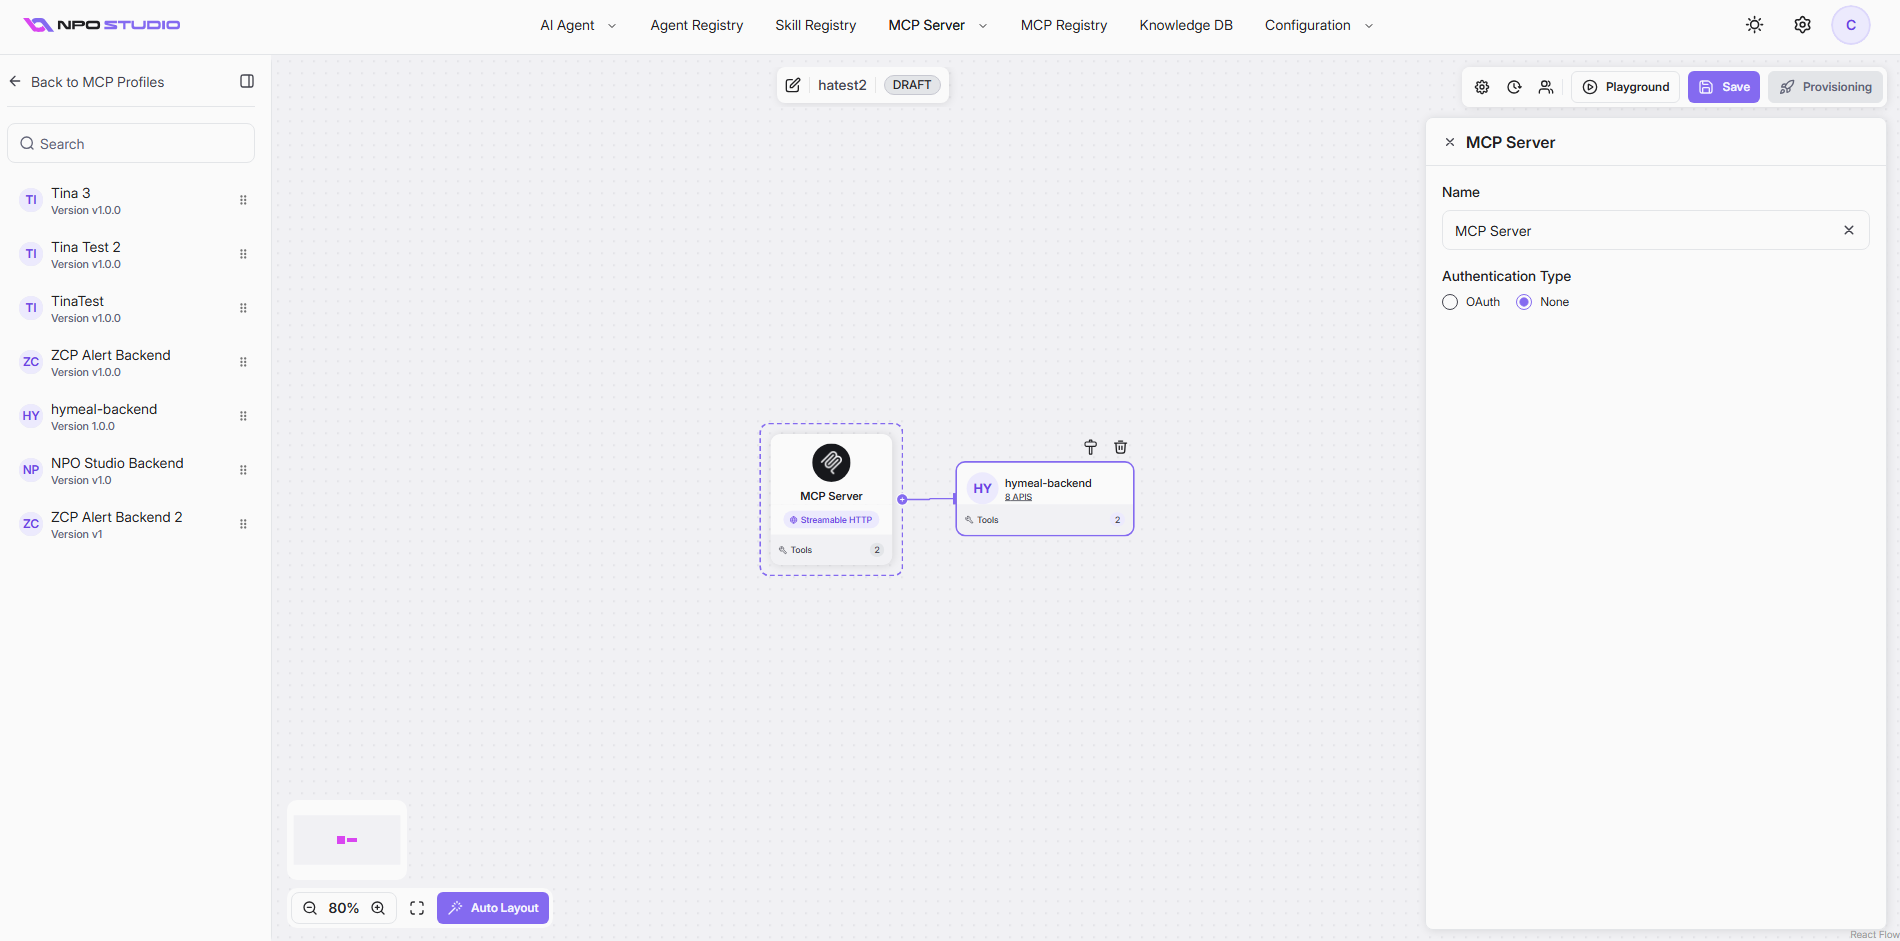
Once inside the profile workspace editor, look for the Provisioning button at the top right corner. This button allows you to create a new MCP server instance based on the current profile configuration. If the button is disabled, it means you must Save first then it can be enabled for provisioning.
When you click Provisioning, this dialog appears to guide you through the deployment options.
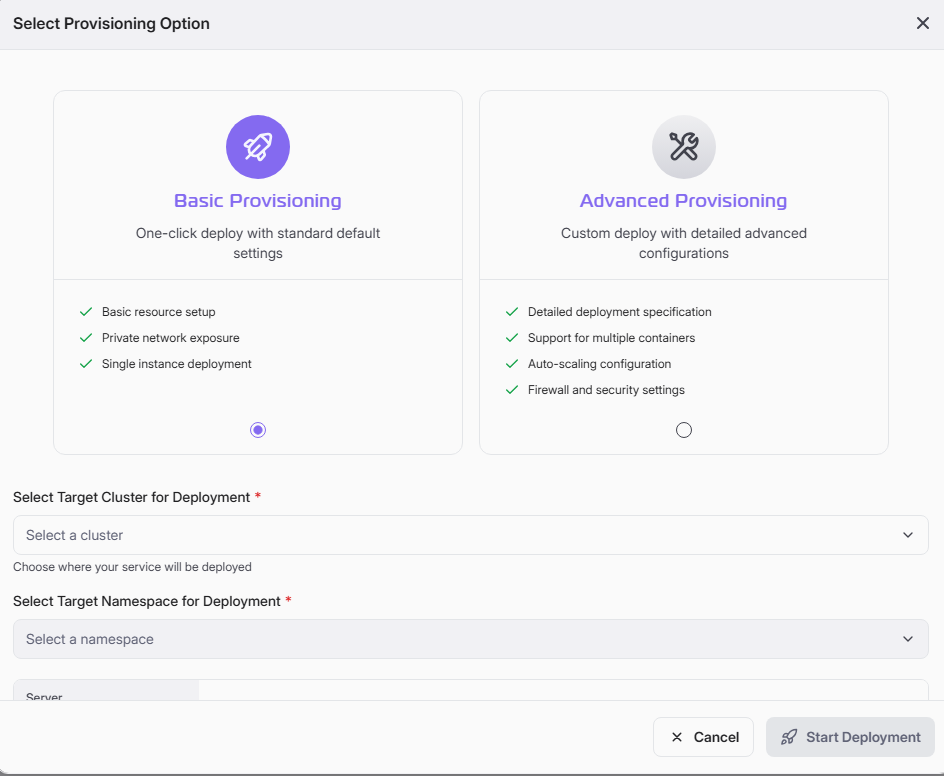
- Select a provisioning option:
- Basic Provisioning: Quick deployment with default settings. This option is ideal if you want a fast, straightforward deployment without customizing advanced settings.
- Advanced Provisioning: lets you customize deployment specs (replicas, CPU, memory) and network settings (expose type, ingress, TLS). Select this option if you require specialized configurations for performance, security, or scalability. On click Advance Provisioning, system redirect you to below settings
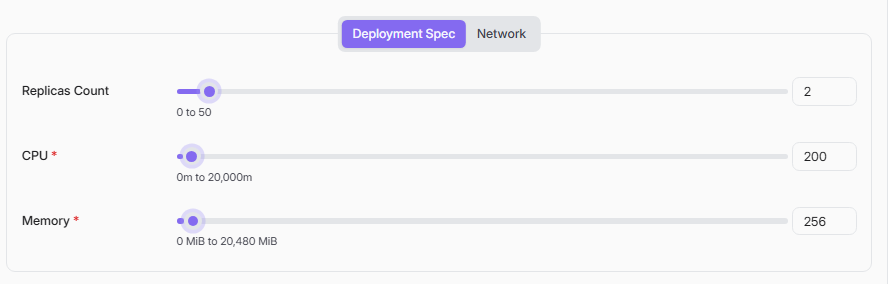
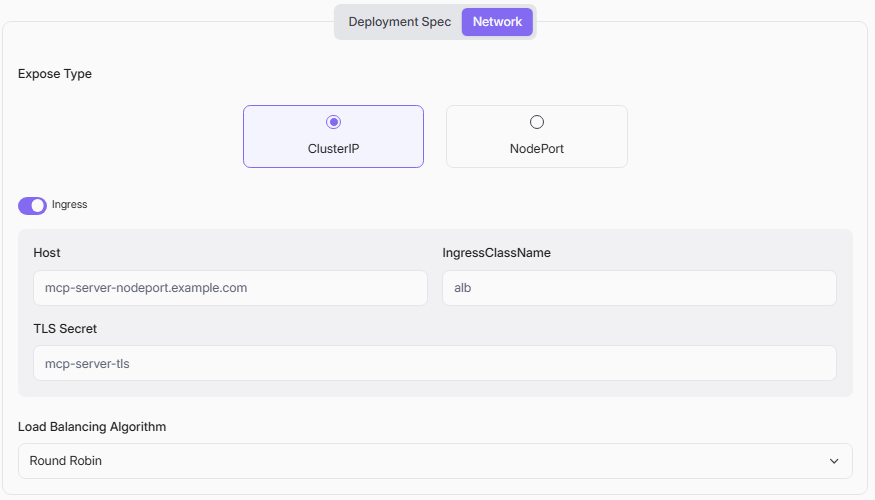
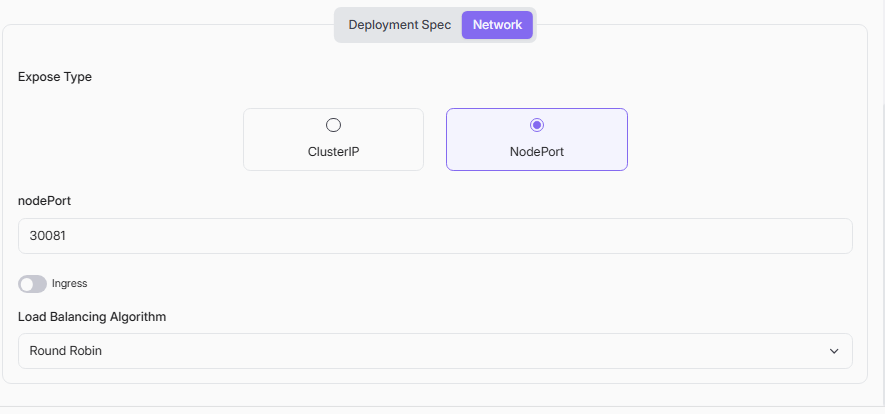
The settings are split into two tabs: Deployment Spec and Network.
Deployment Spec Tab
This tab controls compute capacity and scaling behavior.
Replicas Count- Meaning: Number of MCP Server pod instances to run.
- Range shown in UI: 0 to 50.
- Impact:
- Higher value improves availability and throughput.
- Lower value reduces infrastructure cost.
- Practical note: Use at least 2 replicas for production high availability.
CPUÂ (Required)
- Meaning: CPU request/limit for the MCP Server workload, measured in millicores (m).
- Range shown in UI: 0m to 20,000m.
- Example in screenshot: 200 (typically interpreted as 200m, or 0.2 vCPU).
- Impact:
- Too low can cause throttling and slower response times.
- Too high may waste cluster resources.
Memory (Required)
- Meaning: Memory allocation for the MCP Server workload, measured in MiB.
- Range shown in UI: 0 MiB to 20,480 MiB.
- Example in screenshot:Â 256Â (256 MiB).
- Impact:
- Too low can trigger out-of-memory restarts.
- Too high can reduce node utilization efficiency.
Network Tab
This tab defines how the MCP Server is exposed to internal or external traffic.
Expose Type- ClusterIP:
- Internal-only service exposure inside the Kubernetes cluster.
- Recommended when traffic is routed through Ingress or internal gateways.
- NodePort:
- Exposes service on a static port on each cluster node.
- Useful for direct access or environments without Ingress.
nodePort (Shown when Expose Type = NodePort)
- Meaning: Fixed external port on each node that forwards to the MCP service.
- Example in screenshot:Â 30081.
- Practical note: Ensure firewall/security group rules allow access to this port.
Ingress (Toggle)
- Meaning: Enables HTTP/HTTPS ingress routing rules for this MCP service.
- Behavior:
- ON: Requires host and ingress metadata.
- OFF: No ingress rule is created.
When Ingress is ON, these fields are used:
Host- Meaning: Public DNS hostname used to route requests to this MCP profile.
- Example in screenshot:Â mcp-server-nodeport.example.com.
- Meaning: Ingress controller class that should process this ingress rule.
- Example in screenshot:Â alb.
- Practical note: Must match an ingress controller installed in your cluster.
- Meaning: Kubernetes secret name containing TLS certificate and private key.
- Example in screenshot:Â mcp-server-tls.
- Purpose: Enables HTTPS termination at ingress.
- Meaning: Strategy used to distribute requests across replicas.
- Example shown:Â Round Robin.
- Typical usage:
- Round Robin for even traffic distribution.
- Other algorithms (if available) may optimize for sticky sessions or least connections.
- Select the target cluster for deployment:
At the top, you’ll find a drop-down menu labeled Select Target Cluster for Deployment.
- Here, you select the Kubernetes cluster or cloud environment where your MCP Server instance will be deployed.
- This ensures that your server is launched in the correct infrastructure environment.
After selecting the target cluster, the cluster information is displayed:
- Server URL: The specific address where your service will be hosted. This is the endpoint for external access to your MCP instance.
- Status: Shows whether the system is connected to the selected cluster.
- A green CONNECTED status indicates that the infrastructure is ready for deployment.
- An orange PENDING status indicates
- A red ERROR status indicates
-
Select the target namespace for deployment: select from list Namespace.
-
Once you filled in all required information, button Start Deployment is enabled. Click the Start Deployment button to proceed with provisioning. Review the target cluster and the provisioning plan before continuing.
-
Decide if toggle Affinity and Tolerance should be ON or OFF
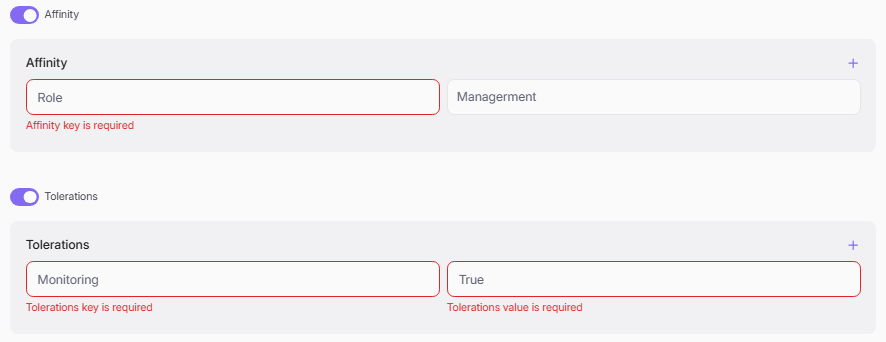
Affinity (Toggle)
- Default is OFF.
- Enable this option to control which cluster nodes the MCP Server pods are scheduled on.
- When enabled, an Affinity key-value pair section appears.
- Each entry defines a scheduling rule:
- Key (Required): The node label key to match against (e.g., Role). Validation error "Affinity key is required" appears if left blank.
- Value: The expected label value on the target node (e.g., Management).
- Click the + button to add multiple affinity rules.
- Use affinity to ensure pods run on specific node pools (e.g., dedicated GPU nodes, specific availability zones, or management nodes).
Tolerations (Toggle)
- Default is OFF.
- Enable this option to allow the MCP Server pods to be scheduled on nodes with matching taints.
- When enabled, a Tolerations key-value pair section appears.
- Each entry defines a toleration rule:
- Key (Required): The taint key to tolerate (e.g., Monitoring). Validation error "Tolerations key is required" appears if left blank.
- Value (Required): The taint value to match (e.g., True). Validation error "Tolerations value is required" appears if left blank.
- Click the + button to add multiple toleration rules.
- Use tolerations when your target nodes have taints that would otherwise prevent pod scheduling (e.g., dedicated or restricted node groups).
- When all information is ready, click Start Deployment as it is enabled to finish provisioning MCP server.
Once the instance created, a success toast message will be display.